
Owner Manual

12
TDM TO MINIMECH CONVERSION PROCEDURES
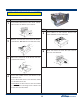
Install the MiniMech Dispenser
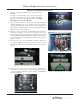
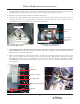
1. Place the MiniMech on the fl oor in front of the ATM,
facedown, printed circuit board up.
2.
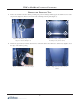
Connect the power cable and the EJ cable to the dis-
penser, secure the EJ cable. Ensure the jumper located
between the power cable and the EJ cable remains con-
nected.
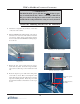
3. Place the dispenser on the mounting tray. Slide the dis-
penser back until it engages the fi nger mounts in the
rear. Minor alignment may be necessary to ensure the
front holes line up with the brackets screw holes. Se-
cure the dispenser with two (2) screws. Allow the ex-
cess cable to hang over the back of the bracket.
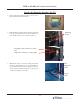
Mini-Mech
power cable
EJ cable (connector
may vary)
Jumper
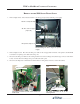
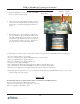
4. Review all steps of this procedure to ensure all connections have been made. At a minimum check for the following:
- AC power extension cable to power supply.
- New power cable from power supply to MiniMech. (Do not forget the fuse)
- New power cable from power supply to Printer.
- New power cable from power supply to Main board.
- Dc topper to power supply. (if installed)
- New communications cable from docking board to EJ. (RJ45 to 25 pin D) (may be tan)
- New communications cable from EJ to MiniMech. (15 pin D to 25 pin D) (may be black)
- Grounds at power supply and power supply bracket, and front left of dispenser tray bracket.
- Ensure ALL cables are secured and do not pose any hazard to the moving parts of the MiniMech dispenser, or to the open-
ing and closing of the control panel.
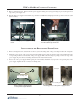
Power UP
ENSURE THE SWITCH ON THE POWER SUPPLY IS TURNED TO THE OFF POSITION.
Connect the AC cord from the ATM to the wall outlet.
Turn the power switch on the power supply to the on position.
Observe the initiation of the ATM is correct.