9100 LED Midtopper Upgrade Kit Installation Manual 07103-08213 February 27, 2014 Corporate Headquarters: 21405 B Street Long Beach, MS 39560 Phone: (800) 259-6672 Fax: (228) 868-9445 Copyright Notice © 2014 Triton. All Rights Reserved. TRITON logo is a registered trademark of Triton Systems of Delaware LLC.
DOCUMENT UPDATES February 27, 2014 Original Tools Required KIT P/N: 06200-08213 - Phillips screwdriver 11/32 nut driver 9100 LED Midtopper Upgrade Kit PARTS SUPPLIED Part Numbers Description Quantity 03011-02040, 0911000179, 03072-00015 Midtopper Assembly (Triton assembled) 1 09120-00826 Power Extension Cable 1
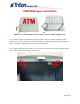
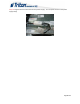
9100 Midtopper Installation Note: For installation in units with a Dual Power Supply only. Step 1: Perform a proper management function shut down of the unit. Unlock and open the ATM control panel. Turn the power switch to the OFF (0) position. Unplug the topper from the unit power supply. If possible, unplug the ATM power cord at the wall outlet. Step 2: While holding the topper in place, use a nut driver to remove the four nuts securing the topper to the cabinet. Set the nuts aside for reinstallation.
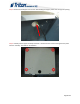
Step 3: Remove the midtopper from the unit while feeding the topper power cord through the opening. Step 4: Carefully set the topper assembly face down. Remove the four screws securing the back panel onto the assembly. Set aside for reinstallation.
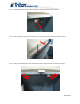
Step 5: Remove the back panel from the assembly and discard. Step 6: Obtain the new back panel. Route the cable through the channel as shown. Step 7: If applicable, remove the protective covers from the studs.
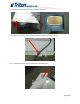
Step 8: Line up the back panel studs with the holes in the topper as shown. Rotate the back panel down into place. Ensure the cable is not pinched and properly routed through the hole in the topper. Step 9: Using the four screws removed in step #4, secure the new back panel to the assembly. Step 10: Plug the topper power cable into the power extension cable as shown.
Step 11: Route the topper power cable through the opening in the top of the cabinet. Step 12: Set the topper in place on the cabinet. Ensure the post line up with the holes as shown. Step 13: Secure the midtopper to the cabinet with the four nuts previously removed in step #2.
Step 14: Plug the extension cable into the dual power supply. Turn the power switch on the power supply ON (I).