
Owner Manual


11
BASIC OPERATION
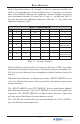
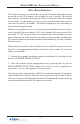
SRETCARAHCDAPYEK-1-2ELBAT
1X2X3X4X5X6X
1Q Z ecapS~! @
2A B C # $ %
3D E F ^ * _
4G H I ( ) |
5J K L \ / "
6M N O ; :
'
)nepO(etouQelgniS
7P R S ? < >
8T U V [ ] ñ
9W X Y { }
'
)esolC(etouQelgniS
0, . - & = +
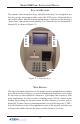
Each of the numbered keys (<0> through <9>) has six characters available. See
Table 2-1, Keypad characters. On most of these keys (<2> through <9>), the first
three of the available characters are alphabetic, and are printed on the keycap
above the number character. Two keys, the <0> and <1>, are different. The <0>
key does not show any additional characters, while the <1> key shows two
alphabetic characters (‘QZ’).
Table 2-1. Keypad characters.
When the desired character is displayed, press the <RIGHT ARROW> key to
‘lock it in’ and move the cursor to the next position. Repeat these steps to enter
the next character.
The <RIGHT ARROW> and <LEFT ARROW> keys are used in most alphanu-
meric data entry situations. The <LEFT ARROW> is used to back up and erase
a character. The <RIGHT ARROW> is used to lock in a character. These keys
will auto-repeat if held down for more than one second.
The <CLEAR> key can be used to clear an entry and start over. The <CANCEL>
key will abort the current transaction.
The first character on the first key (0-9) you press after the <CTRL> key will be
displayed at the current cursor position. Pressing the same key repeatedly (X1-
X6) will cycle the displayed letter through the available character choices for
that key.