
Installation Manual
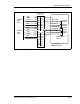
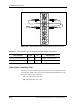
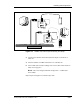
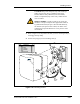
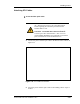

Table Of Contents
- Contents
- List of Figures
- List of Tables
- About This Book
- Warnings and Safety Guidelines
- Avertissements et consignes de sécurité
- Conventions
- Risque de lésions corporelles provoquées par la décharge électrique
- Risque de lésions corporelles provoquées par les câbles à fibres optiques
- Risque de lésions corporelles provoquées par l’exposition de l’énergie radiofréquences
- Autres risques des lésions corporelles
- Risque d’interruption de service
- Autres mises en garde
- Installation Overview
- Staging Procedure
- Installation Procedures
- Commissioning Procedures
- Removing an IFU
- IFU Test Results

Installation Procedures
3-16 © 1999 Triton Network Systems, Inc. All Rights Reserved.
1 Remove the dust cap on the connector. Using the automatic cleaner, wipe
the connector once in each direction across cleaning pad.
2 With canned air, blow a slow 3 to 4 second burst of air across fiber/ferrule
end face to dry connector then replace the dust cap.
3 Repeat Step 1 and Step 2 on the other end of fiber optic cable.
NOTE: Never leave connectors unprotected after cleaning.
4 Attach the fiber optic cable to the scope and inspect for dirt, grease,
defects, dust, oil, etc.
5 Repeat Step 1 and Step 2, if necessary.
To test the fiber optic cable:
1 Connect fiber optic test adapters to the IFU Alpha and IFU Beta fiber
cables.
2 Carefully place the laser receiver IFU Beta test adapter (see Figure 3-9
and Table 3-6).
NOTE: Never connect the transmitter first.
CAUTION: To reduce the risk of fiber optic cable
damage, use the following bend radius guidelines for
indoor/outdoor fiber optic cable:
n Long-term (installed): bend radius is equal to 10 times
the diameter of the cable.
n Short-term (during installation): bend radius is equal to
20 times the diameter of the cable.
MISE EN GARDE : Pour réduire le risque de dommage
aux câbles à fibres optiques, suivre les consignes suivantes
en matière de rayon de courbure des câbles à fibres
optiques extérieurs ou intérieurs :
n Courbure à long terme (installée). Le rayon de courbure
ne doit pas dépasser 10 fois le diamètre du câble.
n Courbure à court terme (pendant l’installation). Le
rayon de courbure ne doit pas dépasser 20 fois le
diamètre du câble.