Gelateria 230V / 150W Art.
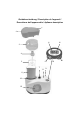
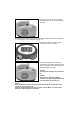
Gerätebeschreibung / Description de l’appareil / Descrizione dell’apparecchio / Apliance description 1 2 11 12 3 4 13 5 7 8 6 16 15 9 10 14
Gebrauchsanweisung Trisa Gelateria, Art. 7713 Vielen Dank, dass Sie sich für unsere “Gelateria” entschieden haben. Das Trisa Electro Team wünscht Ihnen viel Freude mit diesem Gerät und einen guten Appetit! Vor dem Benutzen Bitte lesen Sie alle in dieser Gebrauchsanweisung aufgeführten Informationen aufmerksam durch. Sie geben Ihnen wichtige Hinweise für den Gebrauch, die Sicherheit und die Wartung des Gerätes.
Vor dem Erstgebrauch Prüfen Sie bereits beim Auspacken des Gerätes ob alle Zubehörteile gemäss dieser Gebrauchsanweisung enthalten sind und das Gerät keine Schäden aufweist. Sauberkeit und Hygiene ist sehr wichtig bei der Verarbeitung von Lebensmitteln. Spülen Sie alle Teile die mit der Eiscreme in Berührung kommen (Edelstahl- Alubehälter, Quirl und Deckel) und trocknen alles sorgfältig ab. Achtung! Während des Transports ist das Gerät möglicherweise umgekippt oder auf den Kopf gestellt worden.
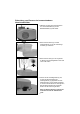
Zubereitung von Eiscreme im herausnehmbaren Aluminiumbehälter. 1. Platzieren Sie den leeren herausnehmbaren Aluminiumbehälter (6) im fixen Edelstahlbehälter (16) des Geräts. 2. Setzen Sie den Deckel (3) und das Antriebsgehäuse (2) mit der Verbindungsschraube (4) zusammen. 3. Setzen Sie den Quirl (5) in die vorgesehene Öffnung des Antriebsgehäuses. Der Quirl muss locker sitzen. 4.
5. Schalten Sie das Gerät ein, indem Sie den Ein / Aus Schalter für Kühlung (9) nach unten drücken. Tipp: Gerät einschalten und dann mit der Zubereitung des Eises beginnen. Somit hat die Kühlung beim einfüllen bereits die volle Leistung. Nach dem Einschalten des Rührmotors darf das Kühlagregat erst wieder ausgeschaltet werden, wenn das Eis fertig ist.
8. Drücken Sie nun den EIN / AUS Schalter für das Rührgerät (1) um den Rührvorgang zu starten. Die linke Angabe auf dem Display ist die momentane Temperatur der Kühlung. (startet bei ca. -18°C bis max. -22°C) Anzeige auf Display “18” . 9. Aktivieren Sie den Rührvorgang, indem Sie die Start Taste (13) drücken. 10. Wenn die Zeit abgelaufen ist, ertönt ein Signalton für 30 sekunden. Drücken Sie den EIN / AUS Schalter für das Rührgerät(1) um den Rührvorgang zu stoppen.
11 .Zur Eisentnahme, entfernen Sie das Antriebsgehäuse (2), indem Sie den Deckelöffnungsknopf (8) drücken und gleichzeitig das Antriebsgehäuse (2) gegen Uhrzeigersinn drehen. Heben Sie das Antriebsgehäuse. Der Quirl (5) bleibt im Behälter. 12. Ziehen Sie den Behälter (6) heraus. 13. Entfernen Sie den Quirl (5) gleich nach Beendung des Rührvorgangs. Servieren Sie das Eis unmittelbar nach der Zubereitung oder füllen Sie das Eis in ein geeignetes Gefäss zum Tieffrieren.
Es kann gleich wieder neue Eiscreme hergestellt werden. Lassen Sie die Kühlung laufen und füllen Sie die neue Masse in den leeren herausnehmbaren Behälter oder in den fixen Behälter und setzen Sie den Vorgang fort. Wenn Sie fertig sind mit der Eiszubereitung, schalten Sie den Ein / Aus Schalter für Kühlung aus, ziehen den Netzstecker und reinigen das Gerät sorgfältig. Hinweis Fertiges Eis niemals bei eingeschaltetem Kühlkompressor im Gerät lassen, da es sich sonst festfriert.
Reinigung und Pflege - Den Netzstecker vor jeder Reinigung ziehen. - Entfernen Sie den Deckel, indem Sie den Öffnungsknopf des Deckels drücken und gleichzeitig den Deckel im Gegenuhrzeigersinn drehen. Lösen Sie den Quirl vom Deckel, indem Sie diese einfach herausziehen. Entfernen Sie den transparenten Teil des Deckels durch lösen der Verbindungsschraube. Spülen Sie alle Teile gründlich und trocknen diese sorgfältig ab. - Das Gehäuse bei Bedarf mit einem feuchten Tuch abwischen und nachtrocknen.
Das Gerät darf nicht in Betrieb genommen werden (Netzstecker sofort ziehen), wenn: * das Gerät, das Gehäuse oder Kabel beschädigt ist. * das Gerät sichtbare Schäden aufweist. * der Verdacht auf einen Defekt nach einem Sturz oder ähnlichem besteht. * bei Störungen während des Gebrauchs. * vor der Reinigung, Umplazierung. * nach dem Gebrauch. Den Stecker niemals am Netzkabel oder mit nassen Händen aus der Steckdose ziehen. Das Gerät nie am Netzkabel tragen oder ziehen.
Mode d'emploi Trisa Gelateria, Art. 7713 Nous vous remercions d'avoir choisi notre "Gelateria". L'équipe de Trisa Electro vous souhaite beaucoup de plaisir avec cet appareil et un bon appétit ! Avant l'utilisation Veuillez lire attentivement ce mode d'emploi dans son intégralité. Il contient des consignes importantes pour l'utilisation, la sécurité et l'entretien de l'appareil. Veuillez conserver précieusement ce mode d'emploi et, le cas échéant, le remettre à l'utilisateur ultérieur.
Avant la première utilisation Lors du déballage, vérifiez que l'appareil compte bien tous les accessoires en vous référant au mode d'emploi, et qu'il n'est pas endommagé. La propreté et l'hygiène sont des caractéristiques très importantes pour la préparation de produits alimentaires. Rincez toutes les pièces qui entrent en contact avec la crème glacée (récipients en inox et en aluminium, batteur et couvercle) et essuyez-les minutieusement.
Préparation de crème glacée dans le récipient en aluminium amovible. 1. Placez le récipient vide en aluminium (6) dans le récipient en inox (16) de l'appareil. 2. Assemblez le couvercle (3) et le boîtier (2) à l'aide de la vis de jonction (4). 3. Placez le batteur (5) dans l'ouverture du boîtier prévue à cet effet . Le batteur doit être un peu lâche. 4. Posez le boîtier de l'entraînement (2) de manière que la fiche du boîtier (2) soit positionnée en face de la fiche fixe (7) de l'appareil.
5. Allumez l'appareil en pressant le bouton marche / arrêt pour le refroidissement (9) vers le bas. Conseil : Allumez l'appareil et ensuite commencez à préparer la crème glacée. De cette manière, le refroidissement est entièrement prêt lorsque vous versez la préparation. Une fois le moteur de l'agitateur allumé, il ne faut pas éteindre le groupe de refroidissement avant que la glace ne soit terminée.
8. Maintenant, appuyez sur l'interrupteur marche / arrêt de l'agitateur (1) pour commencer le mélange Le chiffre de gauche sur l'écran indique la température momentanée de refroidissement. (d'env. -18°C à max. -22°C) Affichage sur l'écran "18". 9. Activez le processus de mélange en appuyant sur la touche Start (13). 10. Lorsque le temps est écoulé, un signal sonore retentit pendant 30 secondes. Appuyez sur l'interrupteur marche / arrêt de l'agitateur (1) pour arrêter le processus.
11. Afin de sortir la crème glacée, retirez le boîtier (2). Pour cela appuyez sur le bou ton d'ouverture du couvercle (8) et simul tanément tournez le boîtier (2) dans le sens inverse des aiguilles d'une montre. Soulevez le boîtier. Le batteur (5) reste dans le récipient. 12. Sortez le récipient (6) en tirant. 13. Retirez le batteur (5) immédiatement après la fin du mélange. Servez la crème glacée juste après l'avoir préparée ou versez-la dans un réci pient approprié afin de la congeler.
Vous pouvez à nouveau préparer de la crème glacée sans attendre. Laissez tourner le dispositif de refroidissement et versez une nouvelle mixture dans le récipient vide amovible ou dans le récipient fixe et continuez comme indiqué précédemment. Une fois que vous avez terminé, éteignez l'appareil à l'aide de l'interrupteur marche / arrêt pour le refroidissement, débranchez la fiche de la prise et nettoyez l'appareil minutieusement.
Nettoyage et entretien - Avant le nettoyage, débranchez toujours la fiche de la prise. - Retirez le couvercle en appuyant sur le bouton d'ouverture du couvercle et simultanément tournez le couvercle dans le sens inverse des aiguilles d'une montre. Détachez le batteur du couvercle en le tirant tout simplement. Retirez la partie transpa rente du couvercle en desserrant la vis de jonction. Rincez tous les éléments à grande eau et essuyez-les avec soin.
N'utilisez pas l'appareil (débranchez-le aussitôt): * si l'appareil, le boîtier ou le cordon secteur sont endommagés. * si l'appareil présente une défectuosité apparente. * si vous pensez que l'appareil a été endommagé en chutant. * en cas de mauvais fonctionnement. * avant chaque nettoyage ou entretien. * en cas d'interruption ou après utilisation. Ne débranchez jamais la fiche en tirant sur le cordon ni avec les mains mouillées. Ne portez ni ne retirez jamais l'appareil par le cordon.
Istruzioni per l'uso Trisa, Art. 7713 Gentile cliente, La ringraziamo di aver scelto la nostra "Gelateria". Il Team di Trisa Electro Le augura buon divertimento con questa macchina e buon appetito! Prima dell'utilizzo Leggere attentamente tutte le informazioni qui riportate. Esse offrono indicazioni importanti per l'utilizzo, la sicurezza e la manutenzione della macchina. Conservare le istruzioni per l'uso accuratamente, e darle eventualmente all'utente della macchina successivo.
Prima del primo utilizzo Controllare che tutti gli accessori, conformi a queste istruzioni per l'uso, siano contenuti nella scatola, e che l'apparecchio non sia danneggiato. Pulizia ed igiene sono molto importanti durante la lavorazione di generi alimentari. Lavare a fondo tutti i componenti che vengono a contatto con il gelato (recipiente d'acciaio e d'alluminio, miscelatore e coperchio) ed asciugare il tutto accuratamente.
Preparazione del gelato nel recipiente d'alluminio rimovibile 1. Posizionate il recipiente d'alluminio rimovibile (6) vuoto nel recipiente d'acciaio (16) fisso della macchina. 2. Avvitate con la vite per fissaggio (4) il coperchio (3) al contenitore del motore (2). 3. Posizionate il miscelatore (5) nelle apposite aperture del contenitore del motore. Il miscelatore deve essere facilmente rimovibile. 4.
5. Accendete la macchina premendo verso il basso l'interruttore ON/OFF per il raffreddamento (9). Consiglio: Prima accendere la macchina e poi cominciare con la preparazione del gelato. In questo modo il motore di raffreddamento ha raggiunto la massima potenza. Una volta acceso il motore miscelatore non spegnere il motore di raffreddamento, prima che il gelato sia finito.
8. Premete ora l'interruttore ON / OFF del miscelatore (1), per metterlo in movimento. L'indicazione a sinistra sul display è la temperatura di raffreddamento momentanea. (comincia da circa -18°C fino a massimo -22°C) Indicazione sul display "18". 9. Attivate il processo di miscelazione pre mendo il tasto START (13) 10. A tempo scaduto sentirete un segnale acustico per 30 secondi. Premete l'interruttore ON / OFF del miscelatore (1) per bloccare il processo.
11.Per estrarre il gelato, aprite il coperchio (3) premendo il tasto per l'apertura del coperchio (8) e girando contemporaneamente in senso antiorario il contenitore del motore (2). Sollevate il coperchio. Il miscelatore (5) rimane nel recipiente. 12.Togliete il recipiente(6). 13.Togliete il miscelatore (5) subito dopo la fine del processo di miscelazione. Servite il gelato subito dopo la preparazione o mettetelo in un contenitore adatto per il congelamento.
Si può produrre subito un nuovo gelato. Lasciate acceso il motore di raffreddamento, riempite il recipiente rimovibile vuoto o il recipiente fisso con una nuova massa, e ricominciate il processo. Quando avete finito la preparazione del gelato, spegnete l'interruttore ON / OFF del motore di raffreddamento, togliete la spina e pulite accuratamente l'apparecchio. Avvertenza: Non lasciare mai il gelato finito nell'apparecchio con il compressore di raffreddamento acceso, altrimenti il gelato si congela.
Pulizia e cura - Tirare la spina prima di ogni pulizia. - Togliete il coperchio premendo il tasto per l'apertura del coperchio e girando contempor aneamente il coperchio in senso antiorario. Staccate il miscelatore dal coperchio semplicemente tirando. Togliete la parte trasparente del coperchio svitando la vite. Lavate tutti gli accessori a fondo e asciugateli accurata mente. - In caso di necessità pulire la macchina con panno umido e asciugare.
Non mettere l'apparecchio in funzione (oppure tirare subito la spina) se: * l'apparecchio, il mobile o il cavo di rete è danneggiato. * l'apparecchio mostra dei danni. * sospettate che ci sia un difetto dopo una caduta o qualche cosa di simile. * in caso di disturbi durante l'uso. * prima di pulire l'apparecchio oppure quando lo si deve spostare in un altro luogo. * dopo l'uso. Non estraete mai la spina fuori della presa al cavo ne con mani bagnate. Non trasportate ne tirate mai l'apparecchio al cavo.
Instructions for use Trisa Gelateria, Art. 7713 Thank you for buying our product "Gelateria". The Trisa Electro crew hopes that you will enjoy working with our device. Bon appetit! Before use Please read carefully all information given in this instruction manual. It provides you with important instructions concerning use, safety and maintenance of the device. Please keep the instruction manual in a safe place and pass it on to the next user, if the occasion should arise.
Before initial use Please check already when unpacking the device if all accessory parts, as stated in the instruction manual, are included and if the device is not damaged. Cleanness and hygiene are very important when processing food. Wash up all parts that come into contact with ice cream (stainless steel and aluminium tank, beater and lid) and dry them carefully.
Preparation of ice cream in the removable aluminium tank 1. Place the empty removable aluminium tank (6) in the fixed stainless steel tank (16) of the device. 2. Connect the lid (3) and the drive housing (2) with the connection bolt (4). 3. Place the beater (5) in the intended opening of the drive housing. The beater must be in a loose position. 4. Put on the drive housing (2) in a way so that the plug connection on the drive housing (2) is placed opposite the fixed plug connection (7) of the device.
5. Switch on the device by pressing down the cooling ON / OFF switch (9). Tip: At first, switch on device and then start preparing ice cream. So cooling is already at full power when filling in. After switching on the mixer motor the cooling aggregate may only be switched off when the preparation of the ice cream has been finished. In case of switching-off or power failure during ice-cream preparation, the compressor will start cooling after rerunning only with a waiting period of 5 minutes.
8. Now press the mixer ON / OFF button (1) to start the mixing procedure The statement on the left side of the display shows current cooling temperature (starts at approx. -18 °C up to a maximum of approx. -22 °C). Indication on display "18". 9. Start the mixing procedure by pressing the Start button (13). 10.If the period of time has been expired, a signal tone will sound for 30 seconds. Press the mixer ON / OFF switch (1) to stop the mixing procedure. Remark The mixer will turn off automatically.
11. In order to take ice-cream from the device, remove the drive housing (2) by pressing the lid opening button (8) und simultaneously turning the drive housing (2) counter-clockwise. Lift the drive housing. The beater (5) remains in with tank. 12. Pull out the tank (6). 13. Remove the beater (5) right after termination of the mixing procedure. Serve the ice cream immediately after preparation or fill the ice cream into a suitable container for deep-freezing.
Right after, new ice cream can be made again. Keep the cooling working and fill in the new mixture into the empty removable tank or into the fixed tank and continue the procedure. When the preparation of the ice cream is finished, switch off the cooling ON / OFF switch, disconnect the mains plug and carefully clean the device. Remark Never leave ice cream with the device with running cooling compressor, because the ice cream will freeze to the device. Preparation of ice cream in the fixed tank 1.
Cleaning and care - Always disconnect mains plug before cleaning. - Remove lid by pressing the lid opening button and simultaneously turning the lid counter-clockwise. Remove beater from lid by just pulling it out. Remove the transparent part of the lid by loosening the connection bolt. Wash up all parts carefully and dry them thoroughly. - Wipe the housing, if necessary, with a damp cloth and dry it. Do not use scouring agents or solvents like benzine, petroleum, furniture cleaner or thinner.
Never pull the plug out of the socket with wet hands. Never carry nor pull the appliance by the flex. Don't pull the flex over sharp edges. Don't wedge it. Do not bend the flex nor wind it around the appliance. Never put the appliance on hot surfaces nor near open flames. Lay the cord so that it does not touch hot or sharp-edged objects. Do not use the appliance while standing on a humid floor or when your hands or the appliance are wet.
Switzerland Trisa Electro AG Kantonsstrasse 121 CH-6234 Triengen info@trisaelectro.ch ++ 41 41 933 00 30 Austria Franz Holzbauer Service GmbH Unterhaus 33 A-2851 Krumbach service@trisaelectro.at ++ 43 (2647)4304070 Germany HKS Satellitentechnik Vertriebs GmbH Graf von Stauffenbergstrasse 8 D-63150 Heusenstamm HKS-GmbH@T-online.