Tripp Lite World Headquarters 1111 W. 35th Street Chicago, IL 60609 USA (773) 869-1234 www.tripplite.com User’s Manual USB 2.0 PCI Card - 5 Port Model #: U234-005-R NOTE: Follow these installation and operating procedures to ensure correct performance and to prevent damage to this unit or to its connected devices. Copyright © 2002 Tripp Lite. All rights reserved. All trademarks are the property of their respective owners. Technical specifications are subject to change without notice.
Overview This fully functional USB 2.0 Host PCI Card supports HighSpeed, Full-Speed, & Low-Speed operation and follows the Enhanced Host Controller Interface (EHCI) specification. Package Content • Hardware: USB 2.
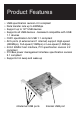
Product Features • • • • • • • • • USB specification revision 2.0 compliant Data transfer rate up to 480Mbps Support up to 127 USB devices Supports all USB devices - backward compatible with USB 1.1 devices OHCI specification for USB 1.1 compliant All 5 ports (4 external and 1 internal) support High-speed (480Mbps), Full-speed (12Mbps) or Low-speed (1.5Mbps) 32-bit 33MHz host interface, PCI specification revision 2.2 compliant PCI-Bus power management interface specification revision 2.
System Requirements PCI Card Requirements: • IBM® PC Pentium II 266MHz CPU or higher or compatible system • Available PCI slot • CD ROM drive for software • Windows® 98/98SE or higher Hardware Installation 1) Turn off PC, unplug power cord, disconnect all peripherals and open the PC case. 2) Find the PCI slot on the motherboard, remove any add-on card blocking easy access to the PCI slot. 3) Remove the USB 2.0 PCI card from the anti-static bag and push it into the first empty PCI slot.
Driver Installation Windows 98/ME shown as an example, Windows 2000 similar. Driver installation for Windows systems only. MAKE SURE YOUR USB PERIPHERALS ARE NOT CONNECTED TO THE NEW CARD. 1) Turn your system on. When Windows boots up, it will automatically detect the presence of the new PCI card. The New Hardware Wizard will appear. Click "Next" to continue.
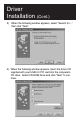
Driver Installation (Cont.) 2) When the following window appears, select "Search for…" then click "Next". 3) When the following window appears, insert the driver CD supplied with your USB 2.0 PCI card into the computer's CD drive. Select CD-ROM Drive and click "Next" to continue.
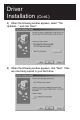
Driver Installation (Cont.) 4) When the following window appears, select "The Updated…" and click "Next". 5) When the following window appears, click "Next". Files are now being copied to your hard drive.
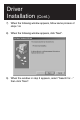
Driver Installation (Cont.) 6) The following window will appear.
Driver Installation (Cont.) 7) When the following window appears, follow same process of steps 1-6. 8) When the following window appears, click "Next". 9) When the window in step 2 appears, select "Search for…" then click "Next".
Driver Installation (Cont.) 10) When the following window appears, Select CD-ROM Drive and click "Next". 11) When the following window appears, click "Next".
Driver Installation (Cont.) 12) When the following window appears, click "Next". 13) Follow the same procedure as in Step 6 (above). 14) The setup for your USB 2.0 PCI card is now completed. To confirm that the installation was a success, click on the "Start" Button on the bottom left corner of the screen. Select "Settings" -"Control Panel""System"-"Device Manager" and you can see a "NEC PCI to USB Enhanced Controller", "NEC USB Open Host Controller" under the Universal Serial Bus Controller.
FCC Radio / TV Interference Notice This device generates and uses radio frequency and may cause interference to radio and television reception if not installed and used properly. This has been tested and found to comply with the limits of a Class B computing device in accordance with the specifications in Part 15 of FCC Rules. These specifications are designed to provide reasonable protection against such interference in a residential installation.
Oficinas internacionales de Tripp Lite 1111 W. 35th Street Chicago, IL 60609 EE.UU. (773) 869-1234 www.tripplite.com Manual del Usuario Tarjeta PCI USB 2.0 de 5 puertos Modelo N.º U234-005-R NOTA: Siga estos procedimientos de instalación y operación para asegurar un rendimiento correcto y para prevenir el daño a esta unidad o a los dispositivos a ella conectados. Derechos de autor © 2000 Tripp Lite. Se reservan todos los derechos. Todas las marcas comerciales son propiedad de sus respectivos dueños.
Descripción general Esta tarjeta PCI USB 2.0 Host admite operaciones de velocidad alta, normal y baja y cumple la especificación EHCI (Enhanced Host Controller Interface, interfaz mejorada de controlador host). Contenido del paquete • Hardware: Tarjeta PCI USB 2.
Características del producto • • • • • • • • • Cumple la revisión 2.0 de la especificación USB Velocidad de transferencia de datos de hasta 480 Mbps Acepta hasta 127 dispositivos USB Es compatible con todos los dispositivos USB, incluso los dispositivos USB 1.1 Cumple la especificación OHCI para USB 1.1 Los 5 puertos (4 externos y 1 interno) admiten velocidades alta (480 Mbps), normal (12 Mbps) o baja (1.5 Mbps) Interfaz host de 33 MHz de 32 bits, cumple la revisión 2.
Requisitos del Sistema • PC IBM®, CPU Pentium II, 266 MHz, o sistema superior o compatible • Ranura PCI disponible • Unidad de CD para el software • Windows® 98/98SE, o superior Instalación del controlador 1) Apague el PC, desconecte el cable de alimentación y todos los periféricos, y abra la caja del PC. 2) Localice la ranura PCI en la placa principal y retire cualquier tarjeta que bloquee el acceso a la ranura PCI. 3) Retire la tarjeta PCI USB 2.
Instalación del Controlador Windows 98/ME como ejemplo, similar a Windows 2000 Instalación del controlador; sólo para sistemas Windows. ASEGÚRESE QUE LOS PERIFÉRICOS USB NO ESTÁN CONECTADOS A LA NUEVA TARJETA 1) Encienda el sistema. Cuando Windows se inicie, detectará automáticamente la presencia de la nueva tarjeta PCI y aparecerá el Asistente para instalar nuevo hardware. Haga clic en "Next" (Siguiente) para continuar.
Instalación del Controlador 2) Cuando aparezca la pantalla siguiente, seleccione "Search for…" (Buscar…) y haga clic en "Next" (Siguiente). 3) Cuando aparezca la pantalla siguiente, inserte en la unidad de CD de la computadora el CD del controlador suministrado con la tarjeta PCI USB 2.0. Seleccione "CDROM Drive" (Unidad de CD) y haga clic en "Next" (Siguiente) para continuar.
Instalación del Controlador 4) Cuando aparezca la pantalla siguiente, seleccione "The updated driver" (El controlador actualizado) y haga clic en "Next" (Siguiente). 5) 19. Cuando aparezca la ventana siguiente, haga clic en "Next" (Siguiente). Los archivos se copiarán a su disco duro.
Instalación del Controlador 6) Aparecerá la ventana siguiente. Cuando aparezca la ventana siguiente, haga clic en "Finish" (Terminar).
Instalación del Controlador 7) Cuando aparezca la pantalla siguiente, repita los pasos 1~6. 8) Cuando aparezca la ventana siguiente, haga clic en "Next" (Siguiente). 9) Cuando aparezca la pantalla del paso 2, seleccione "Search for…" (Buscar…) y haga clic en "Next" (Siguiente).
Instalación del Controlador 10) Cuando aparezca la ventana siguiente, seleccione "CDROM drive" ( Unidad de CD) y haga clic en "Next" (Siguiente). 11) Cuando aparezca la ventana siguiente, haga clic en "Next" (Siguiente).
Instalación del Controlador 12) Cuando aparezca la ventana siguiente, haga clic en "Next" (Siguiente). 13) Repita el Paso 6 (arriba). 14) Se ha completado la instalación de la tarjeta PCI USB 2.0. Para confirmar que la instalación fue satisfactoria, haga clic en el botón "Start" (Inicio) en la esquina inferior izquierda de la pantalla.
Declaración FCC Este dispositivo genera y utiliza señales de radiofrecuencia y puede causar interferencias perjudiciales en la recepción de señales de radio y televisión si no se instala y se utiliza correctamente. Ha sido probado y se ha determinado que cumple los límites de un dispositivo informático de Clase B en conformidad con las especificaciones señaladas en la Parte 15 de las Reglas de la FCC.
Siège mondial de Tripp Lite 1111 W. 35th Street Chicago, IL 60609 États-Unis (773) 869-1234 www.tripplite.com Manuel d’Utilisation Carte PCI USB 2.0 à 5 ports Modèle : F234-005-R REMARQUE : Suivez ces procédures d'installation et d'utilisation pour garantir le fonctionnement correct de l'UPS et des périphériques connectés et écarter tout risque de dommage. Copyright © 2000 Tripp Lite. Tous droits réservés. Toutes les marques de commerce sont la propriété de leur détenteur respectif.
Aperçu général Cette carte PCI hôte USB 2.0 à pleine capacité accepte les débits à haute vitesse, à vitesse normale et à vitesse réduite tout en respectant la norme Enhanced Host Controller Interface (EHCI). Contenu de l'emballage • Matériel : Carte PCI USB 2.
Caractéristiques du produit • Conforme aux spécifications de la révision 2.0 de la norme USB • Débit de transfert des données allant jusqu'à 480 Mbps • Accepte jusqu'à 127 dispositifs USB • S'intègre à tous les dispositifs USB - rétrocompatible avec les dispositifs USB 1.1 • Conforme à la norme OHCI pour USB 1.
Configuration de système • Ordinateur IBM® avec unité centrale Pentium II à 266 MHz ou plus ou tout autre système compatible • Fente PCI disponible • Lecteur de CD pour le logiciel • Windows® 98/98SE ou une version supérieure Installation du pilote 1) Éteignez l'ordinateur, débranchez son cordon d'alimentation, déconnectez tous ses périphériques et ouvrez son boîtier. 2) Repérez la fente PCI sur la carte mère, enlevez toute carte additionnelle pouvant bloquer l'accès à la fente.
Configuration L'exemple illustre la configuration avec Windows 98/ME qui est semblable à celle de Windows 2000 Installation du pilote pour systèmes Windows seulement. VÉRIFIER QUE LES PÉRIPHÉRIQUES USB NE SONT PAS RACCORDÉS À LA NOUVELLE CARTE. 1) Allumez votre ordinateur. Au démarrage, Windows détectera automatiquement la présence de la nouvelle carte PCI. L'assistant Ajout de nouveau matériel apparaît. Cliquez sur « Next (Suivant) » pour continuer.
Configuration 2) À cette nouvelle fenêtre, choisissez « Search for… (Rechercher un…) », puis cliquez sur « Next (Suivant) ». 3) À cette nouvelle fenêtre, insérez la CD de pilote fournie avec votre carte PCI USB 2.0 dans le lecteur de CD de votre ordinateur. Sélectionnez CD Drive (Lecteur de CD) et cliquez sur « Next (Suivant) » pour continuer.
Configuration 4) À cette nouvelle fenêtre, choisissez « The Updated… (Le pilote mis à jour…) » et cliquez sur « Next (Suivant) ». 5) À cette nouvelle fenêtre, cliquez sur « Next (Suivant) ». Les fichiers sont copiés sur votre disque dur.
Configuration 6) La fenêtre ci-dessous apparaît.
Configuration 7) À cette nouvelle fenêtre, suivez le même processus que celui illustré aux étapes 1 à 6. 8) À cette nouvelle fenêtre, cliquez sur « Next (Suivant) ». 9) Quand la fenêtre de l'étape 2 apparaît, choisissez « Search for…(Rechercher un…) », puis cliquez sur « Next (Suivant) ».
Configuration 10) À cette nouvelle fenêtre, choisissez « CD-ROM (Lecteur de CD) » et cliquez sur « Next (Suivant) ». 11) À cette nouvelle fenêtre, cliquez sur « Next (Suivant) ».
Configuration 12) À cette nouvelle fenêtre, cliquez sur « Next (Suivant) ». 13) Suivez la même procédure que celle décrite à l'étape 6 (ci-dessus). 14) L'installation de votre carte PCI USB 2.0 est maintenant terminée. Pour confirmer que l'installation s'est effectuée avec succès, cliquez sur le bouton « Start (Démarrer) » au coin inférieur gauche de l'écran.
Spécifications de la FCC Ce périphérique produit et utilise de l'énergie de fréquence radio et peut causer de l'interférence pouvant nuire à la réception des communications radio et télévision s'il n'est pas installé et utilisé correctement. Ce matériel a été testé et s'est avéré être conforme aux limites des dispositifs numériques de Classe B, conformément à la Partie 15 du règlement de la FCC.
Tripp Lite, weltweite Hauptniederlassung 1111 W. 35th Street Chicago, IL 60609 USA (001) 773 869-1234 www.tripplite.com Benutzerhandbuch 5-Port-USB 2.0 PCI-Karte Modellnr.: F234-005-R HINWEIS: Beachten Sie die folgenden Installations und Betriebsanleitungen, um eine ordnungsgemäße Funktionsweise zu gewährleisten und um Schäden an diesem Gerät bzw. an den angeschlossenen Geräten zu verhindern. Copyright © 2000 Tripp Lite. Alle Rechte vorbehalten. Alle Warenzeichen sind Eigentum ihrer jeweiligen Besitzer.
Überblick Diese voll funktionsfähige USB 2.0 Host-PCI-Karte unterstützt hohe, reguläre und verringerte Übertragungsgeschwindigkeiten und entspricht der Enhanced Host Controller Interface-Spezifikation (EHCI). Lieferumfang • Hardware: USB 2.
Produktmerkmale • • • • • • • • • Entspricht Version 2.0 der USB-Spezifikation Datentransfer bis zu 480 MBit/s Unterstützt bis zu 127 USB-Geräte Unterstützt alle USB-Geräte - rückwärtskompatibel mit USB 1.1-Geräten Entspricht der OHCI-Spezifikation für USB 1.1 Alle 5 Anschlüsse (4 externe und 1 interner) unterstützen die Übertragungsgeschwindigkeiten Highspeed (480 MBit/s), Fullspeed (12 MBit/s) und Lowspeed (1,5 MBit/s). 32-Bit 33-MHz-Hostschnittstelle, entspricht PCI-Spezifikation 2.
Systemvoraussetzungen • IBM® PC Pentium II 266 MHz oder höher bzw. entsprechendes System • Freier PCI-Steckplatz • CD für die Software • Windows® 98/98SE oder höher Treiberinstallation 1) Schalten Sie den Computer aus und ziehen Sie den Netzstecker. Trennen Sie alle Peripheriegeräte vom Computer und nehmen Sie das Gehäuse ab. 2) Machen Sie den PCI-Steckplatz auf der Systemplatine ausfindig und entfernen Sie alle Steckkarten, die den Zugriff auf den betreffenden PCI-Steckplatz behindern.
Konfiguration Windows 98/ME hier angegeben, Windows 2000 ähnlich Treiberinstallation nur für Windows-Systeme. ÜBERPRÜFEN SIE, OB IHRE USB-PERIPHERIEGERÄTE NICHT SCHON AN DER NEUEN KARTE ANGESCHLOSSEN SIND. 1) Schalten Sie den Computer ein. Wenn Windows startet, wird die neue PCI-Karte automatisch erkannt. Der Hardware-Assistent wird angezeigt. Klicken Sie auf „Next" (Weiter), um fortzufahren.
Konfiguration 2) Wenn der folgende Bildschirm erscheint, klicken Sie auf „Search for..." (Nach dem besten Treiber...) und klicken Sie dann auf „Next" (Weiter). 3) Wenn der folgende Bildschirm erscheint, legen Sie die zur USB 2.0 PCI-Karte gelieferte CD ins CD des Computers. Wählen Sie das CD und klicken Sie auf „Next" (Weiter), um fortzufahren.
Konfiguration 4) Wenn der folgende Bildschirm erscheint, klicken Sie auf „The Updated..." (Aktualisierten Treiber...) und klicken Sie dann auf „Next" (Weiter). 5) Wenn der folgende Bildschirm erscheint, klicken Sie auf „Next" (Weiter). Die Dateien werden nun auf die Festplatte kopiert.
Konfiguration 6) Darauf erscheint der folgende Bildschirm. Klicken Sie bei dieser Anzeige auf „Finish" (Fertig stellen).
Konfiguration 7) Wenn der folgende Bildschirm erscheint, wiederholen Sie Schritte 1-6. 8) Wenn der folgende Bildschirm erscheint, klicken Sie auf „Next" (Weiter). 9) Wenn der in Schritt 2 gezeigte Bildschirm erscheint, klicken Sie auf „Search for..." (Nach dem besten Treiber...) und klicken Sie dann auf „Next" (Weiter).
Konfiguration 10) Wenn der folgende Bildschirm erscheint, wählen Sie dann „CD-ROM" und klicken Sie auf „Next" (Weiter). 11) Wenn die folgende Anzeige erscheint, klicken Sie auf „Next" (Weiter).
Konfiguration 12) Wenn die folgende Anzeige erscheint, klicken Sie auf „Next" (Weiter). 13) Befolgen Sie dasselbe Verfahren wie in Schritt 6 (oben). 14) Die Installation der USB 2.0 PCI-Karte ist nun abgeschlossen. Um die erfolgreiche Installation der Karte zu prüfen, klicken Sie auf „Start" unten links auf dem Bildschirm. Wählen Sie „Settings" (Einstellungen) „Control Panel" (Systemsteuerung) „System"- „Device Manager" (Geräte-Manager).
FCC-Erklärung Dieses Gerät erzeugt und verwendet Hochfrequenzenergie und kann zu Funk- und Fernsehstörung führen, wenn es nicht ordnungsgemäß installiert ist. Das Gerät wurde auf Einhaltung der in Teil 15 der FCCVorschriften angegebenen Grenzwerte für Rechnergeräte der Klasse B getestet und hält diese Grenzen ein. Diese Spezifikation dient dem angemessenen Schutz gegen derartige Störungen beim Einsatz in Wohngebieten.
Sede Mundial da Tripp Lite 1111 W. 35th Street Chicago, IL 60609 EUA (USA) +1(773) 869-1234 www.tripplite.com Manual Do Usuário Placa PCI USB 2.0 para 5 portas Modelo Nr: F234-005-R NOTA: Siga estes procedimentos de instalação e de operação para garantir um correto desempenho e evitar danos a esta unidade ou aos dispositivos a ela conectados. Direitos Autorais © 2000 Tripp Lite. Todos os direitos reservados. Todas as marcas comerciais pertencem aos seus respectivos proprietários.
Visão geral Esta placa host PCI USB 2.0 oferece suporte para operação em Alta velocidade, Velocidade total e Baixa velocidade, e segue a especificação Enhanced Host Controller Interface (EHCI). Conteúdo da embalagem • Hardware: Placa PCI USB 2.
Características do produto • • • • • • • • • Compatível com a especificação USB revisão 2.0 Taxa de transferência de dados de até 480Mbps Oferece suporte para até 127 periféricos USB Oferece suporte para todos os periféricos USB compatibilidade reversa com periféricos USB 1.1 Especificação OHCI para compatibilidade com USB 1.
Requisitos do sistema • PC IBM® com processador Pentium II 266MHz ou superior, ou sistema compatível • Slot para PCI disponível • Unidade de CD para o software • Windows® 98/98SE ou superior Instalação do driver 1) Desligue o PC, desconecte o cabo de força e todos os periféricos, e em seguida abra o gabinete do PC. 2) Localize o slot para PCI na placa-mãe e remova qual quer placa complementar que esteja dificultando o acesso a ele. 3) Remova a placa PCI USB 2.
Configuração Windows 98/ME como exemplo, similar no Windows 2000 Instalação do driver somente para sistemas Windows. ASSEGURE-SE QUE OS FIOS PERIFÉRICOS DE USB NÃO ESTÃO CONECTADOS AO CARTÃO NOVO 1) Ao ser inicializado, o Windows detecta automaticamente a presença da nova placa PCI. O Assistente para configurar novo hardware aparece. Clique em "Next" (Avançar) para continuar.
Configuração 2) Quando a janela a seguir aparecer, selecione "Search for…" (Procurar por…) e clique em "Next" (Avançar). 3) Quando a janela a seguir aparecer, insira o CD do driver fornecido com a placa PCI USB 2.0 na unidade de CD do computador. Selecione CD-ROM Drive (Unidade de CD) e clique em "Next" (Avançar) para continuar.
Configuração 4) Quando a janela a seguir aparecer, selecione "The updated drver" (O driver atualizado) e clique em "Next" (Avançar). 5) Quando a janela a seguir aparecer, clique em "Next" (Avançar). Os arquivos são copiados para o disco rígido.
Configuração 6) A janela a seguir é exibida. Quando a janela a seguir aparecer, clique em "Finish" (Concluir).
Configuração 7) Quando a janela a seguir aparecer, siga o mesmo processo descrito nos passos 1~6. 8) Quando a janela a seguir aparecer, clique em "Next" (Avançar). 9) Quando a janela mostrada no passo 2 aparecer, selecione "Search for" (Procurar por…) e clique em "Next" (Avançar).
Configuração 10) Quando a janela a seguir aparecer, selecione "CD-ROM Drive" (Unidade de CD) e clique em "Next" (Avançar). "A" representa a unidade de disquete. 11) Quando a janela a seguir aparecer, clique em "Next" (Avançar).
Configuração 12) Quando a janela a seguir aparecer, clique em "Next" (Avançar). 13) Siga o procedimento descrito no passo 6 (acima). 14) A instalação da sua placa PCI USB 2.0 foi concluída. Para verificar se a instalação foi bem-sucedida, clique no botão "Start" (Iniciar), localizado no canto inferior esquerdo da tela. Selecione "Settings" (Configurações) - "Control Panel" (Painel de controle) "System" (Sistema) - "Device Manager" (Gerenciador de dispositivos).
Declaração da FCC Este dispositivo gera e utiliza radiofreqüência, e pode provocar interferências na recepção de rádio e televisão caso não seja instalado e usado adequadamente. O dispositivo foi testado e foi comprovada sua conformidade com os limites determinados para um aparelho de serviço digital de classe B, de acordo com as especificações descritas na seção 15 das normas da FCC. Essas especificações têm como objetivo fornecer proteção contra tais interferências em instalações domésticas.