
Rack Enclosure Extension Frame Owner's Manual

3
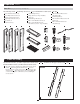
48U
42U
A AB B
C CD D
M
F
M
M
E
M
M
E
G
1-2
1-3
1-4
1-5
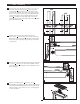
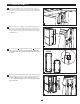
1 – Frame Assembly (continued)
(For25Uenclosures,skipthisstep.)Alignthesetoffourscrew
holes in the lower left vertical section
A
and the upper left
vertical section
C
.Usethelowersetofscrewholesfor48U
enclosures(thiswillmaketheverticalsectionlonger).Usethe
uppersetofscrewholesfor42Uenclosures(thiswillmakethe
verticalsectionshorter).InsertfourM5x10mmscrewsand
washers
M
andtightensecurely.(Startallthescrewsbefore
tightening.)Repeatforthelowerrightverticalsection
B
and the
upper right vertical section
D
.
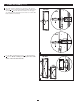
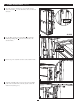
Insert the lower end of the left vertical section into the
bottom section
F
asshown.Alignthescrewholes,insertfour
M5x10mmscrewsandwashers
M
andtightensecurely.(Start
allthescrewsbeforetightening.)Repeatthisstepfortheright
vertical section.
Insert the upper end of the left and right vertical sections into the
top section
E
.Alignthescrewholes,inserteightM5x10mm
screws and washers
M
andtightensecurely.(Startallthescrews
beforetightening.)
Insertthe1Ublankingpanels
G
into the top section
E
.
EachblankingpanelwillsnapintoplacewiththeTrippLitelogo
facingoutward.Theblankingpanelsmayberemovedtoinstall
standard19-inchrackaccessoriesupto3U–contactTrippLite
for more information.
1-2
1-3
1-4
1-5