
Owner`s manual


A
4
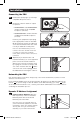
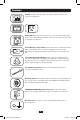
Connecting the PDU
2-1
Connect the input plug to your facility’s
compatibleACpowersource.
2-2
Allmodelscontain2banksofoutput
receptacles.
• PDUMVR20NETandPDUMVR30NET
contain2banksof125-15/20R
receptacles(24total).
• PDUMVR30HVNETcontains2banks
of 10 C13 and 2 C19 receptacles
(24total).
Connectyourequipment’sinputplugs
totheappropriateoutletsonthePDU.
OntheSwitchedmodels,theLEDnear
each outlet illuminates when the outlet
isreadytodistributeliveACpower.
Note: It is recommended that you do not
connect a live load to the PDU. If the load
you intend to connect has an ON/OFF
switch, please turn the switch to OFF prior to
connection.
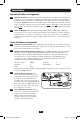
2-3
(Optional)Ifyouattachedthecord
retentionbracket(s),tieeachequipment
powercordtotheretentionbracket.
Attach each cord to the retention shelf
byloopingthecordandsecuringitwith
oneoftheincludedcableties
A
.Make
sureeachcordcanbeunpluggedfrom
thePDUwithoutremovingthecabletie.
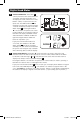
Installation
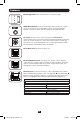
Networking the PDU
Note: The MAC address of the PDU (a 12-digit string in this format: 000667xxxxxx) is printed on a label
attached to the PDU enclosure.
Ifyournetwork’sDHCPserverwillassignadynamicIPaddresstothePDUautomatically,go
toStep
3-1
.IfyouwillassignastaticIPaddresstothePDUmanually,gotoStep
4-1
. If you
areuncertainwhichmethodtouse,contactyournetworkadministratorforassistancebefore
continuing the installation process.
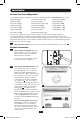
Dynamic IP Address Assignment
3-1
Connect PDU to Network: While the
PDUispowered,connectastandard
EthernetpatchcabletotheRJ-45
EthernetportonthePDU.
Note: This port is not compatible with PoE
(Power over Ethernet) applications. The PDU
will attempt to obtain an IP address via DHCP.
This may take as long as several minutes,
depending on your network environment.
SomeModelsWillVary.
PDUMVR30HVNETShown
PDUMVR30HVNETShown
13-02-027-933161-revB.indb 4 2/7/2013 1:19:13 PM