
Owner`s manual

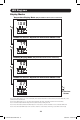


LED Diagrams
HOLD HOLD
HOLD
HOLD
HOLD TIME OUT
HOLD HOLD HOLD
HOLD
15
Control Modes
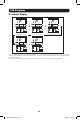
Celsius or Fahrenheit Configuration (Only Shown if Envirosense Connected)
Note 1: Press Mode button to go to the next Display mode (vertical movement on this document). Note the Amps, kW, or Volt
sub-Mode will be remembered.
Note 2: Press and HOLD Enter button for 2 seconds to change the configuration. Whatever configuration is shown is what the unit
is configured for. (horizontal movement on this document)
Note 3: The Active Input LEDs will always show the present source powering the load.
Note 4: Press and hold both Mode and Enter buttons for 2 seconds to show the IP address of the connected SNMP card.
Note 5: Press and hold MODE button for 2 seconds to switch to Display modes. (This will go to the FIRST Display mode)
Note 6: C-F display allows to configure the unit for displaying Celsius or Fahrenheit. (This mode will be omitted if Envirosense is
not connected) (changes will be remembered in NVR)
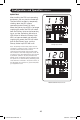
Note 7: SCr Auto scroll enable or disable. When set to y (enabled), the unit will automatically scroll through Display items (See
Display modes 1 page for details. When set to n, the unit will not automatically scroll. (changes will be remembered in NVR)
Note 8: LED brightness control – Set this to 1-4 for the desired illumination intensity. (changes will be remembered in NVR)
Note 9: tSt LED Test control – Press and Hold Enter button for 2 seconds to initiate an LED test where all LEDs will be illuminated
for 6 seconds.
Auto Scroll Enable/Disable
LED Brightness
LED Test Control
13-04-262-93323D-EN.indd 15 5/10/2013 3:02:51 PM