
User guide
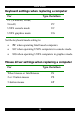
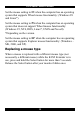
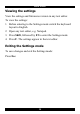
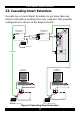

Table Of Contents
- CAT5 Smart KVM Extender User Guide
- Table of Contents
- Welcome
- Introduction
- The system components
- The KVM Extender units
- Pre-installation instructions
- The KVM Extender cables
- The 3 in 1 CPU cable
- Power supply
- The KVM Extender as an extender
- Giving 2 users access to 1 computer
- The KVM Extender as a 2-port KVM Switch
- Operating the KVM Extender
- Adjusting the picture
- Timeout
- Locking KVM control
- KVM Extender Settings mode
- Changing the hotkey
- Changing the Timeout period
- Enabling/disabling lock control
- Making advanced adjustments
- Replacing a computer
- Keyboard settings when replacing a computer
- Mouse driver settings when replacing a computer
- Replacing a mouse type
- Viewing the settings
- Exiting the Settings mode
- Cascading Smart Extenders
- Transmitter Power adapter
- Switching on
- Technical specifications
- KVM Extender configuration

CAT5 SMART KVM EXTENDER
15
Set the mouse setting to IN when the computer has an operating
system that supports Wheel mouse functionality: (Windows 98
and Linux*).
Set the mouse setting to PS when the computer has an operating
system that does not support Wheel mouse functionality:
(Windows 95, NT4, DOS, Linux*, UNIX and Novell).
*Depending on the version.
Set the mouse setting to EP when the computer has an operating
system that supports Explorer mouse functionality: (Windows –
ME, 2000, and XP).
Replacing a mouse type
When a mouse is replaced with a different mouse type (not
necessarily a different mouse) while the KVM Extender is in
use, press and hold the Select button for more than 5 seconds.
Release the Select button after your monitor blinks once.