
User guide

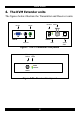
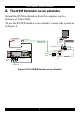
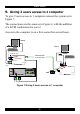
Table Of Contents
- CAT5 Smart KVM Extender User Guide
- Table of Contents
- Welcome
- Introduction
- The system components
- The KVM Extender units
- Pre-installation instructions
- The KVM Extender cables
- The 3 in 1 CPU cable
- Power supply
- The KVM Extender as an extender
- Giving 2 users access to 1 computer
- The KVM Extender as a 2-port KVM Switch
- Operating the KVM Extender
- Adjusting the picture
- Timeout
- Locking KVM control
- KVM Extender Settings mode
- Changing the hotkey
- Changing the Timeout period
- Enabling/disabling lock control
- Making advanced adjustments
- Replacing a computer
- Keyboard settings when replacing a computer
- Mouse driver settings when replacing a computer
- Replacing a mouse type
- Viewing the settings
- Exiting the Settings mode
- Cascading Smart Extenders
- Transmitter Power adapter
- Switching on
- Technical specifications
- KVM Extender configuration
CAT5 SMART KVM EXTENDER
9
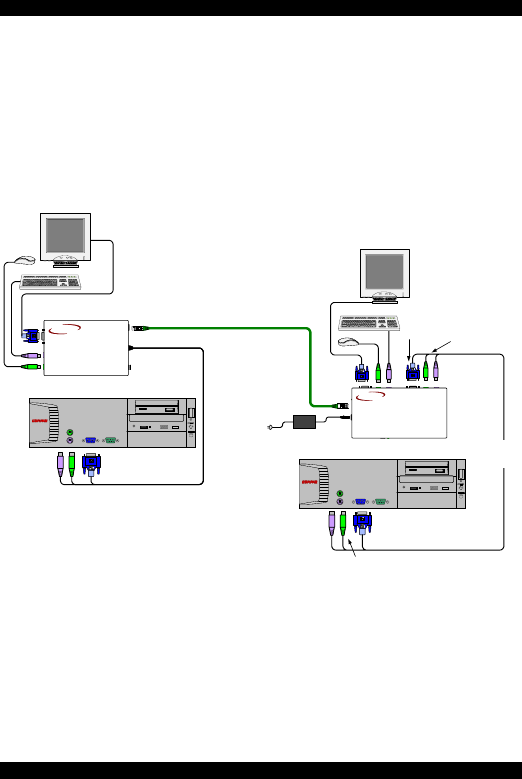
10. The KVM Extender as a 2-port KVM Switch
Figure 8 illustrates the system connected to 2 computers and 2
workstations. User 1 can access his local computer or the
remote computer. User 2 can only access his local computer.
The connections are the same as in Figure 7, with the addition
of the 3 in 1 CPU cable that connects a 2
nd
computer to the
Receiver.
6VDC
SD
DESKPRO
Ω
SD
P110
Computer
Transmitter
Receiver
CAT5 FTP cable
Up to 110m / 360ft
SD
P110
User 1
User 2
3 in 1
CPU
cable
SD
DESKPRO
Ω
To Video card
To
Keyboard
port
To Mouse port
To Computer
Monitor port
To Computer
Keyboard port
To Computer
Mouse port
Computer
CAT5
SMART
Extender
RECEIVER
MINICOM
www.minicom.com
CAT5
SMART
Extender
TRANSMITTER
MINICOM
www.minicom.com
Figure 8 As a 2-port KVM Switch
The option in Figure 8 can also work with only 1 user
workstation connected at the Receiver.
There is another configuration diagram on the last page of this
Guide, and more on the Marketing & Documentation CD.