& dibs" al a Bl USER’S GUIDE IS819B Wireless Music System with Dock for iPod f content S WARNINGS AND PRECAUTIONS PRODUCT INFORMATION FEATURES. IN THE BOX. POWERING THE UNIT & REMOTE AC POWER CORD REMOTE BATTERIES POWERING THE SPEAKERS AC POWER CORD. BATTERY POWER BATTERY BACKUP WIRELESS CONNECTIVITY PAIRING SPEAKERS WITH THE UNIT LINK INDICATOR. coc orvermrcscrerrre USING THE WIRELESS REMOTE. IPOD OPERATIONS DOCKING AN IPOD... PLAYING AN IPOD CLOCK OPERATIONS SETTING THE TIME ..
WARNINGS AND PRECAUTIONS = CAUTION: TO PREVENT ELECTRIC + CAUTION: Danger of explosion if battery SHOCK, MATCH WIDE BLADE OF is incorrectly replaced. Replace only with PLUG TO WIDE SLOT, FULLY INSERT. the same or equivalent type. = WARNING: To prevent fire or shock + PRECAUTION: Danger d explosion si les hazards, do not expose this unit to rain or piles snot replacements de flagon incorrect. moisture.
IMPORTANT SAFETY INSTRUCTIONS 1. Read these Instructions. yan pac ci . + Tho apparatus Dali not be exposed to dry 2. Keep these Instructions. ping or splashing and they no objects Sled 3. Heed all Wr H gs. son such as vies, shill be placed on 4, Follow all instructions, Nonpareil ne dot pos dire appose au opulence nests ou aux Laboriousness of vicing okjef ne 5. Do not use this apparatus near water. ant de guided, tel quoin vase, ne dot fio 6. Clean only with a dry cloth. photo 7.
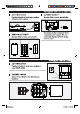
PRODUCT INFORMATION | creatures f firebox Deck plays and charges iPod ISg198 ‘Wireless speakers RF Wireless Remote Control AM/FM radio Docking Brackets for iPod Supports multiple speakers Documentation Advanced hi-phi sound with Channel Purity® Remote Digital volume control Pairing button Left, right, or mono selections Weather resistant Digital 2.
POWERING THE UNIT & REMOTE E Catercorner E BATTERY BACKUP Plug the included AC cord into a standard AC outlet (120V~60Hz) Requires 2 AA batteries, not included. f REMOTE BATTERIES Requires 2 AA batteries, not included. The battery backup is meant for short, unexpected power outages. The unit cannot fully function off of the backup batteries alone.
& WIRELESS CONNECTIVITY BE PAIRING SPEAKERS WITH THE UNIT Note: The speakers need fo be paired with the unit before any audio can be heard. Press the Power Button on the unit fo turn the unit on. Press the Power Bunion on the speakers to turn the speakers on, Press and hold the Pair Button on the unit until the Link Indicator begins blinking. Note: The Link Indicators will flash when the unit is in Standby Mode. Press and hold the Pair Button on the speakers until the Link Indicator begins blinking.
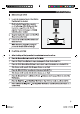
DOCKING AN IPOD Locate the numbered bracket they fits the iPod that will be docked. Each included Bracket has a number on it, indicating which iPod model that bracket is compatible with. See the separate bracket chart page to identify which bracket is needed. Snap the bracket into place over the iPod Connector in the dock. Connect the iPod to the iPod Connector inside the dock. When the unit is plugged in, using AC power, the docked iPod will charge.
CLOCK OPERATIONS f SETTING THE TIMER L SETTING THE TIME Press the Power Button to turn the unit off. L Press the Power Bitten to turn the unit on. 2. Press snd hold the Time/Dimmer 2. Press snd hold the Timer On/Off Button. Button. 3. While holding the Time/Dimmer Button, 3. While holding the Timer On/Off Button, press the Skip/TunButten to adjust the press the Bellybutton to adjust the hour, and the Skip/Tun+ Button to adjust hour, and the Skip/Tun+ Button to adjust the minutes. the minutes.
POD OPERATIONS f TUNING THE AM/FM RADIO f USING THE AUXILIARY INPUT 1. Press the Power Button io turn the unit 1. Connect an MP3 Player or other audio oI. source fo the Auxiliary Input. 2. Press the Source Button to switch to AM 2. Press the Power Button to turn the unit or FM Radio Mode. on. 3. Press the Skip/Tunand Skinflint 3. Press the Surcease Button to switch the Buttons to adjust the AM or FM radio unit to Aux Mode, station.
POD OPERATIONS 01. iPod Connector 49. Timer On/Off Button Use the iPod Connector to dock an iPod With the unit powered on, press the Timer onto the unit. On/Off Button to set the timer. 02, Power Button With the unit powered off, press the Press the Power Button to turn the unit Timer On/Off Button to activate or off and on. deactivate the timer. 03. Volume Buttons Menu/Preset+ & Menu/PresetButton Press the Volume Buttons to adjust the Press the Menu + and Menu Buttons to volume of the unit.
Be be Caution: The included speakers are not designed for use outdoors. Any exposure to precipitation may ruin the speakers.
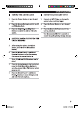
& POD OPERATIONS IS819RIndd 13 Pair Button 21. Press the Pair Button to pair the unit to wireless speakers. Reset Button Use a paperclip or like object to press 22. the Reset Button and reset the unit to it’s defame settings. Auxiliary Input 23. Use the Auxiliary Input to connect an MP3 player or other audio source to the unit. 24 Volume Dial Turn the Volume Dial to adjust the volume of the speaker.
POD OPERATIONS Dirndl 15 Power Button Press the Power Button to turn the unit off and on. Source Button Press the Source Button to switch between iPod, AM, FAM, and Aux Modes. Skip/Search Buttons Press the Skip/Search Buttons to skip between tracks on a docked iPod Press and hold the Skip/Search Buttons 10 search through an individual track on a docked iPod. Preset + & Preset Buttons Press the Preset + & Preset Buttons io eyelet through AM and FM radio stations saved to the unit's memory.
COMPANY INFORMATION | nonadministrative Environmental Commitment te ‘Protect for Today and Sustain for Tomorrow’ 200% marks the official launch of DPL, Inc.’s corporate campaign for a greener and cleaner world. DPI and its four brands, i Live, Weather X, Capri, and GPX, are building upon environmental initiatives introduced at all of their facilities to help formulate and sustain significant and important conservation efforts within its manufacturing and marketing communities.