ASSEMBLY GUIDE TS60KD-1010 Modular Platform Scale SERIES 2 V 2.
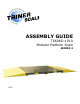
Assembly Guide Triner TS60KD-1010 Platform Scale Note: The location where the scale will be installed is very important. The scale MUST be installed on a firm and level concrete pad. Never install the scale on asphalt. Asphalt is not hard enough to take heavy loads and the scale will sink into the asphalt over time. Installation Procedure 1. Unpack and inspect the system components. Below is a list of the parts and quantity: a. Scale Platforms (2) b. Scale Ramps (4) c. Leveling Feet (8) d.
Assembly Guide 3. Triner TS60KD-1010 Platform Scale Place the first weighing deck into position. Using a forklift, move the first weighing deck into position. Before lowering the deck to the ground: a. Remove the access panel to the junction box compartment and feed the cable out the hole in the bottom of the compartment. Replace and secure panel. Place the bundled cable on top of the weighing deck. b.
Assembly Guide Triner TS60KD-1010 Platform Scale Place the second weighing deck into position. Using a forklift, move the first weighing deck into position. BE SURE to maintain a ½” gap between the two weighing decks. Before lowering the deck to the ground: e. Remove the access panel to the junction box compartment and feed the cable out the hole in the bottom of the compartment. Replace and secure panel. Place the bundled cable on top the weighing deck. f.
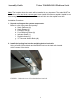
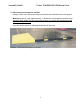
Assembly Guide Triner TS60KD-1010 Platform Scale 4. Place the first ramp into position. Using a forklift, move the first ramp into position and carefully lower to the ground. Make sure there is a gap (approximately 1”) between the scale platform and the ramp. Important Note: Make sure the scale platform does not contact the ramp because this will cause weighing errors. A pry bar will be helpful for adjusting the position of the ramp. FIGURE 4: Place the first ramp into position.
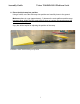
Assembly Guide Triner TS60KD-1010 Platform Scale 5. Place the second ramp into position. Using a forklift, move the second ramp into position and carefully lower to the ground. Make sure there is a gap (approximately 1”) between the scale platform and the ramp. Important Note: Make sure the scale platform does not contact the ramp because this will cause weighing errors. A pry bar will be helpful for adjusting the position of the ramp. FIGURE 5: Place the second ramp into position.
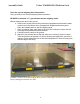
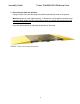
Assembly Guide Triner TS60KD-1010 Platform Scale 6. Place the third ramp into position. Using a forklift, move the third ramp into position and carefully lower to the ground. Make sure there is a gap (approximately 1”) between the scale platform and the ramp. Important Note: Make sure the scale platform does not contact the ramp because this will cause weighing errors. A pry bar will be helpful for adjusting the position of the ramp. FIGURE 6: Place the third ramp into position.
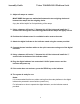
Assembly Guide Triner TS60KD-1010 Platform Scale 7. Place the last ramp into position. Using a forklift, move the last ramp into position and carefully lower to the ground. Make sure there is a gap (approximately 1”) between the scale platform and the ramp. Important Note: Make sure the scale platform does not contact the ramp because this will cause weighing errors. A pry bar will be helpful for adjusting the position of the ramp. FIGURE 7: Place the last ramp into position.
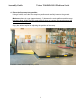
Assembly Guide Triner TS60KD-1010 Platform Scale 8. Adjust all ramps as needed. MAKE SURE that gaps are maintained between the two weighing decks and between the ramps and the weighing decks. A pry bar will be helpful for final positioning of the ramps. 9. Using a hammer drill and a ½” diameter bit, drill the holes and install the ½” anchor bolts through the foot retaining plates and the ramps and tightly secure. 10. Position the indicator stand in a suitable location next to the scale. 11.
Assembly Guide Triner TS60KD-1010 Platform Scale 10