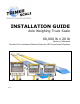
INSTALLATION GUIDE Axle Weighing Truck Scale 60,000 lb x 20 lb Factory Calibrated Includes Pre-interfaced Wireless Remote LED Scoreboard Displays V 1.
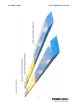
Assembly Guide Axle Weighing Truck Scale OVERVIEW TOOLS REQUIRED • Forklift and block • Prybar • Wrenches: #8 allen wrench, 15/16” & 30mm ratchet or pneumatic wrench ESTIMATED TIME REQUIRED TO SET UP THE SYSTEM • 10-12 hrs RECOMMENDED NUMBER OF PERSONS TO SET UP THE SYSTEM • Two ASSEMBLY SYNOPSIS Assembly of the scale is a very straightforward procedure. Most of the required assembly time is in positioning the large, heavy platforms. The platforms are labeled in sequence at each junction.
Assembly Guide Axle Weighing Truck Scale Important Note: The location of the scale installation is very important. The scale MUST be installed on a level concrete surface. Never install the scale on asphalt. Asphalt is not hard enough to take heavy loads and the scale will sink into the asphalt over time. Ample space must be available for vehicles to accurately approach and exit the platforms. 1.
Assembly Guide Axle Weighing Truck Scale (when attaching, the brackets can be turned over so that the markings face inward). Loosely bolt all brackets into position. Recheck that all platforms are in correct position (a pry bar may be useful for making small adjustments to the platform positions), and then securely tighten down all brackets. 5. ATTACH THE FOUR RAMPS Place the ramps into position and securely bolt down to the end platforms. 6.
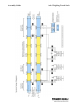
Assembly Guide Axle Weighing Truck Scale 8. ATTACH THE CABLES CONNECTING THE WEIGIHING PLATFORMS TO THE DIGITAL INDICATORS Refer to the System Setup Diagram on page 8 when connecting the cables. NOTE: Cables should be run through securely mounted conduit. The customer determines the conduit installation. Conduit installation is not covered in this Assembly Guide. Connecting the cables is a simple procedure.
Assembly Guide Axle Weighing Truck Scale Locate the four 50 ft. cables with connectors labeled 1A, 2A, 3A and 3C. ATTACH THE CABLES TO THE LEFT SIDE WEIGHING PLATFORMS Cables 1A, 2A, 3A and 3C connect to the Left Side Weighing Platforms, and run directly to the digital indicators. • Attach the long cable connector 1A to the matching weighing platform connector 1A. • Attach the long cable connector 2A to the matching weighing platform connector 2A.
Assembly Guide Axle Weighing Truck Scale • The trailer axles scale indicator will display: the total weight placed on platforms 3A and 3B, the total weight placed on platforms 3C and 3D, and the total of all weights placed on platforms 3A through 3D. The wireless remote will display the total of all weights placed on platforms 3A through 3D. 11.
Assembly Guide Axle Weighing Truck Scale 8
Assembly Guide Axle Weighing Truck Scale 9
Assembly Guide Axle Weighing Truck Scale Triner Scale General Warranty* What is Covered: Triner Scale warrants to the first end user customer of the Triner Scale product enclosed with this limited warranty statement that the product, if purchased and used in the United States, conforms to the manufacturer's specifications and will be free from defects in workmanship and materials for a period of one (1) year from the date of original purchase.
Assembly Guide Axle Weighing Truck Scale THE WARRANTY AND REMEDY PROVIDED ABOVE ARE EXCLUSIVE AND IN LIEU OF ALL OTHER EXPRESS OR IMPLIED WARRANTIES INCLUDING, BUT NOT LIMITED TO, THE IMPLIED WARRANTIES OF MERCHANTABILITY OR FITNESS FOR A PARTICULAR PURPOSE. SOME LAWS DO NOT ALLOW THE EXCLUSION OF IMPLIED WARRANTIES. IF THESE LAWS APPLY, THEN ALL EXPRESS AND IMPLIED WARRANTIES ARE LIMITED TO THE WARRANTY PERIOD IDENTIFIED ABOVE.