T523 SERIAL NO:_________________________ DATE OF PURCHASE: ______________ Write the serial number in the space above for reference. SERIAL NUMBER DECAL OWNER’S MANUAL ASSEMBLY • OPERATION • MAINTENANCE WARRANTY • PART ORDERING CAUTION: Exercise of a strenuous nature, as is customarily done on this equipment, should not be undertaken without first consulting a physician. No specific health claims are made or implied as they relate to the equipment.
M A N U FA C T U R E R ’ S L I M I T E D WA R R A N T Y WHAT DOES THIS WARRANTY COVER? This warranty covers your fitness product against defect in material and workmanship when used for the purpose intended, under normal conditions provided it receives proper care. The warranty is extended only to the original owner and is not transferable.
I M P O R TA N T S A F E T Y P R E C A U T I O N S THIS UNIT IS INTENDED FOR HOUSEHOLD USE ONLY. READ ALL INSTRUCTIONS BEFORE USING THIS TREADMILL. WARNING 1. 2. 3. Before starting any exercise program, it is recommended that you consult your physician. Stop exercising if you feel any unusual pain or dizziness. To reduce the risk of electric shock, always unplug the treadmill from the electrical outlet immediately after using and before cleaning.
I M P O R TA N T S A F E T Y P R E C A U T I O N S 12. Always hold the handrails when initially walking or running on the treadmill, until you are comfortable with the use of the treadmill. 13. Never start the treadmill while you are standing on the walking belt. After turning the power on and adjusting the speed control, there may be a pause before the walking belt begins to move. Always stand on the foot rails on the sides of the frame until the belt is moving.
A S S E M B LY I N S T R U C T I O N S TOOLS REQUIRED ⁄16˝ Wrench • ⁄2˝ Wrench • Phillips Screwdriver • 3⁄16˝ Hex Key (provided) 9 1 LOCATE THE HARDWARE BAG SA2023 CONTAINING: Part # HH2102 MM2105 HH2168 HH2154 HH2095 HH2153 HH2001 MM0087 HH2217 Description. Button Head Bolt 5/16” X 1” Nylon Shoulder Washer Hex Head Bolt 5/16” X 1 1/2” Black Flat Washer 3/8 Star Washer Hex Head Bolt 5/16” X 5” Hex Key Wrench Hex Key Clip Phillips Head screw Qty.
A S S E M B LY I N S T R U C T I O N S LEFT SIDE – Install (4) 5/16" x 1" button head bolts with (4) black flat washers and (4) NYLON SHOULDER WASHERS into the left side of the upright (see Figure 3). Install bolts and washers by hand. Make sure shoulder washers are seated properly in the holes of the upright before tightening. RIGHT SIDE – Install (4) 5/16" x 1" button head bolts with (4) black flat washers and (4) STAR WASHERS into the right side of the upright (see Figure 4).
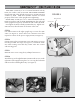
STEP 9 Attach handrail clamp to the bottom of the handrail using 5/16 x 1 1/2” hex head bolt and flat washer. (See Figure 9) Hand tighten only. STEP 10 Tilt the unit on its side. With the treadmill on its side, position the handrail clamp to the frame rail. Secure hand rail clamp to the frame rail using (2) 5/16” x 1 1/2” hex head bolts, then tighten the bolts to the frame rail. Now tighten all bolts. (See Figure 10 & 11) FIGURE 8 STEP 11 Repeat steps 8-10 for the left side handrail.
USING YOUR TREADMILL A BEGINNER’S GUIDE Getting Started If you are over 45, or have had health problems, and this is your first step towards fitness, check with your physician first. Before you even get on your treadmill, stand along side it, and get used to the controls- raise and lower the speed and incline, and get a good feel for the controls. Then get on, straddling the belt with both hands on the handrails. Turn the machine on and set the speed at 1 or 2 MPH.
What to Wear All you really need are a good pair of shoes. Running shoes are not very good for walkers; choose walking shoes with a firm heel counter- the hard piece at the back of the shoe that holds the heel in place- and plenty of room for toes so they can spread out as they push off. Wear loose, comfortable clothes. Stretching At any level of walking, a stretching session is a good idea. Warm muscles respond better to stretches than cold ones, so walk for five or ten minutes until you’re warm.
B e g i n n e r ’ s G u i d e To U s i n g H e a r t R a t e HOW TO USE YOUR CHEST STRAP CHEST STRAP Using your chest strap, you can monitor your heart rate at any time during your workout or you can use a pre-programmed heart rate program. How to use the chest strap: • The chest strap will send your heart rate to the treadmill’s receiver and your pulse will be displayed within a matter of several seconds.
O P E R AT I O N G U I D E Displays actual or target heart rate (beats/min) & % of maximum heart rate. Increases & decreases incline, weight, age, workout time, & target heart rate. Raises and lowers target heart rate during heart rate program. Displays time of workout. Also displays pace (minutes per mile or km) when speed is changed. Displays calories burned during workout or current calories per minute being burned. Increases & decreases speed, weight, age & workout time.
O P E R AT I O N G U I D E NUMERIC KEYPAD The treadmill is equipped with a numeric keypad. This keypad may be used to enter weight, age, workout time, and target heart rate. After entering any of these values, press ENTER to confirm and move to the next prompt. This keypad also enables you to enter speed and incline values during a manual (P1 - MANUAL) or user program (P12-14). See “Fast Speed Entry” and “Fast Incline Entry” sections for more information.
O P E R AT I O N G U I D E Programs 3, 4, and 6 are divided into 9 segments. Divide the program time by 9 to compute the length of each segment. For example, if you choose a program time of 18 minutes, each segment will be 2 minutes long. The display gives a visual and an audible warning before each segment change if there is a change of speed or elevation. The segments of each program have a variety of speeds and inclines (See charts). To review your workout results, press START/STOP.
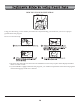
O P E R AT I O N G U I D E 10 Program P2-Speed Interval Walker Grade Speed Speed and Incline (mph & %) Grade Speed Speed and Incline (mph & %) 10 8 6 4 2 Program P3-Speed Interval Jogger 8 6 4 2 0 0 1 2 3 4 5 6 7 8 9 1 10 2 3 4 10 Program P4-Speed Interval Trainer Grade Speed Speed and Incline (mph & %) Grade Speed Speed and Incline (mph & %) 10 8 6 4 2 1 7 8 9 10 Program P5-Hill Repeat 8 6 4 2 2 3 4 5 6 7 8 9 1 10 2 3 4 10 5 6 7 8 9 10 Interval Interval
O P E R AT I O N G U I D E PROGRAMS 9-10 – HEART RATE PROGRAMS (HEART RATE CHEST STRAP MUST BE WORN) Heart Rate - Beats per Minute 1. Press POWER. EXERCISE TARGET ZONE CHART 2. Adjust weight using ARROW (+ or -) keys or Numeric Keypad. Press ENTER. 200 3. Enter age using ARROW (+ or -) keys or Numeric Keypad. Press ENTER. 4. Press PROGRAM key to choose program 180 9 or 10 (P9 – P10). Press ENTER. 5. A suggested target heart is displayed in the TIME/PACE window.
O P E R AT I O N G U I D E • If your heart rate is 26 beats per minute (bpm) or more below the target, there is no additional adjustment in incline. This allows for a warm-up period. Raise your speed to increase your heart rate. • If your heart rate is 3 to 25 bpm below the target, the incline increases. When you are below the target zone, a green heart flashes on the dot matrix display. This reminds you that you are below your target zone.
O P E R AT I O N G U I D E FITNESS TEST (P11) The Fitness Test program measures the user’s baseline cardiopulmonary fitness level. Upon completion of the fitness test, the user’s fitness scores will be given. This score can be used to compare the user’s fitness level progression as performance improves. To use the program, the user must wear the included heart rate transmitter strap. It is important that the user enter their correct age.
O P E R AT I O N G U I D E RESULTS TABLE 1 FITNESS LEVELS WOMEN Age Low Fair Average Good High Athletic Olympic 20-29 <28 29-34 35-43 44-48 49-53 54-59 60+ 30-39 <27 28-33 34-41 42-47 48-52 53-58 59+ 40-49 <25 26-31 32-40 41-45 46-50 51-56 57+ 50-65 <21 22-28 29-36 37-41 42-45 46-49 50+ Age Low Fair Average Good High Athletic Olympic 20-29 <38 39-43 44-51 52-56 57-62 63-69 70+ 30-39 <34 35-39 40-47 48-51 52-57 58-64 65+ 40-49 <30 31-35 36-
O P E R AT I O N G U I D E USER PROFILES 1-4 Your treadmill is equipped with four user profiles. Using this feature offers the following benefits to a user: • Quicker entry into programs- Each user profile stores previously entered values. User weight and age are always remembered. In the preset programs, the treadmill remembers your workout time. • Storage of cumulative workout data- Many users are interested in their fitness progress.
O P E R AT I O N G U I D E PROGRAMS 12-14 – USER PERSONAL PROGRAMS You must be logged into a user profile (see above) to use a personal program. A personal program allows the user to design their own program with their choice of speed and incline for each of 10 segments. To preprogram the custom programs: 1. Press POWER. 2. Press USER 1, USER 2, USER 3, or USER 4 key to select user 1, 2, 3, or 4. 3. Adjust weight using ARROW (+ or -) keys or Numeric Keypad. Press ENTER. 4.
O P E R AT I O N G U I D E RESULTS MODE/PAUSE You may pause your workout for up to four minutes during your workout. During your pause, the treadmill’s display enters RESULTS MODE. RESULTS MODE works in manual mode and in any program or user profile. To pause your workout, step off the walking belt and onto the side rails. Press START/STOP. The walking belt stops. You may review your workout data during the four minute pause. If you wait more than four minutes, the treadmill shuts off automatically.
EXPLODED VIEW 2 3 1 4 5 6 8 7 19 11 12 13 9 10 14 16 17 15 18 18 22
EXPLODED VIEW 20 21 22 23 24 40 25 39 26 38 Pivot Point 28 37 35 29 36 32 30 27 33 35 34 31 41 23
PA R T S L I S T MAIN ASSEMBLY PARTS Key # Part # 1 2 3 4 5 6 7 8 9 10 11 12 13 14 15 16 17 18 19 20 KK2834 MM2290 MM2291 KK2836 QQ2288 MM2293 MM2292 KK2837 QQ2198 QQ2005 502297 QQ2289 JJ2018 502171 KK2835 372148 372147 372154 QQ2277 KK2575 Description Safety Key Magnetic w/36” Cord Overlay Membrane Console Top Electronic Board Rubber Pad Right Rubber Pad Left Console Bottom Heart Rate Chest Strap Heart Rate Transmitter Console Plate Kill Switch Rubber Grip Upright Assembly Motor Cover Handrail, Left Ha
PA R T S L I S T COMMON ASSEMBLY PARTS COMMON ASSEMBLY PARTS Part # 348177 FF2969 HH0032 HH2549 HH0239BK HH1206 HH1267 HH1318 HH1380 HH1996 HH2035 HH2041 HH2049 HH2054 HH2066 HH2075 HH2084 HH2091 HH2095 HH2125 HH2129 HH2138 HH2148 HH2150 HH2151 HH2154 HH2160 HH2167 HH2168 HH2169 HH2200 HH2318 HH2362 HH2584 HH2387 HH2388 HH2429 HH2524 HH2549 HH2584 HH2602 LL2051 LL2053 Description Reinforcement Bracket Owner's Manual Screw #8 x 3/4 Phil Truss Screw # 8 x 3/4 Screw Drill Quick #8 x 5/8 Nylock Nut 1/4-20 Fla
TA K I N G C A R E O F Y O U R T R E A D M I L L Just like changing the oil in your car or replacing a filter in your home’s heating and cooling system, a little preventive maintenance will insure your treadmill will operate smoothly and quietly for years to come. WALKING BELT TENSION As walking belts tend to stretch slightly with use, the walking belt may occasionally need to be tightened.
TA K I N G C A R E O F Y O U R T R E A D M I L L WARNING ALWAYS UNPLUG THE TREADMILL FROM THE ELECTRICAL OUTLET BEFORE CLEANING, LUBRICATING, OR SERVICING THE UNIT. CLEANING General cleaning of the treadmill will prolong the life of the treadmill and improve performance. DANGER Keep the unit clean by dusting regularly. Be sure to dust the exposed part of the deck on either side of the walking belt and also the side rails. For best performance, we recommend your treadmill be placed on a treadmill mat.
TROUBLESHOOTING GUIDE PROBLEM CAUSE CORRECTION Treadmill will not start 1. Not plugged in. 2. Safety pull pin not inserted. 3. Treadmill circuit breaker tripped. 1. Plug into three prong grounded outlet. 2. Insert safety pull pin. 3. Reset circuit breaker Elevation not accurate 1. Out of calibration. 1. Recalibrate unit (See Calibration Instructions). Speed not accurate. 1. Out of calibration. 2. Set in wrong units (kilometers or miles) 1. Recalibrate unit (See Calibration Instructions) 2.
C A L I B R AT I O N P R O C E D U R E WARNING: DURING THE ENTIRE CALIBRATION PROCESS, STAND ON THE PLASTIC SIDE RAILS ONLY! DO NOT STAND ON TREADMILL WALKING BELT! CALIBRATION 1. Turn off treadmill. 2. Simultaneously press PROGRAM, ENTER, and START/STOP for about 3 seconds. 3. Maximum speed will be shown in the TIME/PACE display followed by an “E” for English units or an “N” for metric units. Press START/STOP to change from English units to metric units. 4. Press ENTER. 5. Press START/STOP.
I M P O R TA N T C O N TA C T N U M B E R S If you need assistance, please have both the serial number of your machine and the date of purchase available when you contact the appropriate Nautilus office listed below. OFFICES IN THE UNITED STATES: INTERNATIONAL OFFICES: For technical assistance and a list of distributors in your area, please call or fax one of the following numbers. •INTERNATIONAL CUSTOMER SERVICE NORTH AMERICA OFFICE Nautilus, Inc.
© 2006. Nautilus, Inc. All Rights Reserved. Nautilus and Trimline are registered trademarks of Nautilus, Inc. All other trademarks are owned by their respective companies.