
User Manual


Accessories
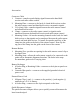
Connector Cable
1. Contacts—transfers grade-display signals between the hand-held
receiver and radio remote control.
2. Mounting Plate—connects to the back of a hand-held receiver so that
the radio remote control and hand-held receiver can transfer signals.
3. 12-ft (4-m) Cable—transfers signals between the radio remote control
and a hand-held receiver.
4. Clamp—connects to the radio remote control so signals can be
transferred between the hand-held receiver and radio remote control.
5. Mounting Guides—fit into the mounting channels on the back of a hand-
held receiver so that signals can be transferred between the radio remote
control and hand-held receiver. To install, first put the small key of the
clamp into the guide on the back of the remote control. Next clip the
top part of the clamp into the guide on the front of the remote.
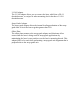
Remote Holster
1. Mounting Slot—provides an opening for the radio remote control clip to
be slipped into.
2. Mounting Strap—allows the radio remote control to be connected to the
grade rod for automatic alignment functions. The holes in the strap
accommodate grade rods of varying sizes.
Battery Recharger
1. 4-Socket Plug w/ Retaining Collar—connects to the 4-pin receptacle on
the laser.
2. Grounded Receptacle—connects to the supplied grounded electrical
power cord.
External Power Cord
1. Alligator Clips (+ and –)—connect to the positive (+) and negative (–)
terminals on a 12 V dc battery.
2. 4-Socket Plug—connects to the 4-pin receptacle on the laser.
Quick-Disconnect Adapter
The quick-disconnect adapter allows you to quickly connect/disconnect the
laser from the tripod.