
User Manual


One-Way and Two-Way Radio Remote Controls (for radio equipped laser
only)
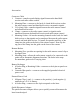
1. Power/Standby Button—turns the remote control on/off and
activates/deactivates standby mode.
2. Manual Button—changes the laser from automatic self-leveling to manual
mode.
3. Mode Button—allows you to choose the laser’s operational mode,
which includes grade change, automatic axis alignment, grade matching,
PlaneLok, grade bump, grade reverse, manual, and beam rotation speed.
4. Up and Down Buttons—increase/decrease the grade for the ∠ and ∠
axes and increase/decrease the laser beam’s rotation speed. When the
laser is in manual mode, these buttons can also be used to
increase/decrease the slope of the laser beam.
5. Left and Right Buttons—increase/decrease the slope of the ∠ axis when
the laser is in manual mode.
6. Liquid Crystal Display (LCD)—shows the mode messages, beam’s
rotation speed, and percentage of grade (on two-way remote control
only).
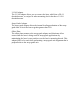
7. Remote Port Contacts—transfer operation and elevation information
between the remote control and the receiver.
8. Antenna—transfers signals between the radio remote control and laser.
9. Enter Button—is a multifunctional button confirms the selection made
from the laser’s operational mode and activates the backlighting
function.
10. Mounting Clip—allows the remote control to be connected to a grade-
rod holster, belt, or a screw on a wall.
11. Battery Housing—holds two AA alkaline batteries.