
User Manual


Features and Functions
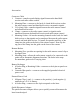
Laser
1. Power Button—turns the laser on/off.
2. Status LED—shows the status of various conditions including an
internal, electronic, or a mechanical error (solid red), low-battery
(flashing yellow), manual mode (flashing red), HI alert (fast flashing red),
and out-of-level (flashing green).
3. Manual Button—changes the laser from automatic self-leveling to manual
mode.
4. ∠ Axis Up and Down Buttons—change the grade for the ∠ axis.
5. Rotation-Control Button—changes the laser beam rotation speed (300,
600, and 900 rpm).
6. ∠ Axis Up and Down Buttons (dual-grade laser only)—change the grade
for the ∠ axis.
7. Axis-Alignment Buttons—rotates the grade axis
clockwise/counterclockwise. Rotating the grade axis simulates turning
the laser on its tripod, with fine adjustment capability.
8. Liquid Crystal Displays (LCDs)—show the percentage of grade,
approximate charge of the batteries, beam's rotation speed, and axis
alignment (if other than zero). The single-grade laser has one LCD.
9. Antenna (for radio remote-control lasers only)—sends and receives
signals to and from the remote control.
10. Sunshade—protects the lighthouse from the environment.
11. Lighthouse—is the 360° exit window for the laser beam. The lighthouse
is sealed and protects the internal components from the environment.
12. Rotor—contains the rotating laser beam.
13. Handle—allows you to carry the laser easily.
14. Battery Recharging Receptacle—is the 4-pin receptacle that the battery
recharger plugs into.
15. Battery Housing—holds six D-cell Ni-Cd, Ni-MH, or backup alkaline
batteries.
16. 5/8-11 Tripod Mount—allows the laser to be connected to a standard
5/8-11 tripod or column mount.
17. Sighting Guides—are used to visually align the laser with a directional
hub or grade stake.
18. Axis-Alignment Marks—correspond with both laser axes and are used
to align the laser in the correct grade direction.