
User's Manual

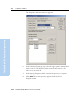
Table Of Contents
- Safety Information
- Introduction
- Trimble R7 GPS Receiver
- Overview
- Setting up the Receiver
- General Operation
- Configuration
- Transferring Data
- Software Utilities
- Specifications
- Default Settings
- Cables and Connectors
- Event Marker Input and 1PPS Output
- Trimble R8 GPS Receiver
- Overview
- Setting up the Receiver
- General Operation
- Configuration
- Software Utilities
- Specifications
- Default Settings
- Cables and Connectors
- Appendixes Trimble R7 / Trimble R8
- NMEA-0183 Output
- RTCM Output
- Troubleshooting
- Index

Trimble R7/R8 GPS Receiver User Guide 137
Software Utilities 16
Trimble R8 GPS Receiver Operation
7. If all is correct, click Finish.
Based on the selections shown above, the Software Upgrade
window appears and shows the status of the operation (for
example,
Establishing communication with the Trimble R8.
Please wait ...)
8. Click OK.
The Software Upgrade window appears again and states that the
operation was completed successfully.
9. Click
Menu to select another operation, or click Exit to quit
WinFlash.
10. If you click
Exit, another screen appears asking you to confirm
that you want to quit. Click
OK.
160.1 Adding frequencies for the 450 MHz internal radio
If your Trimble R8 receiver has the optional internal 450 MHz radio
installed, you must use the WinFlash software to add receiving
frequencies to the default list. If you purchased the transmit option, the
broadcast frequencies must be programmed at the factory.
1. Start the WinFlash software. The Device Configuration screen
appears.
2. From the Device type list, select Trimble R8 Receiver.
3. From the PC serial port field, select the serial (COM) port on the
computer that the receiver is connected to.
4. Click
Next.
The Operation Selection screen appears. The Operations list
shows all of the supported operations for the selected device. A
description of the selected operation is shown in the Description
field.
5. Select Configure Radio and then click
Next.