Contents Welcome ...........................................................................1 Device Hardware ..............................................................2 Unit Setup .........................................................................3 Working with Your Unit...................................................5 Settings on Your Unit .....................................................12 Connecting to the PC ......................................................14 Communication........
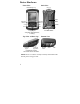
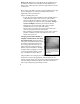
Device Hardware Front View Back View CF-Cap Removable CF-Cap Stylus holder Application Soft Keys* Application Soft Keys* Start Latches OK* Power Enter Navigation pad PowerBoot Module *Assignable application buttons; see Settings Top View- without Cap CF slot #2 Type I CF slot #1 Type I & II Bottom View External Power Serial USB CompactFlash card slots Some units do not have this feature NOTE: Be sure to read the warranty and safety information in this manual prior to using your unit.
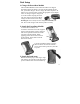
Unit Setup 1. Charge the PowerBoot Module The PowerBoot ModuleTM that contains the batteries is shipped detached from the unit. Before you insert the PowerBoot into the unit, you should charge it. The AC charger has outlet adapters to fit almost every electrical outlet. Connect the appropriate outlet adapter to the AC charger. Plug the charger into an electrical outlet and plug the barrel end of the charger into the PowerBoot. Charge at least 12 hours before using.
. Turning your unit on and off To turn your unit on, press and release the Power key on the lower left hand corner of the keypad. To turn your unit off, press and release the Power key again. One of the most convenient features of the unit is “instant on” and “instant off” (also known as “suspend/resume”). There is no waiting for the unit to boot up every time it is turned on. “Instant on” does not occur on the first boot-up.
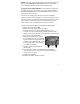
8. Using the CF Expansion Slots If your unit comes with CompactFlash (CF) slots, access to the CF slots is under the CF-CapTM. Unscrew the two screws on the top of the CF-Cap and slide the cap off the unit. Gently insert a CF card or device into one of the two CF slots. Do not force the card into the slot. The pins can be damaged if the card is not aligned correctly. Cards must be inserted with the front of the card facing toward the display side of the unit. CF slot #1 supports Type I & II cards.
Battery Life: Battery life is dependent upon the application and operating environment. The PowerBoot contains 3800 mAh of battery power which typically translates to approximately 15 hours of battery life. Heavy usage of the 802.11 wireless, frequent backlight usage, high power consumption CF cards and cold temperatures can all significantly reduce the battery life. Tips for extending battery life: - If your unit comes with embedded wireless capability (802.11 or Bluetooth) use ONLY when necessary.
NOTE: If the fully-charged unit is still connected to the charger, the status found in Settings / System / Power will report the battery power remaining as if the unit were still on battery power. Swapping the PowerBoot Module: The PowerBoot is designed to be quickly swapped in the field (if you have purchased additional PowerBoot Modules). If the current PowerBoot runs low, replace it and continue with your work.
Storage Memory Unlike many handheld computers which can lose data if they lose power, all your data is always stored in non-volatile persistent storage memory. Losing power will not impact saved data or configurations other than the real time clock. This means that you do not have to use a RAM backup utility to protect your data. However, you can lose data by accidentally deleting or overwriting it.
Pop-up menus You can use pop-up menus to easily select an action for an item. To access a pop-up menu, tap and hold the stylus on an item name. Touch and hold to display the pop-up menu. Lift the stylus and tap the action you want. Tap outside the menu to close it without performing an action. Speaker and microphone Your unit comes with an integrated speaker and a microphone. The speaker will allow you to hear a variety of media. To record, tap Start / Programs / Notes.
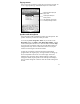
The Today Screen You can view the Today screen by tapping Start / Today. It will also display when you turn on your unit for the first time each day or after a configurable time of inactivity. (When some external applications are running, the Today Screen will not automatically be redisplayed.) At the top of the screen are status icons. Tap an icon to view details or change options. (These icons appear at the top of every screen on your unit, not only the Today screen.
The Keypad The screen shows the function of the two application softkeys Start key OK key Enter key Power key Power key features The Power key turns the unit on and off and performs a number of additional functions. Turn backlight on/off: To toggle the backlight on or off, hold down the power key for approximately 1 second. Once toggled off, the backlight will stay off until it is toggled back on. Screen taps and key presses will not cause it to turn on.
Hold down the Power key to display a countdown. Continue to hold down the Power key until it counts down to zero and beeps twice. Then immediately hold down the Start and OK keys simultaneously. After a few seconds, a screen will come up warning that if you continue, this operation will clear the persistent store including all user data, applications and settings. Follow the instructions on the screen ONLY if you want to completely clear your unit. Settings on Your Unit Tap Start / Settings.
Sounds and Notifications Tap Personal / Sounds & Notifications. You can change sound settings related to event notifications, buttons and screen taps. To change the volume, tap the speaker icon in the status bar of the Today screen. You can either change the volume or mute all sounds coming from the unit. Today Tap Personal / Today. This screen allows you to customize the Today screen. Choosing the “High Contrast” theme may improve display viewing ability while working outdoors.
Screen Tap System / Screen. The orientation can be changed to landscape for some programs that are not screen aware. To change the size of the text on the screen, tap Text Size to see more content or increase the readability in many programs. System Information Tap System / System Information. Unit information can be found here including firmware version, serial number, processor speed, RAM and Flash size, as well as the wireless configurations.
IMPORTANT: Do not connect the unit to the USB port on your PC until after you install ActiveSync. If you prematurely connect the unit to your PC, your PC USB drivers may get into a confused state and ActiveSync will not connect. If you suspect that something like this has happened, uninstall your PC’s ActiveSync, reboot your PC, reinstall ActiveSync and reconnect the unit. Use the Setup Wizard on the Companion CD to install ActiveSync onto the PC.
You will be presented with the Select Synchronization Settings window. Select the types of information that you want to synchronize and click Next. Wait a few moments while ActiveSync synchronizes the selected information types with the unit. Once connected over ActiveSync, you will see this window on your PC. Click the Explore icon to view the file structure on the unit. Troubleshooting ActiveSync connection problems 1. Confirm the unit is configured to communicate with the PC.
7. Tap Start/ Settings / Connections / USB to PC and try changing the check box Enable advanced network functionality. 802.11 (Wireless LAN) If your unit comes with embedded Wireless LAN (wLAN) capability, also known as 802.11 or Wi-Fi, your unit has the ability to wirelessly connect to the Internet and other data networks by connecting to available access points or hot spots. Once connected, you can browse the Internet or file shares on the local network. To find out if you have built-in 802.
through a corporate wireless network. A Work connection allows you to view file shares on a corporate network. If you chose to create an Internet connection, open Internet Explorer Mobile on the unit (Start / Internet Explorer) to browse the Internet. Some features supported by desktop PC browsers are not supported by Internet Explorer Mobile. For instance, there are no pop-up windows, some sites may not be accessible and you may be unable to send e-mail with file attachments.
name, password and domain in the next window. Tap Next. Choose the data types you want to synchronize and tap Finish. Troubleshooting 802.11 connection problems 1. Confirm that the unit has an appropriate IP address. Tap Start / Settings / Connections / Network Cards / Network Adapters / Marvell CF8385N Wireless Card to view the unit’s IP address. Confirm that the IP address is appropriate for the network to which you are trying to connect (for instance, 10.0.x.x or 192.168.x.x).
Bluetooth file transfer between two units It is possible to transfer files from one unit to another over a Bluetooth connection. Tap Start / Settings / Connections / Bluetooth, and confirm that Bluetooth is enabled on both units. Confirm that the unit that will receive the file is set to Make this device discoverable to other devices. Tap Start / Programs / File Explorer on the unit that will send the file. Browse to the file to be sent, and touch and hold on it. Choose Beam File from the menu that appears.
Once the Bluetooth partnership has been created, you can establish a Bluetooth ActiveSync connection by tapping Start / Programs / ActiveSync / Menu / Connect via Bluetooth. If you have difficulty connecting over Bluetooth ActiveSync, open ActiveSync on the PC and confirm that serial connections are enabled (they are disabled by default in ActiveSync 4.1). Confirm that the serial port being used by ActiveSync is the serial port which corresponds to the Bluetooth serial port connection profile on the PC.
Installing additional software on your unit The unit can run third-party software designed for Microsoft Windows Mobile 5.0. However, not all Windows Mobile thirdparty programs are screen-rotation-aware and therefore may not run properly in a portrait environment. To allow these programs to run correctly, the screen orientation can be changed in Settings / System / Screen. Most third-party software is installed by running a setup program on the PC while the unit is connected with ActiveSync.
Mechanical shock The unit is designed to resist damage for drops up to 1.22 meters (4.0 ft). However, you should protect the display from impact, pressure, or abrasive substances that can scratch it or crack it. The unit should not be dropped unnecessarily. Case Vent Hole The unit uses a GoreTex membrane at the vent hole to equalize the atmospheric pressure within the unit and to prevent dust, water, etc. from entering. This vent must remain clear of any obstruction.
Temperature Range The operational temperature range is from -22°F to +140° F (-30C to +60C). In addition, the unit can be stored at temperatures from -40°F to +158°F (-40C to +70C). Although the unit is designed to be rugged, do not leave it in direct sunlight or in a parked vehicle in the sunlight for extended periods. Batteries perform best at room temperature. The battery also has a very stable capacity as temperature rises above the human comfort level.
Repair Do not attempt to dismantle the unit for repair. There are no userserviceable parts inside. For service, use the contact details listed on the cover of this manual or contact your local dealer. Battery safety • Use only the battery supplied with your unit to power the unit. Use of other power sources could damage the unit, void your warranty and pose safety hazards. • Caution: Do not expose to temperatures above 60 C (140 °F) Do not short external contacts.
• AC chargers are designed for indoor use only. Avoid using the AC charger in wet areas. • Unplug the AC charger from power when not in use. • Do not short the output connector. Environmental Specifications TEMPERATURE Operation: -30 to +60 C (-22 to +140 °F) Storage: -40 to +70 C (-40 to +158 °F) WATER IP67, sealed against accidental immersion (submersible to 1 meter for 30 minutes) MIL-STD 810F, Method 512.4, Procedure 1 DROP MIL-STD-810F, Method 516.5, Procedure IV 26 drops @1.22 m (4 ft.
Hardware Specifications OS Windows Mobile 5.0 (Premium edition) CPU 200 MHz or 400 MHz Intel PXA255 XScale® processor RAM (VOLATILE) 64 MB SDRAM FLASH STORAGE MEMORY (NONVOLATILE) 128 or 256 MB of nonvolatile Flash storage DISPLAY 240 x 320 pixel (¼ VGA) color TFT with LED front light BATTERY LIFE 15 hours continuous room temperature operation with default settings and no embedded radios BATTERY CHARGING ~12 hours to full charge (w/802.
Troubleshooting How do I delete files? Open File Explorer and browse to the file to be deleted. Touch and hold on the file and then tap Delete from the menu that appears. Unlike desktop PCs, Windows Mobile does not support a Recycle Bin. Once you delete a file, it cannot be recovered. Is there anything I can do to make the display more viewable? The default backlight brightness is set to about 65 percent of the maximum brightness.
It is critically important that my battery doesn’t fail during a job. Do you have any suggestions? Consider carrying a fully charged spare battery in the field. The unit is designed so that battery replacement is quick and easy. I connected my unit to external power and nothing happened. Is something wrong with my battery? Turn the unit off while charging. If a battery is really low, it can take a while for the unit to respond when external power is applied.
I am trying to connect my unit to the Internet using a Webenabled cell phone, but it refuses to connect. Confirm the phone, cable, and login work by connecting to a PC. If your cellular provider is also providing you with Internet access, contact your provider for information about how to connect a Windows Mobile device. Typically, the provider may require certain modem initialization strings or APN (Access Point Name) strings.
Regulatory Information U.S.A. This device complies with Part 15 of the FCC Rules. Operation is subject to the following two conditions: (1) this device may not cause harmful interference, and (2) this device must accept any interference received, including interference that may cause undesired operation. This equipment has been tested and found to comply with the limits for a Class B digital device, pursuant to Part 15 of the FCC Rules.
Declaration of Conformity Europe According to ISO / IEC Guide 22 and EN 450 14 Manufacturer’s Name: Manufacturer’s Address: Tripod Data Systems, Inc. 345 SW Avery Ave.