
User's Manual


9
temperature range for charging the battery is between 0°C and
+45°C (+32°F and +113°F). If the battery temperature is outside
of this range, the battery will not charge.
Warning! Be sure to only use the AC adapter included with your
unit. Use of other adapters will void the product warranty.
Battery Status (right LED)
Color Function
Off
Solid yellow
Solid green
Blinking yellow
On battery power
Charging on AC adapter
Fully charged on AC adapter
Battery fault during charging (temperature
out of range, defective or missing battery)
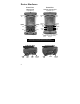
Changing the battery: The battery is designed to be quickly
changed (if you have additional batteries). The unit saves enough
power that if you swap the battery within approximately one
minute, it will not trigger a reset. If the saved power runs out
before the new battery is installed, the unit will reset. This will not
impact saved data, programs or configuration, however unsaved
data will be lost and the time will need to be reset.
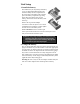
To change a battery, perform the following steps:
1. Close open applications and save data in case the battery
exchange takes too long.
2. Remove the hand strap from the unit.
3. Turn the unit off using
Replace Battery
(ensures that alarms
will not wake up the unit while changing the battery). Press
and hold the
Power
key and tap
Replace Battery
. See page
12 about the Power Menu.
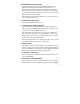
4. Use the supplied stylus or a small #1 Philips head screwdriver
to loosen the four screws in the battery door.
5. Remove the battery from the unit.
6. Quickly insert the replacement battery onto the unit.
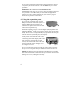
7. Place the battery door over the battery, with the flat side of
the battery door at the top of the unit. Use the stylus or
screwdriver to finger tighten the four screws.
8. Replace the hand strap.
9. Turn the unit ON to resume operation.