
User's Manual


13 ADL Vantage/ADL Vantage Pro/ADL Vantage 35
Setting up in the Field
1. Attach the antenna to the radio, either directly to the top of the radio or to an antenna cable.
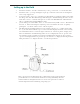
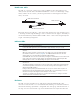
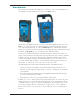
2. Attach the radio to your tripod using the tripod clip on the back of the radio. See the gure be
low for setup suggestions.
3. Connect the radio to the source of the data you will transmit, for example, a GPS receiver, using
the data/power cable. e ADL Vantage, ADL Vantage Pro and ADL Vantage 35 radios use the
same data connector – with the same pinouts - found on the PDL HPB radio. is makes the
radios compatible with existing HPB data cables.
4. Join the data/power cable’s SAE connector to the 12 Volt battery’s SAE connector. is will turn
the radio on. If the radio had previously been powered on and then o , turn it on again by
pressing the On/O button in the center of the front panel.
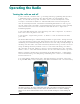
5. e ADL Vantage’s and ADL Vantage Pro’s user interface allows you to con gure and trouble
shoot your radio in the eld. e top row of the radio’s LCD displays the name of the currently
selected rmware function. Press the right or left buttons on the front panel to display other
functions available in the ADL Vantage. e bottom row displays the various options for the
selected function. e currently active setting is marked with an asterisk. To select another
option for the displayed function, press the up or down button to display the desired parameter.
en press Enter to recon gure the radio to use this new parameter.
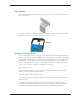
Note – If you operate the ADL Vantage Pro or ADL Vantage 35 in a fixed installation,
you should attach it to a wall with the wall mount accessory (P/N 84269). The wall
mount includes two small fans that move air over the rear of the radio to reduce its
internal temperature when transmitting at high duty cycle.