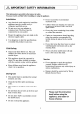
2\ IMPORTANT SAFETY INFORMATION “This information is provided in the interest of safety. You must read it carefully before installing or sing the appliance. installation « Any electrical work required to install the appliance must be carried out by 2 competent qualified person. » Do not use a two-way adapter or extension lead. The dryer must be connected o its own socket. « Erasure the appliance does not stand on the electrical supply cable.
CONTENTS FOR THE USER Page Important Safety information Installation Child Safety Erring Use Service Description of the Appliance Temperature Button ‘Time Selector Dial Programmer Chart Programmer Chart Hints & Tips on Drying Operating Loading the Laundry Selecting the programmer When drying is complete Maintenance and Cleaning . External Cleaning Cleaning the Lint Filter Cleaning the Door Something Not Working... Symptoms and Solutions Service and Spare Parts.. Customer Care ..
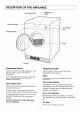
DESCRIPTION OF THE APPLIANCE Anti-crease button Dryer On indicator Air fete / Temperature Button Depress the button for the high temperature. Cross the button again to release it for the Jow temperature. Use the high temperature for drying toaster and nd the low temperature for drying s and delicate, Time Selector Dial The time selector dial is marked in minutes up t a maximum of 140 minutes, To select a drying time, o the dial clockwise until the time you require is in line with the marker.
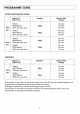
1 HINTS & TIPS ON DRYING Before placing articles of Laundry in your ramble dryer, check the care labels to ensure they are recommended for tumble drying Care labels yon may find en your laundry Suitable for womble drying 2] Tumble dry using full heat tumble dry using half hear B 0o not e dey A Do not overload the appliance Here is a list of the approximate weight of some common laundry items: Chest Pillowcase Tablecloth Table Napkin .. Kitchen Towel Linen Hand Towel .
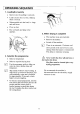
OPERATING SEQUENCE 1. Loading the laundry « Open the door by pooling it outwards + Load the items one at a time, shaking them out loosely. » Where possible mix the load, i.e. large and small items. » Close the door. Dy your hands and plug in the appliance, 3. When drying is complete » The machine stops automatically + Remove the laundry * Switch off the munchie There is an automatic 12 minute cool down period at the end of every cycle, during which the heater is switched off.
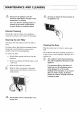
MAINTENANCE AND CLEANING AN Disconnect the appliance from the electricity supply before carrying out any maintenance or cleaning. Never use abrasive cleaning products or cleaning agents wick contain bleach, acetate, alcohol or mentholated spirits. External Cleaning Periodically wipe the outside of the appliance. using only water and 2 soft cloth. Dry thoroughly.
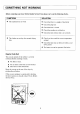
SOMETHING NOT WORKING Before contacting your local Trinity Bendix Service Force please carry aut the following checks.
SERVICE AND SPARE PARTS the event of your appliance requiring service, or if you wish to purchases spare parts please contact your local Trinity Bendix Service Fore Center by telephoning: 0870 5 929929 (UK) 0752 01 409 0770 (EIRE)} Your telephone call will be automatically transferred to your local Service Center. The addresses can be found on the pages headed Trinity Bendix Service Force Centers.
GUARANTEE CONDITIONS Standard guarantee conditions We, Trinity Bendix, undertake that i within 12 months of the date of the purchase this Trinity Bendix appliance or any park thereof is proved 1o be defective by reason only of faulty workmanship or materials, we will, at stir option repair or replace the same FREE OF CHARGE for labor, materials or carriage on condition that * The appliance has been correctly instated and used only on the electricity supply stated on the rating pale * The appliance has been
INSTALLATION INSTRUCTIONS Technical information Dimensions; Height 85 cm Width 595 cm Depth 5B em Maximum Dry Weight Loads: Cotton Gkg “Basseterre’ polymerization 6kg (For minim creasing) 2k Dedicates 2kg Electrical Ratings Voltage 220-240v Frequency Shiraz Power rating 2700w Site Preparation « The installation surface must be clean and A\ The plug must be accessible after ary. installation.
i ELECTRICAL CONNECTION Any electrical work required to install this appliance should he cursed out by @ quantified electrician or competent person, ‘WARNING THIS APPLIANCE MUST BE EARTHED Before switching on make sure the electricity supply voluble i the same as that indicated on the appliance rating plate. The rating plate is locate ct on the back panel of your tumble dryer. CHANGING A FUSE “Your womble dryer will be fitted with one of two plugs.
ADDITIONAL Door Reversal Your dryer has a reversible door. To change the direction of the opening Presaged as follows: (Fig (Fig (Fig 3) Open the door Undo resew (A} Remove switch striae (B) ad replace screw Remove hinge block resews (E) Remove door from hinge blocks Remove hings scows (F) and hinge (G) Refit to the apposite side as shown Refit lurch plate (D) and screws (C) Remove screw (H) at top of door and refit switch strike (B) as shown Fit door to hinge blocks and secure with screws (B} 13 Fig.
& Trinity Bendix, 55-77 High Street, Slough, Berkshire SL1 1DZ Consumer care telephone number... 08705 950 950 (UK) 0752 01 409 0770 (EIRE) MODEL NO. c € PART NO.