TECHNICAL DETAILS MODEL NO. SIEVE Voltage: 230/240 Volts AC 50Hz Wattage: Height: 800mm Width: 500mm Depth: 600mm This appliance complies with: European Council Directive 73/23/EEC. EMG Directive 89/336/EEC. CE Marking Directive 93/68/EEC.
CONTENTS Technical Details Contents Preface @ W Before Installation . During Operation After Use .. General Introduction .. 8 Rating Plate . Installation . . Reversible Main Oven Door . General Notes on Using Your Cooker . About Condensation and Steam Ventriloquy Indicator Eons .. Grill and Oven Furniture Getting to Know Your Cooker The Control Panel The Electronic Minute Minder .. The Sealed Hotplates Recommended Saucepans Hints and Tips .. PR Deep Fat Frying Preserving The Grill Lo Selecting the Grill .
CONTENTS Defrost Feature Uses of Defrost Feature . Selecting Defrost Things to Note .. Hints and Tips .. Care and CRAMMING Cleaning Materials . Cleaning the Sealed Hotplates and Hotplate Trims 24 Things To Note Cleaning the Quayside of the Cooker . Cleaning the Grill Deflector, Grill Pan, Grid and Oven Shelves Cleaning Inside the Grill/Oven Compartments Care of Stay clean Surfaces .
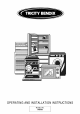
Dear Customer, Thank you for buying a Trinity Bendix cooker. With our 80 years experience in developing and manufacturing the very best in U.K. cookers, you can be assured that you have purchased a hard working, reliable, quality product. Trinity Bendix ockers comply with British Standard safety and performance requirements. They have been approved by BEAN (British Electronically Approvals Board) and are covered by a 12 month parts and labor guarantee.
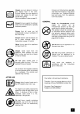
THESE WARNINGS ARE PROVIDED IN THE INTERESTS OF YOUR SAFETY. ENSURE THAT YOU UNDERSTAND THEM ALL BEFORE INSTALLING OR USING THE COOKER. PLEASE READ CAREFULLY BEFORE INSTALLATION This appliance is heavy and care must be taken when moving it. Ensure that all packaging, both inside and outside the appliance, has been removed before the appliance is used. Do not try to move the appliance by puling the door handles.
AFTER USE Always use oven gloves to remove and replace food in the oven. Similarly always use oven gloves to remove and replace the grill pan handle when grilling. Recommendations given on page 15. Ensure that you support the grill pan when it is in the withdrawn or partially withdrawn position. Ensure that all vents are left unobstructed to ensure ventilation of the oven cavity. Ensure that the anti-chit shelves are put in place correctly. Refer to instructions on page 17 and 20.
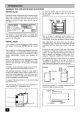
INTRODUCTION WARNING: THIS APPLIANCE MUST BE EARTHED RATING PLATE Record the model, product and serial numbers on the back cover of this instruction book, from the rating plate. This is situated on the sower front frame of the appliance and can be seen upon opening the top oven door.
It is important to ensure that the appliance is level after installation. Leveling feet are fitted to the front of the appliance to accommodate uneven floors. REVERSIBLE MAIN OVEN DOOR If you require the oven door to be hinged on the opposite side, you will need to contacts qualified Service Engineer. See page 29 for your nearest Service Center.
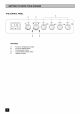
THE CONTROL PANEL e ot approx 66-5-06 FEATURES Fan Oven Temperature Control Fan Oven Indicator Neon Top Oven/Grill Control Top Over/Grill Indicator Neon Hotplate Controls mow
ELECTRONIC MINUTE MINDER 1= () DECREASE CONTROL & MINUTE MINDER SETTING BUTTON INCREASE CONTROL. COOK POT SYMBOL CLOCK SETTING SYMBOL { 1) MINUTE MINDER SYMBOL Fig.1 The electronic minute minder can indicate the time of day, operate as a minute minder and it can be used to time and switch off the main oven. 1. SET THE TIME OF DAY When the electricity supply is first switched ON, the display will flash 0.00. See Fig. 1. Fig.2 Press buttons (1) and (2} together. The display 9 wilt momentarily read 88.88.
2. THE MINUTE MINDER IMPORTANT The minute minder can be used to time a set cooking period. At the end of the cook time the minute minder will automatically switch off the main oven if in use. The minute minder gives an audible reminder at the end of any period of cooking up to 23 hours and 59 minutes. To set press button (1) and the display will read 0,00, see Fig. 6. Release button (1) and press and hold button {2).
BEFORE USING THE HOTPLATES FOR THE FIRST TIME Turn the control knob to a medium/high setting and allow the hotplate to heat, uncovered by a saucepan for 3-8 minutes. This hardens the protective coating on the hotplates, and makes it more resistant to normal use. A harmless smoke will be given off from the hotplates. 8,00 + @b-g-00 s o TOP EVEN B o sen orientate FRONT (EFT son T BR ox operate the hotplates turn the control knobs in either direction fo vary the heat setting.
DEEP FAT FRYING SPECIAL FRYING NOTE: For safety purposes when deep fat frying, fill the pan one-third full of oil, DO NOT cover the pan with a lid and DO NOT leave the pan unattended. In the unfortunate event of a fire, switch OFF at the electricity supply and cover the pan with a lid or darn cloth to assist in smothering the flames. DO NOT use water on the fire. Leave the pan to cool for at least 30 minutes before moving it.
THE GRILL CAUTION ACCESSIBLE PARTS MAY BECOME HOT WHEN THE GRILL IS IN USE. CHILDREN SHOULD BE KEPT AWAY. SELECTING THE GRILL ™ 100 s st Frosting operate the grill open the grill door and tum THE GRILL PAN AND HANDLE the top oven/grill control clockwise so that the control knob lines up with setting The grill pan is supplied with 2 removable handle. .
To correctly locate the grill pan on the shelf, ensure that the cut out on the underside of the handle bracket locates over the front bar of the shelf. ® Accompaniments such as tomatoes and mushrooms may be placed around the outer edges or underneath the grid when grilling meats. To check the progress of the food being grilled, the grill pan should be withdrawn on the shelf to tend the food during cooking, or the carrier shelf can be lifted away from the cooker and rested on a heat resistant work surface.
USES OF THE TOP OVEN The top oven is the smaller of the two ovens. It is heated by elements in the top and bottom of the oven. it is designed for cooking on one level and for smaller quantities of food. It gives especially good results if used to cook fruit cakes, sweet or savory flans or quiche. The top oven is also ideal for use as a warming compartment to warm dishes and keep food hot. Use a temperature setting of 80-100°C on the top oven control dial.
‘When cooking cakes, pastry, scones, bread, ac, place the tins or baking trays centrally on the shelf directly below the element. DO NOT place dishes directly note the oven base as it becomes very hot and damage may scour. The material and finish of the baking trays and dishes will affect the degree of base browning of the food. Enamelware, dark, heavy or non-stick utensils increase base browning. Shiny aluminum or polished steel trays reflect the heat away and give less base browning.
USES OF THE FAN OVEN PREHEATING The fan oven quickly reaches its temperature, so it is not usually necessary to preheat the oven. Without preheating, however, you may find you need to add an extra 5 10 minutes on the recommended cooking times. For recipes needing high temperatures, e.g. bread, pastries, scones, souffles, etc., best results are achieved if the oven is preheated first. COOKING TEMPERATURES Fan oven cooking generally requires lower temperatures than conventional cooking.
HINTS AND TIPS ® Do not place dishes or baking trays directly on the oven floor as it interferes with the oven air circulation and can lead to base burning; use the lower shelf position. However non critical dishes can be placed on the oven base when more space is required. & Arrange the shelves in the required positions before switching the oven ON, Shelves are numbered from the bottom upwards.
OVEN COOKING CHART The oven temperatures are intended as a guide only. It may be necessary to increase or decrease the temperatures by 10°C to suit individual preferences and requirements.
TING CHART ROASTING CHART INTERNAL TEMPERATURES Rare: Medium: Well Done: 70-80°C MEAT SECOND/FAN COOKING TIME WOVEN Beef 160-180°C 20-35 minutes per Gretzky {1lb} and 20-35 minutes over Beef, boned 160-180°C 25-35 minutes per Yegg (1lb) and 25-35 minutes over Mutton and Lamb 160-180°C 25-35 minutes per Gretzky {1lb} and 25-35 minutes over Pork and veal 160-180°C 30-40 minutes per Yegg {1lb} and 30-40 minutes over Ham 160-180°C 30-40 minutes per Gretzky (1lb} and 30-40 minutes over Chicken 160-180°C 15-20 mi
DEFROST FEATURE USES OF DEFROST FEATURE This fan oven function defrosts most foods faster than more conventional methods, #t is particularly suitable for delicate frozen foods which are to be served cold e.g. cream filled gateaux, cakes covered with icings or frostings, cheesecakes, biscuits, s Cones, elc. it is preferable to thaw fish, meat and poultry slowly in the fridge. However, this process can be accelerated by using the defrost function.
ALWAYS SWITCH OFF THE ELECTRICITY SUPPLY AT THE MAIN WALL SWITCH AND ALLOW THE COOKER TO COOL BEFORE CLEANING. CLEANING MATERIALS Before using any cleaning materials on your ocker, check that they are suitable and that their use is recommended by the manufacturer, Cleaners that contain bleach should NOT be used as they may deli the surface finishes, Harsh abrasives should also be avoided.
CLEANING THE GRILL DEFLECTOR, GRILL PAN, GRID AND OVEN SHELVES All removable parts, except the grill pan bandies can be washed in the dishwasher. The grill pan, grill deflector and oven shelves may be cleaned using a soap impregnated steel wool pad. The grill pan grid should be cleaned using hot soapy water, Soaking first in soapy water will make cleaning easier.
CLEANING BETWEEN THE FAN OVEN QUEER AND INNER COR GLASS The outer door glass is removable for cleaning. TO REMOVE THE QUEER GLASS 1. Open the oven door slightly to gain access to the two cross head screws on the top of the oven door. 2. Loosen the two screws using a overdrive screwdriver. 3. Hold the door glass securely in place with one hand before removing the screws completely with the other hand. 4. Using both hands, gently tilt the fop of the door glass towards you.
SOMETHING NOT WORKING? We strongly recommend that you carry out the following checks on your appliance before calling a Service Engineer. It may be that the problem is a simple one, which you can solve yourself without the expense of a service call. it our Service Engineer finds that the problem is listed below you will be charged for the call whether or not the appliance is under guarantee. The cooker does not work at all: * Check that the appliance has been wired in and is switched on at the wall.
HELP US TO HELP YOU Please determine your type of inquiry before writing or telephoning. SERVICE it is a recommendation by the manufacturer that annual servicing of the product is done by the manufacturers approved service organization.
GUARANTEE CONDITIONS Standard guarantee conditions We, Trinity Bendix, undertake that if within 12 months of the date of the purchase this Trinity Bendix appliance or any part thereof is proved to be defective by reason only of faulty workmanship or materials, we will, at our option repair or replace the same FREE OF CHARGE for labor, materials or carriage on condition that: « The appliance has been correctly installed and used only on the electricity supply stated on the rating plate.
RATING PLATE REFERENCE MAKE AND MODEL NO. PRODUCT NO. SERIAL NO. DATE OF PURCHASE IMPORTANT NOTICE In line with our continuing policy of research and development, we reserve the right to alter models and specifications without prior notice. This handbook is accurate at the date of printing, but will be superseded and should be disregarded if specifications or appearance are changed. L INA: e TRINITY BENDIX,PO BOX 47, NEWBURY,BERKSHIRE, REORG 5XL TELEPHONE (01635) 525542 MODEL NO. SIEVE C€ PART NO.