Operation Manual / Mode d’emploi / Bedienungsanleitung / Manual de uso SS-4200 with BPA-Free Components / avec des composants sans BPA / mit BPA-freien Komponenten / con componentes sin BPA SAVE THIS MANUAL-KEEP IT HANDY FOR QUICK REFERENCE / CONSERVEZ CE MODE D’EMPLOI GARDEZ-LE À PORTÉE DE MAIN POUR POUVOIR Y FAIRE RÉFÉRENCE / BEWAHREN SIE DIESE ANLEITUNG AUF – HALTEN SIE SIE ZUM SCHNELLEN NACHSCHLAGEN GRIFFBEREIT / GUARDE ESTE MANUAL EN UN LUGAR ACCESIBLE POR SI NECESITA CONSULTARLO READ INSTRUCTIONS
LANGUAGES EN • English............................................................................................................................................5 • Français.........................................................................................................................................27 • Deutsch..........................................................................................................................................49 • Español.....................................
WELCOME EN ® Congratulations and welcome to the Tribest family! Your purchase of the Tribest Solostar®4 represents a decision that you made to live a healthier lifestyle. As with every Tribest product, the Solostar 4’s sleek design and rich features are the result of smart choices that were made to achieve one thing: Making Healthy Living Easy. Due to its smart design, the Solostar 4 produces up to 33% more torque while using up to 20% less electricity.
TABLE OF CONTENTS EN • Welcome...................................................................................................................5 • Important Safety Instructions......................................................................................8 • Juicer Part Description...............................................................................................9 • Solostar 4 Assembly and Operation......................................................,...................
IMPORTANT SAFETY INSTRUCTIONS 1. Please read all instructions carefully. 2. Do not submerge Main Body in water or other liquids to protect against the risk of electric shock. 3. Do not touch the electric plug or outlet with wet hands to avoid electric shock. 4. While the Solostar 4 is in operation, avoid contact with its moving parts. 5. Unplug the Solostar 4 from the electrical outlet and be sure to switch the Solostar 4 off before assembling or disassembling and when not in use. 6.
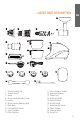
JUICER PART DESCRIPTION EN 5 1 2 3 4 9 8 7 6 10 11 12 14 13 15 16 18 1. Screen Locking Cap 2. Juicing Screen 3. Auger 4. Auger Housing/Feeding Chute 5. Funnel 6. Auger Housing Retaining Ring 7. Main Body 8. Homogenizing Screen 9. Juice Container 10. Pulp Container 17 20 19 11. Juice Container Strainer 12. Hand-held Strainer 13. Power Cord 14. Fettuccini Nozzle 15. Spagetti Nozzle 16. Juicing Nozzle 17. Homogenizing Nozzle 18. Plastic Plunger 19. Cleaning Brush 20.
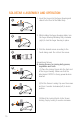
SOLOSTAR 4 ASSEMBLY AND OPERATION 1. Insert the Auger into the Auger Housing and attach to the front of the Main Body. 1 2. While holding the Auger Housing stable, turn the Auger Housing Retaining Ring clockwise (right) to lock the Auger Housing in place. 2 3. Pick the desired screen according to the foods being used. Do not turn the screen. 3 JUICING SCREEN A 1 UPPER HOMOGENIZING SCREEN Assemble as follows: A. Juicing Screen: for juicing leafy greens, vegetables and fruits.
B. Homogenizing Screen: for making rice cake/ breadstick, grinding (tomato, garlic, coffee beans, etc.), pasta noodles (spaghetti or fettuccini), or tofu. (1) Attach the Homogenizing Screen into the Auger Housing. Fasten and turn the Screen Locking Cap counter-clockwise to lock in position. EN B (2) Place the desired nozzle into the Screen Locking Cap and 2 (3) turn it counter- clockwise. • Use the Homogenizing Nozzle for homogenizing and grinding fresh garlic, onion, ginger or peppers.
NOTE: • Fibrous vegetables or fruits with seeds can be juiced by using the Homogenizing Nozzle instead of Juicing Nozzle. • Small amounts of pulp can be in juices depending on the produce used.
DISASSEMBLING AND CLEANING THE SOLOSTAR 4 1. (1) Unlock the Auger Housing Retaining Ring by turning it counter-clockwise and (2) pull the Auger Housing to separate from the Main Body. 1 EN 2 1 2. For easier cleaning, take the Auger Housing to your sink and disassemble the parts under running water. 2 3. (1) Separate the Screen Locking Cap and (2) Nozzle from the Solostar 4 by turning clockwise. 3 1 2 4. Pull to remove the Screen and wash thoroughly using the included Cleaning Brush. 4 5.
NOTE: • For easier disassembly, run the Reverse Switch on for 2-3 seconds, then turn off and unplug the Solostar 4 before disassembly. • Be sure to clean and properly store the parts of the Solostar 4 after every use. When the Screens are not cleaned after use, the residue can dry, blocking the holes from filtering and juicing. • Do not use hot water or any harsh chemicals such as bleach to clean the Solostar 4. It can result in the deformation of parts.
TROUBLESHOOTING EN SYMPTOM SOLUTION There is no power. • Make sure the electrical cord is properly put into the outlet. Loud Noise • Make sure the Solostar 4 is leveled on a flat surface. • Make sure that the unit corresponds to the voltage in your country. Difficulty in feeding foods into the machine • Produce needs to be cut into smaller lengthwise pieces. • The Solostar 4 may be operating in reverse.
WHEN YOU NEED SERVICE In the unlikely event that you do need service on your Solostar 4 Juice Extractor, or if it fails to function properly while within the warranty period (normal household operation only) - contact the nearest authorized Solostar 4 Service Center. PLEASE FOLLOW THE INSTRUCTIONS BELOW: If You Need Service: • Call to obtain a Return Authorization Number to send your Solostar 4 or part back to the service center. Explain the problem you are experiencing.
WARRANTY EN We warrant to you, the end-user customer who has properly registered after purchasing the Solostar 4 Juice Extractor with BPA Free components for valuable consideration, that the plastic parts and motor will be free from defects in materials and workmanship for a period of 15 years from the date of purchase. All other parts, including but not limited to the Juice and Pulp Containers, Plastic Plunger are not subject to any warranty.
WE MAKE NO OTHER EXPRESS OR IMPLIED WARRANTY OR CONDITION WHETHER WRITTEN OR ORAL TO THE EXTENT ALLOWED BY LOCAL LAW, ANY IMPLIED WARRANTY OF FITNESS FOR A PARTICULAR PURPOSE OR IMPLIED WARRANTY OR CONDITION OF MERCHANTABILITY IS LIMITED TO ONE (1) YEAR. In the event that such limitation or exclusion on the duration of an implied warranty is not allowed in the state or county wherein you reside, the above limitation or exclusion will not apply.
RECIPE INDEX EN JUICE AND DRINKS Citrus Blend................................................................................................................ 20 Apple Lemonade..........................................................................................................20 Wheatgrass Delight......................................................................................................20 Watermelon Quench......................................................................................
JUICE AND DRINKS Citrus Blend 2 small grapefruit (peeled and cut into 4 to 6 pieces) 3 medium sized oranges (peeled and cut into 4 pieces) ½ small lemon (peeled and cut into 2 pieces) ½ small lime (peeled and cut into 2 pieces) NOTE: 1) For sweeter taste use less lemon and lime. 2) It is not necessary to peel the lemon or lime. Method: Juice all together and enjoy.
EN Ambrosia Nectar 2 bunches of grapes 3 apples (Yellow Delicious, Granny Smith or Pippin - cut into 6 pieces) 1 kiwi (peeled and cut into 2 pieces) 1 slice honeydew (cut into cubes) 1 slice pineapple (cut into cubes) 1 whole lemon (peeled and cut into 4 pieces) ½ cup cranberries Method: 1. Alternate juicing grapes, kiwi pieces, melon cubes, pineapple cubes, apple pieces, and cranberries. 2. Juice lemon separately and add to taste. NOTE: Quantities of ingredients may be varied with good results.
Dr. Walkers Choice (#61) 10 oz. carrots (cut into 4 pieces) 6 oz. spinach (fresh) Method: 1. Juice spinach first. 2. Juice carrots. Green Tang 2 pineapple wedges (cut into smaller pieces) 1 sprig of mint 3 handfuls of wheatgrass ¼ lemon 1 slice of ginger for flavor Method: 1. Juice wheatgrass. 2. Juice the mint. 3. Juice lemon. 4. Juice pineapple cubes. NOTE: Pineapple wedge is a 1 round slice of whole pineapple cut into quarter pieces).
RYE RAW BREADSTICKS AND MOCHI (RICE CAKE) EN Rye Raw Breadsticks 2 cups of rye (soak overnight) ½ cup of sunflower seeds (soak overnight) 2 Tbsp. of caraway seed ½ tsp of sea salt Method (use homogenizing screen): 1. Mix all ingredients together in a bowl. 2. Feed into machine a little at a time. 3. Collect bread sticks as they emerge from the Homogenizing Screen. 4. Before drying, these sticks can be shaped into pretzels, braided together, etc. for a variety of shapes. 5.
PÂTÉ AND CROQUETTE Cashew-Curry Croquettes 2 cups of cashew 1 cup of sprouted wheat berries 3 Tbsp. of curry paste (available at Gourmet Food Shops) 1 tsp of vege-salt Method: 1. Put the cashews and sprouted wheat berries into the Feeding Chute 2. Add curry paste and vege-salt a little at a time while texturizing. 3. Collect the texturized mixture. 4. Mix together by hand or with a wooden spoon. 5.
DESSERT EN Cashew Poppy 1 cup sprouted wheat berries (soaked) ¼ cup of poppy seeds ¼ cup of sunflower seeds (soaked) 1 cup of cashew ½ tsp of vanilla 4 tsp of honey Method: 1. Soak wheat berries for 12 hours for the sprout tips to emerge. 2. Soak sunflower seeds for 6 hours. 3. Homogenize the wheat berries, sunflower seeds, cashews, and poppy seeds by inserting them into the feeding chute. 4. Collect the mixture into a bowl. 5. Add vanilla and honey and mix together. 6.
PRODUCT SPECIFICATIONS ITEM MODEL ELECTRICITY RATING ELECTRICAL POWER SIZE WEIGHT 26 HORIZONTAL SLOW MASTICATING JUICER SOLOSTAR 4 (SS-4200) USA: AC 120V~, 60Hz EUROPE/ASIA: AC 230V~, 50/60Hz USA: 135W EUROPE/ASIA: 120W 19” (W) x 10” (H) x 8” (D) 15.
BIENVENUE Félicitations et bienvenue dans la famille Tribest ! Votre achat de Solostar®4 de Tribest® représente une décision prise pour un mode de vie plus sain. Comme pour tout produit Tribest, le design élégant et les riches fonctionnalités du Solostar 4 sont des choix intelligents qui ont été faits pour atteindre un objectif ultime : Rendre la vie saine plus facile. Grâce à sa conception intelligente, le Solostar 4 produit jusqu’à 33% de couple en plus en utilisant 20% d’électricité en moins.
TABLE DES MATIÈRES • Bienvenue...............................................................................................................27 • Instructions de sécurité importantes.........................................................................30 • Description des pièces de la centrifugeuse...............................................................31 • Assemblage et fonctionnement de Solostar 4...........................................................32 • Démontage de Solostar 4.............
INSTRUCTIONS DE SÉCURITÉ IMPORTANTES 1. Lisez attentivement toutes les instructions. 2. Pour limiter les risques de décharge électrique, ne plongez pas la structure principale dans l’eau ou tout autre liquide. 3. Pour limiter les risques de décharge électrique, ne touchez pas la fiche ou prise électrique avec les mains mouillées. 4. Pendant que le Solostar 4 fonctionne, évitez tout contact avec les pièces en mouvement. 5.
PIÈCES DE LA CENTRIFUGEUSE SOLOSTAR 4 5 1 2 3 4 9 8 7 FR 6 10 11 12 14 18 13 15 16 17 20 19 1. Capuchon de verrouillage du tamis 2. Tamis à jus 3. Hélice 4. Boîtier de l’hélice / goulotte d’alimentation 5. Entonnoir 6. Bague de retenue du boîtier de l’hélice 7. Structure principale 8. Tamis d’homogénéisation 9. Récipient à jus 10.Récipient à pulpe 11. Crépine du récipient à jus 12. Crépine à main 13. Cordon d’alimentation 14. Embout à fettuccini 15. Embout à spaghetti 16.
ASSEMBLAGE ET FONCTIONNEMENT DE SOLOSTAR 4 1. Insérez l’hélice dans le boîtier de l’hélice et fixez-le devant la structure principale. 1 2. Tout en maintenant le boîtier de l’hélice stable, tournez la bague de retenue du boîtier de l’hélice dans le sens des aiguilles d’une montre (à droite) pour verrouiller le boîtier de l’hélice en place. 2 3. Choisissez le tamis souhaité, en fonction des aliments utilisés. Ne tournez pas le tamis.
B. Tamis d’homogénéisation : pour faire des gâteaux de riz / gressins, pour broyer (tomates, ail, grains de café, etc.), des pâtes et des nouilles (spaghetti ou fettuccini), ou du tofu. (1) Fixez le tamis d’homogénéisation au boîtier de l’hélice. Fixez et tournez le capuchon de verrouillage du tamis dans le sens inverse des aiguilles d’une montre pour le verrouiller en position.
REMARQUE: • Pour extrait du jus de légumes fibreux ou de fruits avec des graines utilisez l’embout d’homogénéisation au lieu de l’embout à jus • De petites quantités de pulpe peuvent rester dans les jus, selon le produit utilisé.
DÉMONTAGE ET NETTOYAGE DE SOLOSTAR 4 1. (1) Déverrouillez la bague de retenue du boîtier de l’hélice en la tournant dans le sens inverse des aiguilles d’une montre et (2) tirez sur le boîtier de l’hélice pour le séparer de la structure principale. 1 2 1 2. Pour un nettoyage facile, mettez le boîtier de l’hélice dans votre évier et démontez les pièces sous l’eau courante. 2 FR 3.
REMARQUE: • Pour un démontage plus facile, appuyez sur l’interrupteur de marche arrière pendant 2 à 3 secondes, puis arrêtez et débranchez le Solostar 4 avant de le démonter. • Assurez-vous de nettoyer et ranger correctement les pièces du Solostar 4 après chaque utilisation. Quand les tamis ne sont pas nettoyés après utilisation, les résidus peuvent sécher, bloquant les trous de filtrage et de jus.
DÉPANNAGE SYMPTÔME SOLUTION Il ne s’allume pas • Assurez-vous que le cordon d’alimentation est correctement branché à une prise. Grand bruit • Assurez-vous que le Solostar 4 est à niveau sur une surface plane. • Assurez-vous que l’appareil correspond au voltage de votre pays. Difficulté à mettre les aliments dans l’appareil. • Les produits doivent être coupés en plus petits morceaux dans le sens de la longueur. • Le Solostar 4 peut fonctionner en marche arrière. Le moteur s’est arrêté.
LORSQUE VOUS AVEZ BESOIN D’UN SERVICE Dans le cas, peu probable, où vous ayez besoin de faire réparer votre centrifugeuse Solostar 4, ou si elle cesse de fonctionner correctement pendant la période de garantie suite à une utilisation domestique normale, veuillez contacter le centre de services de garantie Solostar 4.
GARANTIE Nous garantissons à l’utilisateur final qui a procédé à l’enregistrement de sa centrifugeuse Solostar 4 avec des composants sans BPA après achat, que les pièces plastique et le moteur sont exempts de tout défaut matériel et de main d’œuvre pendant une période de 15 ans à compter de la date d’achat. Toutes les autres pièces, comprenant sans limitation, le récipient à jus et à pulpe, le poussoir en plastique ne sont sujets à aucune garantie.
ne respectant pas les instructions ; [b] l’utilisation de pièces ou de fournitures qui ne sont pas fournies ou autorisées par le fabricant ; [c] un entretien négligeant, incorrect ou inadéquat ; [d] un service effectué ou une tentative de service effectuée par une personne non autorisée ; [e] des dommages, accidentels ou autres, survenus au Solostar 4 qui ne sont pas directement causés par nous ou par le fabricant ; ou [f] des dommages causés par des abus, des altérations, une mauvaise utilisation, une util
SOMMAIRE DES RECETTES JUS ET BOISSONS Mélange d’agrumes..................,.................................................................................. 42 Limonade de pomme...................................................................................................42 Délice d’agropyre.........................................................................................................42 Boisson Désaltérante à la pastèque..........................................................................
JUS ET BOISSONS Mélange d’agrumes 2 petits pamplemousses (pelés et coupés en 4 à 6 morceaux) 3 oranges de taille moyenne (pelées et coupées en 4 morceaux) ½ petit citron (pelé et coupé en 2 morceaux) ½ petit citron vert (pelé et coupé en 2 morceaux) REMARQUE: 1) Pour un goût plus sucré, utilisez moins de citron et de citron vert. 2) Il n’est pas nécessaire d’éplucher le citron et le citron vert. Méthode: Passez le tout à la centrifugeuse et dégustez.
Nectar d’ambroisie 2 grappes de raisin 3 pommes (Yellow Delicious, Granny Smith ou Pippin, coupées en 6 morceaux) 1 kiwi (pelé et coupé en 2 morceaux) 1 tranche de melon vert d’Espagne (coupée en cubes) 1 tranche d’ananas (coupée en cubes) 1 citron entier (pelé et coupé en 4 morceaux) ½ tasse de canneberges Méthode: 1. Alternez l’extraction du jus de raisin, des morceaux de kiwi, des cubes de melon, des cubes d’ananas, des morceaux de pomme et des canneberges. 2.
Le choix du Dr Walker (N° 61) 280 g de carottes (coupées en 4 morceaux) 170 g d’épinards (frais) Méthode: 1. Passez d’abord les épinards à la centrifugeuse. 2. Passez les carottes à la centrifugeuse. Saveur verte 2 tranches d’ananas (coupées en petits morceaux) 1 brin de menthe 3 poignées d’agropyre ¼ de citron 1 tranche de gingembre pour la saveur Méthode: 1. Passez l’agropyre à la centrifugeuse. 2. Passez la menthe à la centrifugeuse. 3. Passez le citron à la centrifugeuse. 4.
GRESSIN AU SEIGLE CRU ET MOCHI (GÂTEAU DE RIZ) Gressin au seigle cru 2 tasses de seigle (trempées pendant la nuit) ½ tasse de graines de tournesol (trempées pendant la nuit) 2 c. à soupe de graines de Carvi ½ c. à café de sel de mer Méthode (avec le tamis d’homogénéisation): 1. Mélangez tous les ingrédients dans un bol 2. Introduisez-les dans la machine petit à petit 3. Recueillez les gressins lorsqu’ils émergent du tamis d’homogénéisation 4.
PÂTÉ ET CROQUETTE Croquettes de noix de cajou au curry 2 tasses de noix de cajou 1 tasse de germes de blé 3 c. à soupe de pâte de curry (disponible dans les épiceries fines) 1 c. à café de sel végétal Méthode: 1. Placez les noix de cajou et les germes de blé dans la goulotte d’alimentation 2. Ajoutez la pâte de curry et le sel végétal petit à petit pour donner de la texture. 3. Récoltez le mélange. 4. Mélangez à la main ou avec une cuillère en bois. 5.
DESSERTS Coquelicot à la noix de cajou 1 tasse de germes de blé (trempés) ¼ de tasse de graines de coquelicot ¼ de tasse de graines de tournesol (trempées) 1 tasse de noix de cajou ½ c. à café de vanille 4 c. à café de miel Méthode: 1. Laissez tremper les germes de blé pendant 12 heures jusqu’à ce que les extrémités des germes émergent. 2. Laissez tremper les graines de tournesol pendant 6 heures. 3.
CARACTÉRISTIQUES DU PRODUIT ARTICLE MODÈLE RÉGIME ÉLECTRIQUE NOMINAL COURANT ÉLECTRIQUE TAILLE POIDS 48 CENTRIFUGEUSE À MASTICATION LENTE HORIZONTALE SOLOSTAR 4 (SS-4200) ÉTATS-UNIS: 120V CA~, 60Hz EUROPE/ASIE: 230V CA~, 50/60Hz ÉTATS-UNIS: 135W EUROPE/ASIE: 120W 19 (L) x 10 (P) x 8 (H) po 7 kg (15.
HERZLICH WILLKOMMEN Herzlichen Glückwunsch und herzlich willkommen bei der Tribest-Familie! Der Kauf des Tribest® Solostar®4 repräsentiert die von Ihnen getroffene Entscheidung, einen gesünderen Lebensstil zu führen. Wie bei jedem Tribest-Produkt ist das schnittige Design und die reichhaltige Ausstattung der Solostar 4 das Resultat kluger Entscheidungen, die nur eines erreichen sollten: Gesundes Leben leichtzumachen.
INHALTSVERZEICHNIS • Herzlich willkommen................................................................................................49 • Wichtige Sicherheitshinweise....................................................................................52 • Saftpresse Teilebeschreibung...................................................................................53 • Zusammenbau und Bedienung der SoloStar 4..........................................................54 • Auseinanderbauen der SoloStar 4....
WICHTIGE SICHERHEITSHINWEISE 1. Bitte lesen Sie alle Anweisungen sorgfältig durch. 2. Tauchen Sie den Hauptkörper nie in Wasser oder andere Flüssigkeiten ein, um sich vor der Gefahr eines Stromschlags zu schützen. 3. Berühren Sie den Netzstecker oder die Steckdose nicht mit nassen Händen, um einen Stromschlag zu vermeiden. 4. Solange die Solostar 4 in Betrieb ist, vermeiden Sie den Kontakt mit ihren beweglichen Teilen. 5.
TEILE DER SOLOSTAR 4 -SAFTPRESSE 5 1 2 3 4 9 8 7 6 10 11 12 14 13 15 16 17 20 DE 18 19 1. Sieb-Verschlusskappe 2. Entsaftungssieb 3. Schneckenpresse 4. Schneckengehäuse/Einfüllschacht 5. Einfülltrichter 6. Sicherungsring für Schneckengehäuse 7. Hauptteil 8. Püriereinsatz 9. Saftbehälter 10.Tresterbehälter 11. Siebkorb für Saftbehälter 12. Handsiebkorb 13. Stromkabel 14. Fettuccine-Aufsatz 15. Spaghetti-Aufsatz 16. Aufsatz zum Entsaften 17. Pürierdüse 18. Kunststoff-Stopfer 19.
SOLOSTAR 4 ZUSAMMENBAU UND BEDIENUNG 1. Legen Sie die Schneckenpresse in das Schneckengehäuse ein, und bringen Sie es an der Vorderseite des Hauptkörpers an. 1 2. Während Sie das Schneckengehäuse in stabiler Lage halten, drehen Sie den Sicherungsring des Schneckengehäuses im Uhrzeigersinn (rechts), um das Gehäuse zu arretieren. 2 3. Wählen Sie das gewünschte Sieb je nach den verwendeten Nahrungsmitteln aus. Drehen Sie das Sieb nicht.
B. Püriereinsatz: zum Herstellen von Reiskuchen/ Brotstangen, Mahlen/Zerkleinern (Tomaten, Knoblauch, Kaffeebohnen usw.), Nudelteig (Spaghetti oder Fettuccine) oder Tofu. . (1) Bringen Sie den Püriereinsatz im Schneckengehäuse B 1 an. Befestigen und drehen Sie die Sieb-Verschlusskappe gegen de Uhrzeigersinn, um sie festzuziehen. (2) Setzen Sie die gewünschte Düse in die Sieb-Verschlusskappe ein und 2 (3) drehen Sie sie gegen den Uhrzeigersinn.
HINWEIS: • Faserige Gemüse oder samenhaltige Früchte können unter Verwendung der Pürierdüse anstatt des Aufsatzes zum Entsaften entsaftet werden. • Je nach dem verwendeten Obst und Gemüse kann ein wenig Fruchtfleisch in den Säften enthalten sein.
AUSEINANDERBAUEN UND REINIGUNG DER SOLOSTAR 4 1. (1) Lösen Sie den Sicherungsring des Schneckengehäuses, indem Sie ihn gegen den Uhrzeigersinn drehen und (2) das Schneckengehäuse vom Hauptkörper trennen. 1 1 2. Zur leichteren Reinigung nehmen Sie das Schneckengehäuse zu Ihrem Spülbecken und bauen Sie die Teile unter fließendem Wasser auseinander. 2 3. (1) Lösen Sie die Sieb-Verschlusskappe und (2) die Düse von der Solostar 4, indem Sie sie im Uhrzeigersinn drehen. 3 4.
HINWEIS: • Zum leichteren Auseinanderbauen schalten Sie den Rückwärtsschalter für 2-3 Sekunden ein, schalten dann aus und ziehen den Stecker heraus, bevor Sie die Solostar 4 auseinanderbauen. • Stellen Sie sicher, die Teile der Solostar 4 nach jedem Gebrauch zu reinigen und ordnungsgemäß aufzubewahren. Wenn die Siebe nach Gebrauch nicht gereinigt werden, können die Rückstände trocknen und die Löcher am Filtern und Entsaften hindern.
PROBLEMBEHEBUNG SYMPTOM LÖSUNG Kein Strom vorhanden • Stellen Sie sicher, dass das Stromkabel richtig in der Steckdose eingesteckt ist.. Lautes Geräusch • Stellen Sie sicher, dass die Solostar 4 auf einer ebenen und glatten Oberfläche steht. • Stellen Sie sicher, dass das Gerät der Stromspan nung in Ihrem Land entspricht. Schwierigkeiten, dem Gerät Nahrungsmittel zuzuführen • Das Obst und Gemüse muss der Länge nach in kleinere Stücke geschnitten werden. • Die Solostar 4 wird u. U.
WENN SIE SERVICE BENÖTIGEN Im unwahrscheinlichen Fall, dass Sie für Ihre Solostar 4 Saftpresse Service benötigen oder sie nicht ordnungsgemäß funktioniert, während sie noch im Garantietzeitraum ist (nur bei normalem Haushaltsbetrieb) – wenden Sie sich an das nächstgelegen Solostar 4 ServiceCenter. BITTE BEFOLGEN SIE DIE NACHSTEHENDEN ANWEISUNGEN: Wenn Sie Service benötigen: • Rufen Sie an, um eine Rücksendenummer zu erhalten, um Ihre Solostar 4 oder ein Zubehörteil an das Service-Center zurückzuschicken.
GARANTIE Wir garantieren Ihnen als Endkunden, der sich nach dem Kauf des Solostar 4 Entsafters mit BPA-freien Komponenten gegen eine entgeltliche Gegenleistung ordnungsgemäß registriert hat, dass die Kunststoffteile und der Motor für einen Zeitraum von 15 Jahren ab dem Kaufdatum frei von Material- und Verarbeitungsfehlern sind. Alle anderen Teile, einschließlich, aber nicht beschränkt auf Saft- und Tresterbehälter und KunststoffStopfer, unterliegen nicht der Garantie.
die von uns nicht vorgesehen oder zugelassen sind, [c] fahrlässiger, unsachgemäßer oder unzureichender Wartung, [d] von nicht autorisiertem Servicepersonal durchgeführtem oder versuchtem Service, [e] Schäden, die zufällig oder anderweitig an der Solostar 4 entstanden sind und die nicht direkt von uns oder vom Hersteller verursacht wurden sowie [f] Schäden aufgrund von Missbrauch, Manipulation, falscher Anwendung, kommerziellem Einsatz oder nicht autorisierten Änderungen an der Solostar 4.
REZEPTÜBERSICHT SÄFTE UND GETRÄNKE Zitrus-Mix................................................................................................................... 64 Apfel-Limonade............................................................................................................64 Weizengras-Delight......................................................................................................64 Wassermelonen-Durstlöscher..........................................................................
SÄFTE UND GETRÄNKE Zitrus-Mix 2 kleine Grapefruits (schälen und in 4-6 Stücke schneiden) 3 mittelgroße Orangen (schälen und in 4 Stücke schneiden) ½ kleine Zitrone (schälen und in 2 Stücke schneiden) ½ kleine Limette (schälen und in 2 Stücke schneiden) HINWEIS: 1) Für einen süßeren Geschmack weniger Zitrone und Limette nehmen. 2) Die Zitrone oder Limette muss nicht geschält werden. Methode: Alles zusammen entsaften und genießen.
Ambrosia-Nektar 2 Trauben Weintrauben 3 Äpfel (Yellow Delicious, Granny Smith oder Pippin - in 6 Stücke schneiden) 1 Kiwi (schälen und in 2 Stücke schneiden) 1 Scheibe Honigmelone (in Würfel schneiden) 1 Scheibe Ananas (in Würfel schneiden) 1 ganze Zitrone (schälen und in 4 Stücke schneiden) 50 g Preiselbeeren Methode: 1. Abwechselnd Trauben, Kiwistücke, Melonenwürfel, Ananaswürfel, Apfelstücke und Preiselbeeren entsaften. 2. Zitrone separat entsaften und den Saft nach Geschmack hinzufügen.
Dr. Walkers Wahl (Nr. 61) 280 g Karotten (in 4 Stücke schneiden) 170 g Spinat (frisch) Methode: 1. Zuerst den Spinat entsaften. 2. Karotten entsaften. Green Tang 2 Ananasviertel (in kleinere Stücke schneiden) 1 Zweig Minze 3 Handvoll Weizengras ¼ Zitrone 1 Scheibe Ingwer für den Geschmack Methode: 1. Weizengras entsaften. 2. Minze entsaften. 3. Zitrone entsaften. 4. Die Ananasviertel entsaften. HINWEIS: Ein Ananasviertel ist eine runde Scheibe einer ganzen Ananas, die in Viertelstücke geschnitten wird.
ROGGEN-ROHKOST-BROTSTANGEN UND MOCHI (REISKUCHEN) Roggen-Rohkost-Brotstangen 340 g Roggen (über Nacht einweichen) 70 g Sonnenblumenkerne (über Nacht einweichen) 2 Esslöffel Kümmelsamen ½ Teelöffel Meersalz Methode (Püriereinsatz verwenden): 1. Alle Zutaten in einer Schüssel mischen 2. Zutaten langsam in das Gerät geben 3. Sammeln Sie die Brotstangen ein, wenn sie aus dem Püriereinsatz herauskommen 4. Vor dem Trocknen können diese Stangen, zu Brezeln oder miteinander verflochten usw.
PÂTÉ UND KROKETTEN Cashew-Curry-Kroketten 340 g Cashewnüsse 110 g Weizensprossen 3 Esslöffel Currypaste (erhältlich in Delikatessengeschäften) 1 Teelöffel Gemüsesalz Methode: 1. Cashewnüsse und Weizenkeime in den Einfüllschacht geben 2. Currypaste und Gemüsesalz während der Texturierung langsam hinzugeben. 3. Die pürierte Mischung entnehmen. 4. Per Hand oder mit einem Holzlöffel vermischen. 5.
NACHTISCH Cashew-Mohnsamen 110 g Weizensprossen (eingeweicht) 30 g Mohnsamen 35 g Sonnenblumenkerne (eingeweicht) 170 g Cashewnüsse ½ Teelöffel Vanille 4 Teelöffel Honig Methode: 1. Weizensprossen 12 Stunden lang einweichen, bis die Sprossenspitzen aufgehen. 2. Sonnenblumenkerne 6 Stunden lang einweichen. 3. Weizensprossen, Sonnenblumenkerne, Cashew-Kerne und Mohnsamen in den Einfül lschacht geben und pürieren. 4. Mischung in einer Schüssel auffangen. 5. Vanille und Honig hinzufügen und mischen. 6.
PRODUKTSPEZIFIKATIONEN ARTIKEL MODELL LEISTUNGSANGABEN ELEKTRISCHE LEISTUNG GRÖSSE GEWICHT 70 HORIZONTALE NICHT ZENTRIFUGIERENDE SAFTPRESSE SOLOSTAR 4 (SS-4200) USA: 120V, 60Hz Wechselstrom EUROPE/ASIA: 230V, 50/60Hz Wechselstrom USA: 135W EUROPE/ASIA: 120W 482 (B) x 254 (H) x 203 (T) mm 7 kg
BIENVENIDO ¡Enhorabuena y bienvenido/a a la familia Tribest! Al comprar una Tribest® Solostar®4, está reafirmando su intención de adoptar un estilo de vida más saludable. Como con todos los productos Tribest, el elegante diseño de Solostar 4 y todas sus características son resultado de decisiones estudiadas para ayudarle a lograr un objetivo: que le resulte más fácil mantener un estilo de vida saludable.
ÍNDICE • Bienvenida..............................................................................................................71 • Instrucciones de seguridad importantes....................................................................74 • Descripción de piezas de la licuadora.......................................................................75 • Funcionamiento y montaje de Solostar 4..................................................................76 • Desmontaje de Solostar 4.....................
INSTRUCCIONES DE SEGURIDAD IMPORTANTES 1. Lea todas las instrucciones atentamente. 2. Para evitar el riesgo de descargas eléctricas, no sumerja la estructura principal en agua ni en otro líquido. 3. Para evitar una descarga eléctrica, no toque el enchufe ni la toma de corriente con las manos húmedas. 4. Cuando Solostar 4 esté funcionando, no toque las piezas móviles. 5. Desenchufe Solostar 4 de la toma de corriente y asegúrese de apagar Solostar 4 antes de montarla o desmontarla y cuando no la esté usando.
PIEZAS DE LA LICUADORA SOLOSTAR 4 5 1 2 3 4 9 8 7 6 10 11 12 14 18 13 15 16 17 20 19 1. Tapa de bloqueo del tamiz 2. Tamiz de licuado 3. Eje 4. Cubierta del eje/tubo de alimentación 5. Embudo 6. Anillo de retención de la cubierta del eje 7. Estructura principal 8. Tamiz de homogeneización 9. Depósito de zumo 10. Depósito de pulpa 11. Colador del depósito de zumo 12. Colador manual 13. Cable de alimentación 14. Boquilla para fettuccini 15. Boquilla para spaghetti 16.
MONTAJE Y FUNCIONAMIENTO DE SOLOSTAR 4 1. Inserte el eje en su cubierta y fíjelo delante de la estructura principal. 1 2. Mientras sujeta la cubierta del eje, gire el anillo de retención en el sentido de las agujas del reloj para bloquear la cubierta en su posición. 2 3. Seleccione el tamiz deseado en función de los alimentos que vaya a usar. No gire el tamiz. 3 JUICING SCREEN A 1 UPPER 2 3 76 HOMOGENIZING SCREEN Monte de la siguiente forma: A.
B. Tamiz de homogeneización: para hacer tortas de arroz/palitos de pan, moler (tomate, ajo, granos de café, etc.), fideos de pasta (spaghetti o fettuccini) o tofu. (1) Ponga el tamiz de homogeneización en la cubierta del eje. Sujete y gire la tapa de bloqueo del tamiz en el sentido contrario a las agujas del reloj para bloquearla en su posición. B 1 (2) Coloque la boquilla en la tapa de bloqueo del tamiz y 2 (3) gírela en el sentido contrario a las agujas del reloj.
NOTA: • Las frutas con semillas o los vegetales con fibras se pueden licuar con la boquilla de homogeneización en lugar de con la boquilla de licuado. • Según el producto utilizado, podrían quedar pequeñas cantidades de pulpa en los zumos.
DESMONTAJE Y MONTAJE DE SOLOSTAR 4 1. (1) Suelte el anillo de retención de la cubierta del eje girándolo en el sentido contrario de las agujas del reloj y (2) tire de la cubierta para separarla de la estructura principal. 1 2. Para facilitar la limpieza, lleve la cubierta al fregadero y desmonte las piezas bajo el grifo abierto. 2 3. (1) Separe la tapa de bloqueo del tamiz y (2) la boquilla de la licuadora Solostar 4 girando en el sentido de las agujas del reloj. 3 2 1 1 2 4.
NOTA: • Para facilitar el desmontaje, encienda el interruptor Reverse (Invertir) durante 2 o 3 segundos, a continuación, apague y desenchufe la licuadora Solostar 4 antes de desmontarla. • Asegúrese de limpiar y guardar bien las piezas de la licuadora Solostar 4 después de cada uso. Si los tamices no se limpian después de usarlos, los residuos podrían secarse, lo que atascaría los orificios de filtrado y licuado.
RESOLUCIÓN DE PROBLEMAS SÍNTOMA SOLUCIÓN No se enciende. • Asegúrese de que el cable eléctrico está correcta mente enchufado a la toma de corriente. Ruido alto • Asegúrese de que la licuadora Solostar 4 está nivelada sobre una superficie plana. • Asegúrese de que la unidad se corresponde con el voltaje de su país. • El producto tiene que cortarse en trozos más Es difícil introducir los alimentos en pequeños. la máquina. • La licuadora Solostar 4 podría estar girando en sentido inverso.
SI NECESITA ASISTENCIA En el caso improbable de que necesite reparar la licuadora Solostar 4, o si presenta un fallo de funcionamiento dentro del período de garantía (sólo si se ha usado en el ámbito doméstico), póngase en contacto con el centro de servicio autorizado de Solostar 4. SIGA ESTAS INSTRUCCIONES: Si necesita asistencia técnica: • Llame para obtener un número de autorización de devolución para enviar su Solostar 4 o alguna pieza al centro de servicio. Explique el problema.
GARANTÍA Garantizamos al cliente y usuario final que se ha registrado correctamente tras comprar la licuadora Solostar 4 con componentes libres de BPA, que las piezas de plástico y el motor no tendrán desperfectos de materiales ni mano de obra durante un período de 15 años a partir de la fecha de la compra. El resto de piezas, entre otras, los depósitos de zumo y pulpa, el compactador de plástico, no está cubierto por ninguna garantía.
EN LA MEDIDA PERMITIDA POR LA LEY LOCAL, NO REALIZAMOS NINGUNA GARANTÍA EXPRESA NI IMPLÍCITA, POR ESCRITO O VERBAL; CUALQUIER GARANTÍA IMPLÍCITA ACERCA DE LA ADECUACIÓN PARA UN USO CONCRETO O GARANTÍA O CONDICIÓN IMPLÍCITA DE MERCANTILIDAD ESTÁ LIMITADA A UN (1) AÑO. En el caso de que tal limitación o exclusión de la duración de una garantía implícita no se permita en el estado o condado en el que reside, no se aplicará la condición anterior.
ÍNDICE DE RECETAS ZUMOS Y BEBIDAS Mezcla de frutas cítricas.............................................................................................. 86 Limonada de manzanas................................................................................................86 Delicia de pasto de trigo...............................................................................................86 Sandía refrescante...............................................................................................
ZUMOS Y BEBIDAS Mezcla de frutas cítricas 2 pomelos pequeños (pelados y cortados en 4 a 6 trozos) 3 naranjas de tamaño mediano (peladas y cortadas en 4 trozos) ½ limón pequeño (pelado y cortado en 2 trozos) ½ lima pequeña (pelada y cortada en 2 trozos) NOTE: 1) Para un sabor más dulce, utilice menos limón y lima. 2) No es necesario pelar el limón ni la lima. Método: Extraiga el zumo de todo junto y disfrute.
Néctar de ambrosía 2 manojos de uvas 3 manzanas (Yellow Delicious, Granny Smith o reinetas, cortadas en 6 trozos) 1 kiwi (pelado y cortado en 2 trozos) 1 rodaja de melón (cortada en dados) 1 rodaja de piña (cortada en dados) 1 limón entero (pelado y cortado en 4 trozos) ½ taza de arándanos rojos Método: 1. Vaya alternando la extracción de zumo de uvas, trozos de kiwi, dados de melón, dados de piña, trozos de manzana y arándanos rojos. 2. Exprima el limón por separado y agregue al gusto.
El preferido del Dr. Walker (n.º 61) 280 gramos de zanahorias (cortar en 4 trozos) 170 gramos de espinacas (frescas) Método: 1. Licúe las espinacas primero. 2. Licúe las zanahorias. Verde con sabor fuerte 2 cuñas de piña (cortar en trozos más pequeños) 1 ramito de menta 3 manojos de pasto de trigo ¼ limón 1 rodaja de jengibre para más sabor Método: 1. Licúe el pasto de trigo. 2. Exprima el zumo de la menta. 3. Exprima el limón. 4. Licúe los dados de piña.
PALITOS DE PAN DE CENTENO Y MOCHI (TORTAS DE ARROZ) Palitos crudos de centeno 2 tazas de centeno (dejar en remojo durante la noche) ½ taza de semillas de girasol (dejar en remojo durante la noche) 2 cucharadas de comino en semilla ½ cucharadita de sal marina Método (usar el tamiz de homogeneización): 1. Mezcle todos los ingredientes en un bol 2. Introduzca poco a poco en la licuadora 3. Recoja los palitos conforme salen del tamiz de homogeneización 4.
PATÉS Y CROQUETAS Croquetas de anacardo al curry 2 tazas de anacardos 1 taza de brotes de grano de trigo 3 cucharadas de pasta de curry (disponible en tiendas de alimentos gourmet) 1 cucharadita de sal vegetal Método: 1. Ponga los anacardos y brotes de grano de trigo en el tubo de alimentación 2. Agregue la pasta de curry y la sal vegetal poco a poco mientras se texturiza. 3. Recoja la mezcla texturizada. 4. Mezcle a mano o con una cuchara de madera. 5.
POSTRES Amapola y anacardo 1 taza de brotes de granos de trigo (hidratados) ¼ taza de semillas de amapola ½ taza de semillas de girasol (hidratadas) 1 taza de anacardos ½ cucharadita de vainilla 4 cucharaditas de miel Método: 1. Deje en remojo los granos de trigo durante 12 horas para que emerjan los brotes. 2. Deje en remojo las semillas de girasol durante 6 horas. 3. Homogeneice los granos de trigo, las semillas de girasol, el anacardo y las semillas de amapola introduciéndolos en el tubo de alimentación.
ESPECIFICACIONES DEL PRODUCTO ARTÍCULO MODELO TENSIÓN ELÉCTRICA NOMINAL ALIMENTACIÓN ELÉCTRICA DIMENSIONES PESO 92 LICUADORA TRITURADORA DE PROCESO LENTO SOLOSTAR 4 (SS-4200) EE. UU.
NOTES ES 93
NOTES 94
NOTES © 2015 Tribest Corp. No copies, transmission, or translation into other languages of this manual by any means without written permission of Tribest Corp. is allowed. All rights are reserved.
Tribest Corporation P.O. Box 4089, Cerritos, CA 90703 toll free: 888-254-7336 | fax: 714-879-7140 www.tribest.com | service@tribest.com ©2015 Tribest Corporation v.