Cascade Multiple Boiler Distribution Manifold and Hydronic Junction for PRESTIGE Solo 250 or PRESTIGE Solo 399 Boilers WARNING NOTICE Revised 3/25/13 This document is intended to be used by a qualified heating contractor or service technician. Read all instructions within this document, the PRESTIGE Boiler Installation and Maintenance Manual and Prestige Vent Supplement before proceeding with the installation.
Table of Contents PRODUCT & SAFETY INFORMATION Definitions . . . . . . . . . . . . . . . . . . . . . . . . . . . . . . . . . . . . . . . . . . . . . . . . . . . . . . . 1 Product and Safety Information . . . . . . . . . . . . . . . . . . . . . . . . . . . . . . . . . . . . . . . 1 SECTION I – PRE-INSTALLATION ITEMS Code Compliance. . . . . . . . . . . . . . . . . . . . . . . . . . . . . . . . . . . . . . . . . . . . . . . . . . . 2 Determine Location . . . . . . . . . . . . . . . . . . . . . . . . . . . . .
Table of Contents SECTION VIII – WIRING Power Supply . . . . . . . . . . . . . . . . . . . . . . . . . . . . . . . . . . . . . . . . . . . . . . . . . . . . . 37 Multiple Boiler Control . . . . . . . . . . . . . . . . . . . . . . . . . . . . . . . . . . . . . . . . . . . . . 37 CSD-1 P/S or R/R with Valves Kit . . . . . . . . . . . . . . . . . . . . . . . . . . . . . . . . . . . . . 37 CSD-1 R/R . . . . . . . . . . . . . . . . . . . . . . . . . . . . . . . . . . . . . . . . . . . . . . . . . . . . . . .
Product & Safety Information Definitions The following terms are used to bring attention to the presence of potential hazards or important information concerning the product. BEST PRACTICE WARNING Indicates a hazardous situation which, if not avoided, could result in death, serious injury or substantial property damage. Indicates recommendations made by Triangle Tube for the installers which will help to ensure optimum operation and longevity of the equipment.
Pre-Installation Items SECTION I – PRE-INSTALLATION ITEMS Consult local codes for any additional clearance requirements. Code Compliance Cascade Kit Components Installation of the Cascade must comply with local codes and requirements and with the latest edition of National Fuel Gas Code NFPA 54, ANSI Z223.1 for installations in the U.S. For Installations in Canada, the installations must comply with latest edition of CAN/CSA B149.1.
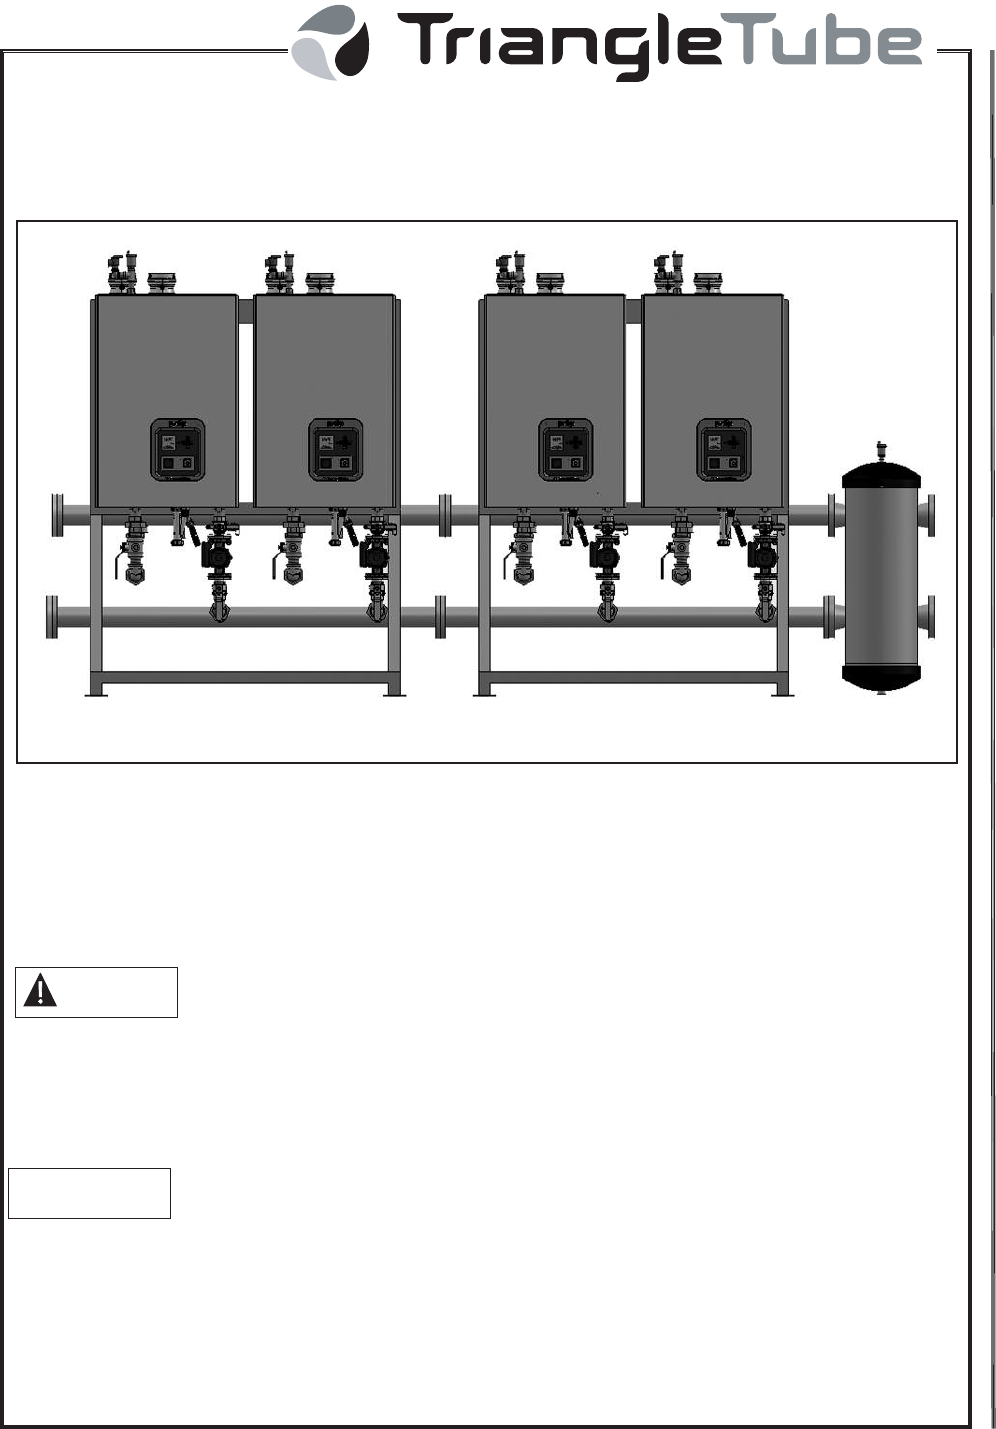
3 See Figure 2, Page 4 See Figure 3, Page 4 5 Fig.
Pre-Installation Items 15 5 24 11 25 14 5 12 13 23 Fig. 2: Cascade Kit Components for Solo 250 Boilers – Primary Secondary Supply Piping- See Table 1, Page 5 15 5 16 17 18 19 20 13 12 Fig.
Pre-Installation Items Table 1: Cascade Kit Components for Solo 250 Boilers – Primary Secondary (P/S) - See Figs.
6 See Figure 5, Page 7 See Figure 6, Page 7 4 5 6 2 3 5 6 Fig.
Pre-Installation Items 17 8 12 9 19 18 12 13 11 10 Fig. 5: Cascade Kit Components for Solo 250 Boilers - Reverse Return Supply Piping - See Table 2, Page 8 17 14 10 11 Fig.
Pre-Installation Items Table 2: Cascade Kit Components for Solo 250 Boilers Reverse Return (R/R) - See Figs, 4-6, Pages 6&7 CRR500 Item CRR1000 Kit Components Quantity 1 Prestige Solo 250 Boiler 2 4 2 2 Boiler Manifold 1 2 3 Flange - ANSI to 3" NPSC 2 2 4 Flange - ANSI to Blind 2 2 5 Gasket - ANSI 4 6 6 Flared Bolt & Nut – Flange (5/8-11 x 3”) 16 24 7 Bolt, Washer & Nut – Boiler Mounting Bracket (5/16-18 x ¾”) 4 8 8 1-1/2” NPT Union 2 4 9 1-1/2” NPT x 4” Nipple 2 4 10
9 See Figure 9, Page 10 Fig.
Pre-Installation Items 1 Supplied in Standard Reverse Return Kits (CRR) 2 Fig. 8: Optional Kit Components for Solo 250 Boilers– R/R with Valves Supply Piping - See Table 3 3 4 Supplied in Standard Reverse Return Kits (CRR) Fig.
11 See Figure 11, Page 12 See Figure 12, Page 12 4 5 Fig.
Pre-Installation Items 11 15 14 14 18 19 12 14 17 13 Fig. 11: Cascade Kit Components for Solo 399 Boilers – Primary Secondary Supply Piping- See Table 4, Page 13 16 17 18 19 13 12 20 Fig.
Pre-Installation Items Table 4: Cascade Kit Components for Solo 399 Boilers – Primary Secondary (P/S) - See Figs.
14 See Figure 14, Page 15 See Figure 15, Page 15 Fig.
Pre-Installation Items 8 8 12 15 9 16 12 13 11 10 Fig. 14: Cascade Kit Components for Solo 399 Boilers - Reverse Return Supply Piping - See Table 5, Page 16 8 14 10 11 Fig.
Pre-Installation Items Table 5: Cascade Kit Components for Solo 399 Boilers Reverse Return (R/R) - See Figs, 13-15, Pages 14 & 15 Item 1 CRR800 Kit Components CRR1200 CRR1600 CRR2000 Quantity Prestige Solo 399 Boiler 2 3 4 5 2 Boiler Manifold 1 0 2 1 3 Boiler Manifold 0 1 0 1 3 Flange - ANSI to 3" NPSC 2 2 2 2 4 Flange - ANSI to Blind 2 2 2 2 5 Gasket - ANSI 4 4 6 6 6 Flared Bolt & Nut – Flange (5/8-11 x 3”) 16 16 24 24 7 Bolt, Washer & Nut – Boiler Mounting B
17 See Figure 18, Page 18 Fig.
Pre-Installation items 1 2 Supplied in Standard Reverse Return Kits (CRR) Fig. 17: Optional Kit Components for Solo 399 Boilers – R/R with Valves Supply Piping - See Table 6 3 4 Supplied in Standard Reverse Return Kits (CRR) Fig.
Pre-Installation Items BEST PRACTICE The CRR models (Reverse Return (R/R)) and the optional R/R with Valves kit do not include any balancing valve(s). It is recommended to balance the flow through the individual R/R boilers. This balancing can be accomplished by installing a balancing valve on the return pipe of each boiler.
Combustion Air and Venting SECTION II – COMBUSTION AIR AND VENTING WARNING For detailed instructions regarding the installation of the combustion air and venting, reference the PRESTIGE Installation and Maintenance Manual, PRESTIGE Vent Supplement and /or the various optional vent kit instructions. Both the PRESTIGE Solo Installation and Maintenance Manual and PRESTIGE Vent Supplement is included in each boilers installation envelope.
Combustion Air and Venting Fig. 21: Optional Common Venting of 2 or 3 PRESTIGE Solo 399 Boilers (Not Available for Solo 250 Boilers) For instructions or information regarding Common Venting of 2 or 3 PRESTIGE Solo 399 Boilers as shown in Fig. 21, contact Triangle Tube Technical Support.
Installation SECTION III – INSTALLATION 5. Install ANSI to 3” NPSC connection flanges to the system supply (top) and system return (bottom) connections utilizing the gasket and hardware supplied. Distribution Manifold 1. Place the distribution manifold in the location to be installed. If a Hydronic Junction is utilized consideration must be made in determining location. Multiple Distribution Manifolds The maximum number of boilers that can be piped using multiple Cascade Distribution Manifolds is five.
Installation 4. Install air vent and drain valve in the Hydronic Junction, see Figure 23. The air vent should be installed in the top tappings as shown. The drain valve (1-1/4” NPT shut off valve) should be installed horizontally using a 1- 1/4” NPT 90º elbow and 1-1/4” NPT x 4” nipple in the tapping located at the bottom. The handle on the shut off valve will need to be in the horizontal position when the valve is closed. Remove handle and install accordingly.
Installation Boiler Mounting NOTICE 1. Attach the boiler mounting brackets shipped with the boilers to the top front of the distribution manifold using the hardware supplied, see Figure 24. Ensure brackets are level. Remove the front door from all boilers before mounting boilers on brackets. Carefully lift boilers using the supply / return pipes in the boilers, onto the mounting brackets.
Boiler Piping SECTION IV – BOILER PIPING General NOTICE Ensure that the maximum boiler and distribution manifold working pressure does not exceed the maximum pressure rating of the boiler. Connect the supply piping and return piping from the distribution manifold to each boiler. If necessary to align the supply and return pipes you can slide the boiler(s) on the boiler mounting bracket(s). NOTICE Use a high quality sealant for sealing all threaded connections, similar to Loctite 577.
CSD-1 Piping & Control Installation SECTION V – CSD-1 INSTALLATION 6. A ¾” NPT brass tee will need to be installed at the top of each boiler utilizing ¾” NPT brass close nipple, both supplied in kit. Install tee with the branch portion facing horizontally. If local codes require the installation to comply with CSD-1, the addition of high limit control(s) and low water cut off control(s) are required. The quantity and location of the controls vary depending on the installation. 7.
CSD-1 Piping & Control Installation SECTION VI – SYSTEM PIPING drop/100 feet listed for the pipe size to establish the total circuit pressure drop for that pipe size. If using various pipe sizes in the system, you will need to do this calculation for each pipe size separately and add the total pressure drops of all sizes to get a total system pressure drop. Multiple Distribution Manifolds The maximum number of boilers that can be piped in series is five.
System Piping Fitting or Valve 90° Elbow 90° Elbow Long Radius 45° Elbow Tee - Line Flow Tee - Branch Flow Globe Valve Gate Valve Swing Check Coupling Union Machined Threaded Cast Machined ANSI Flanged Cast Machined Threaded Cast Machined ANSI Flanged Cast Machined Threaded Cast Machined ANSI Flanged Cast Machined Threaded Cast Machined ANSI Flanged Cast Machined Threaded Cast Machined ANSI Flanged Cast Machined Threaded Cast Machined ANSI Flanged Cast Machined Threaded Cast Machined ANSI Flanged
System Piping High Pressure Systems or Involving Fluid Separation NOTICE A heat exchanger is required between the Cascade and the system piping as shown in Figure 33, page 35 when operating under the following conditions: - Standard 30 PSI Cascade - System operating pressure greater than 30 PSI. - High Pressure (HP) 80 PSI Cascade - System operating pressure greater than 80 psi.
System Piping Fig.
System Piping Flow Check Valves System Supply System Return Fig.
System Piping Flow Check Valves System Supply System Return Balancing Valve Fig.
See Fig. 34, page 38 for Prestige wiring System Piping Fig.
Fig. 32: System Piping – Cascade R/R 34 See Fig.
System Piping Fig.
Gas Piping SECTION VII – GAS PIPING - Natural Gas - Pipe Sizing Refer to Table 11 for Schedule 40 metallic pipe length and diameter requirements for natural gas, based on the total of all PRESTIGE Solo Boiler inputs (divided by 1,000 to obtain cubic feet per hour required). - For additional gas piping sizing information, refer to ANSI Z223.1. For Canadian installations refer to CAN/CSA B149.1.
Wiring SECTION VIII – WIRING CSD-1 R/R 1. A single high limit control and low water cut off control for the Cascade system can be wired to each boiler through an isolation relay. A dry contact input relay is included with the common vent system and can be used for all external limits. See Fig. 35, page 39. If the common vent system is not being utilized, each boiler will require a 120 VAC coil relay with a normally open contact. See Fig. 35A, page 40.
Wiring NOTES: 1. 2. 3. 4. 5. This drawing shows system wiring concept only Installer is responsible for all equipment & detailing required by local codes All wiring shall be in conformance with the latest edition of the National Electrical Code Do not run sensor wiring in same conduit or raceway as line voltage wiring Use 18 AWG copper twisted pair wiring for all sensor wiring Fig. 34: Wiring Diagram - Individual LWCO & High Limit Per Boiler 38 NOTICE See Fig.
Wiring NOTES: 1. 2. 3. 4. 5. This drawing shows system wiring concept only Installer is responsible for all equipment & detailing required by local codes All wiring shall be in conformance with the latest edition of the National Electrical Code Do not run sensor wiring in same conduit or raceway as line voltage wiring Use 18 AWG copper twisted pair wiring for all sensor wiring NOTICE See Fig. 32, page 34 for System Piping Fig.
Wiring NOTES: 1. 2. 3. 4. 5. This drawing shows system wiring concept only Installer is responsible for all equipment & detailing required by local codes All wiring shall be in conformance with the latest edition of the National Electrical Code Do not run sensor wiring in same conduit or raceway as line voltage wiring Use 18 AWG copper twisted pair wiring for all sensor wiring NOTICE See Fig. 32, page 34 for System Piping Fig.
System Start-Up SECTION IX - SYSTEM START-UP Flush System to Remove Sediment Check System Water Chemistry The installer must flush the system to remove any sediment to allow proper operation. Flush the systems until the water runs clean and is free of sediment. WARNING Do not use petroleum-base cleaning or sealing compounds in the boiler system. Damage to seals and gaskets in the system components could occur, resulting in substantial property damage.
System Start-Up Check and Test Antifreeze For systems containing antifreeze solutions, follow the antifreeze manufacturer’s instructions in verifying the inhibitor level and to ensure the fluid characteristics are within specification requirements. Due to the degradation of inhibitors over time, antifreeze fluids must be periodically replaced. Refer to the manufacturer of the antifreeze for additional instructions.
Maintenance Schedule SECTION X - MAINTENANCE SCHEDULE Every 6 months: Service Technician - At least on an annual basis the following maintenance should be performed by a qualified service technician: Check piping for corrosion or potential signs of leakage. - Operate the pressure relief valve. General - Attend to any reported problems. - Check for leaks: water. - Check water pressure, piping and expansion tank. WARNING Follow the maintenance procedures given throughout this manual.
Maintenance Procedures SECTION XI - MAINTENANCE PROCEDURES Check Boiler/ Cascade System Maintenance Procedures Verify all system components are correctly installed and operating properly. Check the cold fill pressure for the system, typical cold water fill pressure is 12 psig. WARNING The Cascade should be inspected and serviced annually, preferably at the start of the heating season, by a qualified service technician.
Maintenance Procedures Check Boiler Relief Valve Inspect the relief valve and lift the lever to verify flow at least annually or as recommended on the warning tag of the valve. WARNING Before manually operating the pressure relief valve, ensure the discharge piping is directed to a suitable place of disposal to avoid a potential scald hazard. The discharge piping must be full size without restriction and installed to permit complete drainage of both the valve and line.
Replacement Parts Part # Description PSLWC01 Low Water Cut Off with Probe - 3/4” NPT x 2” Long Insertion PSFLG03 Flange ANSI to 3” NPSC PSFLG02 Flange ANSI to Blind PSGK24 Gasket ANSI PSNUT03 5/16” - 18 Nut - Flanged PSBLT03 5/16” - 18 x 3” Bolt - Flanged PSCON07 Manual High Limit - 200ºF PSWEL01 1/2” NPT x 1 1/2” Dry well for High Limit PSCOM01 Heat Conductive Compound for High Limit 1 2 4 3 Fig.
Replacement Parts 1 4 3 2 Fig.
Replacement Parts 1 2 4 3 Fig.
Replacement Parts 1 2 3 Fig.
Replacement Parts 1 3 2 Fig.
Replacement Parts 1 2 4 3 Fig.
12” (Typ.) 12” Air “A” 27.5” (Typ.) Vent Fig. 42: Dimensions CPS for Solo 250 Boilers 52 18” 16” System Return System Supply 33.8” 3” Threaded Flange with 7 1/2” O.D. 6” Bolt Hole Circle 72” Part Nº 8.5” CPS 500 CPS 1000 8” 16” 36” 7” 20.
72” 33.8” 16” 3” Threaded Flange with 7 1/2” O.D. 6” Bolt Hole Circle 12” (Typ.) 12” “A” Air 27.5” (Typ.) Vent Fig. 43: Dimensions CRR for Solo 250 Boilers 53 System Return System Supply 33” 7” 20.5” 68” 136” CRR 500 CRR 1000 8.
8” (Typ.) 7” “A” 27.5” (Typ.) Vent Air 18” 8” 16” Fig. 44: Dimensions CPS for Solo 399 Boilers 54 16” System Return 33.8” 72” 3” Threaded Flange with 7 1/2” O.D.
72” 33.8” 16” 3” Threaded Flange with 7 1/2” O.D. 6” Bolt Hole Circle 8” (Typ.) 7” 27.5” (Typ.) “A” Vent Air Fig.
Product Specifications Model Product Specifications Cascade Kit P/N # of Manifolds # of Solo 250 or 399 Boilers C(PS or RR) 500 1 2 (250) C(PS or RR)1000 2 4 (250) C(PS or RR)1600 2 C(PS or RR) 800 1 C(PS or RR)1200 1 C(PS or RR)2000 2 Component Prestige 250 Prestige 399 2 Boiler Manifold 3 Boiler Manifold Hydronic Junction 2 (399) 3 (399) 4 (399) 5(399) Individual Water Content Gal 4.1 7 6.6 9.
Product Specifications CRR 500 and CRR 800 Pressure Drop Curve Graph 1: Pressure Loss Through CRR 500 and CRR 800 CRR 1200 Pressure Drop Curve Graph 2: Pressure Loss Through CRR1200 CRR 1000 and CRR 1600 Pressure Drop Curve Graph 3: Pressure Loss Through CRR 1000 and CRR 1600 57
Product Specifications CRR2000 Pressure Drop Curve Graph 4: Pressure Loss Through CRR2000 Optional Strainer Pressure Drop Curve - PSCAS24 Graph 5: Pressure Loss Through Optional Strainer 58
Product Specifications Hydronic Junction System Pressure Drop Curve .81 Pressure Drop (feet of W.C.) .69 .58 .46 .35 .33 .
Notes
Additional quality water heating equipment available from Triangle Tube PRESTIGE CONDENSING WALL MOUNTED BOILER - 95% AFUE - Fully modulating - Natural gas or propane - Stainless Steel Construction - Direct vent with standard schedule 40 PVC - Outdoor Reset SMART SERIES INDIRECT FIRED WATER HEATERS - Exclusive tank-in-tank design - Stainless steel construction - Available in 8 sizes and 2 models - Limited LIFETIME residential warranty - 15 year limited commercial warranty - Self cle