
Install Instructions

PRESTIGE TriMax Blower and Gasket
Replacement Kit
3
11. Attach the Molex plug(s) on the wiring harness
to the connector(s) on the blower.
The Molex plug will only fit in one direction.
Do not force the plug. If the plug does not fit
rotate the plug 180ºF.
On PRESTIGE 60, 110 and EXCELLENCE
Boilers with serial numbers beginning with
PS, ensure to connect the 120 V wire harness
to the blower. The harness is located and wire
tied in the upper right corner of the jacket
enclosure.
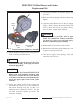
12. Install the venturi gasket on the venturi and
reassemble the venturi / gas valve assembly to
the blower housing using the (2) M5 x 12
mounting screws supplied in the kit. Use the
#25 Torx wrench to tighten all screws and
secure the assembly.
13. Reconnect the Molex or Rectifier plug to the
gas valve.
14. Reconnect the gas piping at the brass union and
tighten.
15. Open the main shutoff valve to the gas supply
piping. Before placing the Prestige back into
service check and test all gas piping connec-
tions for leaks. Repair leaks if found.
Do not check for gas leaks with an open
flame. Use a bubble test. Failure to check for
gas leaks can cause severe personal injury,
death or substantial property damage.
16. Reattach the air inlet elbow to the venturi.
17. Remount the front jacket panel and the top / rear
jacket access panel to the unit.
18. Turn power supply to the Prestige “ON” and
return the unit to service.
WARNING
WARNING
NOTICE
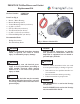
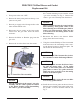
Venturi/Gas Valve
Assembly
Blower
Blower
Gasket
B
u
r
n
e
r
P
la
te
Fig. 3:
Date: 12/5/11
2011-54 Prestige_TriMax Blower & Gasket Repl. Kit
Venturi/Gas Valve and Blower Assembly