
Install Instructions
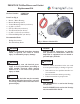

PRESTIGE TriMax Blower and Gasket
Replacement Kit
Instructions
1. Turn power to the unit “OFF”.
2. Remove the front jacket panel and the top / rear
jacket access panel.
3. Shut off gas supply to the Prestige boiler at the
main manual shutoff valve.
4. Disconnect the gas piping at the brass union
located near the gas valve inside the boiler
enclosure.
5. Remove the Molex or Rectifier plug from the
gas valve.
6. Remove the air inlet elbow from the venturi.
Note the orientation of the venturi / gas valve
assembly and the venturi gasket in relation
to the blower housing when disassembling
the venturi / gas valve assembly.
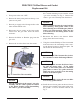
7. Using the #25 Torx wrench from the kit remove
the 2 venturi mounting screws from the venturi
/ gas valve assembly, see Fig. 2. Remove the
venturi / gas valve assembly from the blower.
There is a gasket between the venturi and the
blower housing. If the gasket “sticks” to the
blower housing use a flat blade putty knife to
remove any gasket material. Make sure not
to scratch or score the mating surface on the
blower housing.
8. Disconnect the blower wire harness Molex
plug(s) from the blower housing.
9. Using the extended Phillips or Torx bit included
in the kit remove the 4 mounting screws secur-
ing the blower housing to the burner plate. Do
not discard the blower housing.
Contact Triangle Tube Customer Service for a
RGA number to return the damaged Blower.
There is a gasket between the blower hous-
ing and the burner plate. If the gasket
“sticks” to the burner plate use a flat blade
putty knife to remove any gasket material.
Make sure not to scratch or score the mating
surface on the burner plate.
For the reassembly process do not use adhe-
sives on any gasket surfaces.
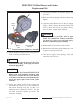
10. Install the new blower gasket to the new blower
housing and assemble to the burner plate using
the (4) M4 x 12 screws included in the kit, see
Fig. 3.
NOTICE
NOTICE
NOTICE
NOTICE
NOTICE
2
Venturi/Gas
Valve Assembly
Venturi
Mounting Screw
Venturi
Mounting Screw
Fig. 2: Venturi/Gas Valve Assembly