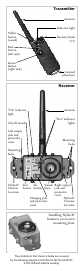
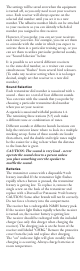
Transmitter Antenna Indicator light Yellow button (sound) Intensity knob (1-7) Red button (left jack) Green button (right jack) Lanyard placement Receiver “On” indicator light On/off switch Left output jack and protective cover Antenna “Test” indicator lights Mounting holes Mounting holes Nylatch® Fastener Location Test Set Sound Right output button button horn jack and protective cover Nylatch® Charging jack and protective Fastener cover Location Installing Nylatch® fasteners on receiver mountin
The Pro Control™ RL Please read these instructions before using your Pro Control™ RL The Pro Control™ RL controls a variety of remotely operated dog training equipment, including: • Several brands of bird releasers used for training pointing and flushing dogs • Most brands of launchers used for retriever training • Several accessory items for retriever launchers such as “retiring guns” and sound-making devices Quick Guide 1.
Transmitter Components: • • • • • Transmitter Lanyard for transmitter Short antenna for transmitter 9-volt alkaline battery (already installed) Pro Control™ RL Owner’s Guide Receiver Components: • • • • • • • Receiver Long antenna for receiver AC charger Two Nylatch® fastener sets per receiver Spare charging jack protection covers Set of adhesive identification numbers Pro Control™ RL Owner’s Guide Accessories for the Pro Control™ RL: Order these accessories from your Tri-Tronics dealer, on our web site
the corresponding jack. Pressing the TEST button will not activate training devices. Transmitter Buttons To operate the device plugged into the left output jack, press the red button on the transmitter. To operate the device plugged into the right output jack, press the green button on the transmitter. The small yellow transmitter button operates the receiver sound (see the next section). Sound The speaker on the receiver makes a loud sound when the yellow button on the transmitter is pressed.
The settings will be saved even when the equipment is turned off, so you only need to set your receivers once. Each receiver will always operate on the selected dial number until you set it to a new number. The adhesive number labels can be attached to your receivers so you can identify which dial number you assigned to that receiver. However, if you prefer, you can set your receivers each time you train.
A full charge requires 14 hours. You can use the receiver after less than 14 hours of charging but you should recharge more frequently if you charge for shorter periods. If the Pro Control™ RL has been in storage, it is a good idea to charge the receiver just before the training session. Attaching the Receiver to Your Training Equipment. Attach the Pro Control™ RL receiver to your training equipment in accordance with your manufacturer's directions.
Troubleshooting Guide Problem #1. The receiver did not accept a set. Be sure the receiver has been turned on, and that you press the transmitter button within five seconds of pressing the SET switch. Waiting longer than five seconds will cause the receiver to return to normal on mode. Make sure receiver batteries are charged. Problem #2. I press the transmitter button but my training device does not activate. A. Be sure that the receiver is turned on. B.
Phone, Fax or Write to Us To Order 1-800-456-4343 Product Information, Product Support & Customer Service 1-800-456-4343 General Business Phone: 520-290-6000 Fax: 520-722-9000 Write To Us Tri-Tronics, Inc. P.O. Box 17660 Tucson, AZ 85731 Visit Our Web Site tritronics.com E-Mail Us support@tritronics.