
Installation Guide


149
SELECT RAILING
NOTE: Construction methods are always improving. Please refer to www.trex.com for the most up-to-date installation requirements.
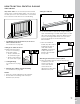
HOW TO INSTALL ON-AN-ANGLE RAILING
TREX SELECT
NOTE: Brackets are designed to be installed up to a
45° angle.
Both 4" x 4" (102 mm x
102 mm) or 6" x 6"
(152 mm x 152 mm) post
sleeves work well for angles
up to 45 degrees. Bottom
rail brackets may need to
be slightly offset to one
side in order to fit properly
to hold rail in place. Before
attaching bracket to rail,
measure and mark to ensure bottom rail remains parallel
to upper rail.
4 x 4 OR 6 x 6
Post Sleeve
4 x 4
Post Sleeve
6 x 6
Post Sleeve
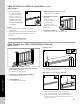
7. Secure 2" x 4" (51 mm
x 102 mm) to Select
top rail with 3/4" screw
provided approx. every
16" on center. Screws are
to be installed inside of
the baluster holes into
the decking board.
NOTES:
»
DO NOT overtighten. Note that a long drill bit will
be required to fit inside the baluster holes.
»
If installing 8' rail section and using Aluminum Rail
Stiffener, predrilling will be required through the
stiffener.
8. Assembling Railing Sections
See instructions on page 145.
9. Installing Railing Sections to Posts
See instructions on page 146.
1 0 . Attaching 2x4 to Posts
Pre-drill a pilot hole
and toenail 2-1/2"
(64 mm) screw at each
end of 2" x 4" (51 mm
x 102 mm) into post on
back side of rail (side
not facing decking).
11.
Attaching Post Caps
and Installing
Foot Block
Secure post caps with silicone or PVC adhesive.
Attach foot block per foot block instructions.
HOW TO INSTALL TREX TRADITIONAL RAILING/CONTINUED
TREX SELECT
1
10
7