
Installation Guide


145
SELECT RAILING
HOW TO INSTALL TREX SELECT RAILING/CONTINUED
TREX SELECT
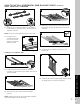
Installing Pressure-Treated Posts
» Select Railing Kits are
designed for posts to
be installed at maximum
of 6' or 8' (1.83 m or
2.44 m) ON CENTER
depending on the length
being used.
NOTE: Smaller spans are
allowed.
» Attach posts using
1/2" (13 mm) carriage
bolts.
» Minimum joist size is 2" x 8" (51 mm x 203 mm).
» Top bolts must be 1" (25 mm) from tops of joists.
» Bottom bolts must be 5-1/8" (130 mm) from top bolts.
NOTE: Blocking MUST be added for extra strength.
Installing Post Sleeve
Skirts and Post Sleeves
2. Slide post sleeve skirt
over post and down to
rest on decking surface.
Slide post sleeve over
post and position inside
post sleeve skirt.
NOTE: Shims can be used to plumb post sleeves.
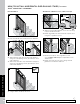
Cutting Railings
3a. Position bottom and top rails between posts,
ensuring baluster holes are lined up and spaced
evenly.
3b. Also allow for a minimum of 1-9/16" (40 mm) on
each end of rail for bracket placement AND baluster
clearance. Mark rails at intersection of rail and post.
IMPORTANT NOTE REGARDING FOOT BLOCK
INSTALLATION:
» Refer to detailed instructions (Trex
Select® rail instructions) included with
foot block prior to installation of railing
section as these include other required
steps for proper installation.
Attaching Foot Block to
Bottom Rail
4. Invert the bottom rail.
Center and drill a hole
using a 3/16" (5 mm)
drill bit. This will be
location for foot block
attachment (to be
installed last).
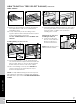
Attaching Brackets to Rails
5a. Position brackets on each end of TOP RAIL on the
same side as baluster holes. Attach brackets using
three #8-18 x 1" self-drilling screws (provided).
5b. Position brackets on each end of BOTTOM RAIL on
the OPPOSITE SIDE of the baluster holes. Attach
brackets using three #8-18 x 1" self-drilling screws
(provided).
NOTE: For ease of bracket attachment place rail against
stationary flat vertical surface along with bracket.
Assembling Railing Section
6a. On a clean flat surface, lay bottom railing on its side.
Make sure to allow enough room for installation of
balusters and top rail. Place a scrap piece of 1"
(25 mm) decking board running parallel to bottom
rail for support when installing balusters.
6b. Insert balusters into bottom rail slots until balusters
are fully seated.
1
5-1/8" (130 mm) min.
2" x 8"
(51 mm x
203 mm)
min.
1" (25 mm) min.
1
2
2
3a
1-9/16"
(40 mm)
3b
1
4
2
2
5b
Bottom Rail
5a
Top Rail
6a
6b