
Installation Guide


139
TREX
®
SIGNATURE™ RAILING
How to Mark, Cut and Place Top Stair Railing
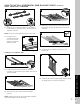
8. Position top rail to side of post. Mark top stair rail at
each location stated. On UPPER STAIR POST, mark
from underside of bottom rail. On LOWER STAIR
POST, mark from topside of bottom rail.
9. Cut each end of top stair rail and top rail cover
1/4" (0.6 cm) shorter than mark to allow for fit into
top stair rail bracket.
NOTE: Railing does not need to be cut at angle. Brackets
are designed to allow for railing to be installed with
standard straight cut.
10. Set top stair rail into
top stair rail brackets.
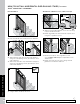
Measuring and Cutting Rods
11.
Using the long edge of the stair template, mark the
location of the end verticals on the upper and lower rails.
NOTE: Mark should only be 1" max length or it will be
visible after installation of verticals.
12. Measure and mark the mid-line (6' sections) of the
two end marks of the top and bottom rail. Take that
measurement and add 3/8" for rod length in next
step.
NOTE: For 8' sections divide the distance into thirds
and make two marks for the two verticals.
13. Cut rods to the length measured in previous step.
IMPORTANT: DO NOT CUT RODS AT RAIL
ANGLE; MAKE 90˚ CUTS ONLY!
8
9
1/4"
(0.6 cm)
1/4"
(0.6 cm)
1/4"
(0.6 cm)
1/4"
(0.6 cm)
KEY
Mark
Cut
KEY
Top stair rail
10
11
12
X" + 3/8"
X" + 3/8"
X" + 3/8"
13
HOW TO INSTALL HORIZONTAL ROD RAILING STAIRS/CONTINUED
TREX
®
SIGNATURE™
STANDARD