
Installation Guide


138
TREX
®
SIGNATURE™ RAILING
NOTE: Construction methods are always improving. Please refer to www.trex.com for the most up-to-date installation requirements.
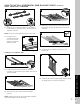
2. Cut each end of the bottom stair rail and bottom rail
cover 1/4" (0.6 cm) shorter than the mark on each
end to allow for fit into bottom stair rail brackets.
NOTE: Railing does not need to be cut at angle.
Brackets are designed to allow for railing to be installed
with standard straight cut.
3. With deckboard still on nose of stair tread, place
brackets on end of bottom stair rail (DO NOT
attach brackets to rail) and mark posts for bracket
locations.
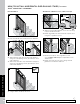
Installing Lower Stair Brackets
4. Center lower stair bracket on post above the
marked line and attach using two self-tapping
screws (provided). In some cases it may be difficult
to attach the stair bracket on the lower stair post.
Recommend using a 90° drill adapter or loosen the
post to get access to the lower bracket screw holes.
Installing Upper Stair Brackets
5. On Lower Post – From top of lower bracket,
measure up and mark with light line (33-1/4"
for 36" rail; 39-1/4" for 42" rail).
On Upper Post – From top of lower (upper) bracket,
measure up and mark with light line (33-1/8"
for 36"rail; 39-1/8" for 42" rail).
6. Center upper stair brackets on posts below
the marked lines and attach using two self-tapping
screws (provided).
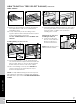
7. Set bottom stair rail
into bottom stair rail
brackets.
2
1/4"
(0.6 cm)
1/4"
(0.6 cm)
1/4"
(0.6 cm)
1/4"
(0.6 cm)
KEY
Mark
Cut
KEY
Bottom stair rail
1"
(2.5 cm)
3
4
Bottom stair
bracket –
bottom rail
Top stair
bracket –
bottom rail
1
1
2
36" – 33-1/4"
42"– 39-1/4"
36" – 33-1/4"
42"– 39-1/4"
5
36" – 33-1/8"
42" – 39-1/8"
36" – 33-1/8"
42" – 39-1/8"
Lower
post
Upper
post
HOW TO INSTALL HORIZONTAL ROD RAILING STAIRS/CONTINUED
TREX
®
SIGNATURE™
STANDARD
6
Lower stair
bracket –
top rail
Upper stair
bracket –
top rail
1
1
2
7
2