
Installation Guide


128
TREX
®
SIGNATURE™ RAILING
NOTE: Construction methods are always improving. Please refer to www.trex.com for the most up-to-date installation requirements.
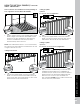
Cutting Top Rail
Option 3:
For Crossover Post-to-Crossover Post Configuration
3c. Cut each end of top rail 3/4" (19 mm) LONGER than
the mark to allow for fit into the crossover post
bracket on each side.
4. Using razor knife or other cutting tool, cut rail insert
3/4" (19 mm) FROM EACH SIDE.
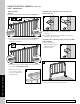
5. Mark and cut top rail
cover same length as
top rail for all top rail
configurations.
If Installing Trex
®
Signature™ Panel Using Lower
Bracket with Tab
6a. Break or cut the bottom tab off the bottom
brackets.
6b. Put a dab of silicone in the basket of the bottom
bracket to prevent rattle.
If Installing Trex
®
Signature™ Panel Using Lower Rail
Tabless Bracket
7. Peel backings from
adhesive strip provided
and place inside the
bottom bracket.
8. Place panel in bottom and top brackets.
3c
3/4 "
(19 mm)
3/4 "
(19 mm)
3/4 "
(19 mm)
3/4 "
(19 mm)
KEY
Mark
Cut
KEY
Top rail
Crossover post
Crossover post
4
3/4 "
(19 mm)
3/4 "
(19 mm)
3/4 "
(19 mm)
3/4 "
(19 mm)
Top rail
8
5
6a
7a
6b
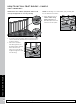
HOW TO INSTALL PANELS/CONTINUED
TREX
®
SIGNATURE™