
Installation Guide


127
TREX
®
SIGNATURE™ RAILING
How to Measure and Cut Bottom and Top Railings of
Trex
®
Signature™ Panel (When REQUIRED)
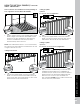
1. Position panel between posts and align with bottom
bracket. Align center baluster with middle of span
between posts (this will allow for equal spacing
between end balusters and each post). Mark
bottom and top rail at each end.
NOTE: If the end balusters fall too close to the brackets,
the center point can be adjusted one baluster to the left
or right to allow more room.
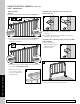
Cutting Bottom Rail
2. Using a saw equipped with a non-ferrous metal
blade, cut each end of bottom rail and bottom rail
insert 1/4" (6 mm) shorter than mark on each end to
allow for fit into bottom rail brackets.
Cutting Top Rail
Option 1:
For Post-to-Post Configuration
3a. Using a saw equipped with a non-ferrous metal
blade, cut each end of top rail 1/4" (6 mm) shorter
than mark to allow for fit into top rail brackets.
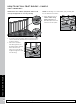
Cutting Top Rail
Option 2:
For Post-to-Crossover Post Configuration
3b. Top rail must be cut differently on each side of the
rail. Railing side that attaches to standard post
should be cut 1/4" (6 mm) shorter than the mark to
allow for fit into top rail bracket. Railing side that
attaches to the crossover post should be cut
3/4" (19 mm) LONGER than the mark to allow for fit
into the crossover post bracket.
HOW TO INSTALL PANELS/CONTINUED
TREX
®
SIGNATURE™
1
2
1/4 "
(6 mm)
1/4 "
(6 mm)
1/4 "
(6 mm)
1/4 "
(6 mm)
KEY
Mark
Cut
KEY
Bottom rail
3a
1/4 "
(6 mm)
1/4 "
(6 mm)
1/4 "
(6 mm)
1/4 "
(6 mm)
KEY
Mark
Cut
KEY
Top rail
Standard post
Standard post
3b
1/4 "
(6 mm)
1/4 "
(6 mm)
3/4 "
(19 mm)
3/4 "
(19 mm)
KEY
Mark
Cut
KEY
Top rail
Crossover post
Standard post