
Installation Guide


116
TREX
®
SIGNATURE™ RAILING
NOTE: Construction methods are always improving. Please refer to www.trex.com for the most up-to-date installation requirements.
ATTACHING STAIR RAILS IN CROSSOVER POST APPLICATIONS
TREX
®
SIGNATURE™
Cutting Top Stair Rail and Insert
For Stair Post-to-Stair Crossover Post Configuration
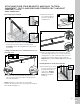
When Using Fixed Stair Brackets:
9a. Top stair rail along with rail insert must be cut
differently on each side of the rail. Railing side
that attaches to standard post should be cut 1/4"
(0.6 cm) shorter than the mark to allow for fit into
top rail bracket. Railing side that attaches to the
crossover post should be cut directly on the mark
to allow for fit into the crossover post bracket.
When using Upper Stair Swivel and Stair Crossover
Swivel Brackets:
9b. When going from standard stair post to stair
crossover post, measurement must be taken from
inside of top horizontal stair swivel bracket to
inside lip of stair crossover bracket. Crossover post
will need to be modified to have swivel crossover
bracket installed.
Cutting Top Stair Rail and Rail Insert
For Stair Crossover Post-to-Stair Crossover Post
Configuration
10. Cut each end of the top stair rail along with rail
insert on the mark line to allow for fit into the
crossover post bracket on each side.
Cutting Top Stair Rail Cover, and Attachment of Top
Stair Rail Cover
11. Mark and cut top rail
cover same length as
top rail for all top rail
configurations.
12. Attach “crowned" upper stair rail cover to upper
stair rail by aligning cover on one side of rail. Then,
starting from one end of stair rail, snap cover onto
opposing slot working down length of stair rail.
GENTLY tapping with a rubber mallet may facilitate
fastening.
9a
1/4"
(0.6 cm)
1/4"
(0.6 cm)
KEY
Mark
Cut
KEY
Top stair rail
Crossover post
Standard post
9b
Crossover
post
Standard
post
Standard
post
11
10
KEY
Mark
Cut
KEY
Top stair rail
Crossover post
Crossover post
1
12
3
2