
Installation Guide


88
TREX
®
SIGNATURE™ RAILING
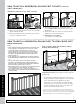
1
9
3
2
1
8
Inverted Bottom viewInverted Bottom view
Center balluster slot
Center balluster slot
2
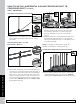
Cutting Top Rail
5. Cut each end of top rail 1/4" (0.6 cm) shorter than
mark to allow for fit into top rail brackets.
Cutting Top Rail Insert and Cover
6. Slide rail insert out and cut 3/4" (1.9 cm) FROM
EACH SIDE of insert, then slide back inside rail
and center.
7. Mark and cut top rail
cover same length as
top rail for all top rail
configurations.
Attaching Center Baluster to Bottom Rail
8. Attach shorter, center baluster in center slot in
bottom rail using two #8 x 1-1/4" (3.2 cm) screws
(provided).
Attaching Bottom Rail Cover and
Bottom Rail to Brackets
9. Attach “flat" bottom rail cover to bottom rail by
first centering cover on bottom rail (this will allow
gap on each end of bottom rail for placement into
brackets). Align cover on one side of bottom rail in
slot on side of rail. Then starting from one end of rail
snap cover onto opposing slot working down the
length of rail. In some cases, GENTLE tapping with a
rubber mallet may facilitate fastening.
7
5
1/4"
(0.6 cm)
1/4"
(0.6 cm)
1/4"
(0.6 cm)
1/4"
(0.6 cm)
KEY
Mark
Cut
KEY
Top rail
Standard post
Standard post
6
3/4 "
(1.9 cm)
3/4 "
(1.9 cm)
3/4 "
(1.9 cm)
3/4 "
(1.9 cm)
Top rail
Lorem ipsum
HOW TO INSTALL HORIZONTAL RAILING POST TO POST/CONTINUED
TREX
®
SIGNATURE™
NOTE: Construction methods are always improving. Please refer to www.trex.com for the most up-to-date installation requirements.