
Installation Guide


78
TRANSCEND RAILING
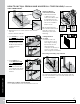
7. Mark both posts on inside channel of the bottom
stair rail.
Remove bottom stair rail.
8. For UPPER post – install
RSB FLAT SIDE DOWN,
ABOVE MARKED LINE,
using two wood screws
provided. Take second
RSB, turn upside down
and interlock into
bracket.
9. For LOWER post –
install RSB FLAT SIDE
UP, ABOVE MARKED
LINE, using two wood
screws provided. Take
second RSB, turn upside
down and interlock into
bracket.
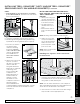
Attaching Foot Block to Bottom Rail
10. See detailed instructions included with foot block.
Attaching Bottom
(Universal) Stair Rail
11. Lift bottom stair rail
so RSB’s are in the
channel and attach with
3 self-tapping screws
provided. Use the three
outer holes in RSB to
attach screws.
Tip: Deckboard can be
placed underneath bottom
stair rail to help hold
rail firmly in place while
attaching.
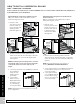
Cutting Balusters
on Angle
12. Balusters will seat
properly when cut on
same angle as railing.
Ensure that cuts are
taken from both
ends/tips of balusters as
shown to retain overall
same length of the balusters.
Measuring and Cutting Top Stair Rail
13. Snap bottom baluster spacer into bottom stair rail.
14. Place two balusters into lower stair rail at each end
closest to the post.
HOW TO INSTALL CROWN AND UNIVERSAL STAIR RAILING/CONTINUED
TREX TRANSCEND
®
7
3
1
8
2
11
2
Upper Post
Location -
Bottom Rail
Lower Post
Location -
Bottom Rail
1
12
13
3
1
9
2
14
NOTE: Construction methods are always improving. Please refer to www.trex.com for the most up-to-date installation requirements.