
Installation Guide


74
TRANSCEND RAILING
1. Installing Pressure-Treated Posts
See instructions on page 65.
2.
Installing Post Sleeve Skirts and Post Sleeves
See instructions on page 65.
3.
Installing Railing Support Brackets (RSBs)
See instructions on page 65.
4.
Cutting Railings
See instructions on page 66.
5.
Attaching Foot Block to Bottom Rail
See instructions on page 66.
6.
Attaching Bottom Rail (Universal Rail)
See instructions on page 66.
7-8.
Attaching Weatherstripping and
Positioning Panel
See instructions on page 71.
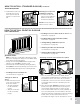
Attaching Top Rail
9. Cut 2" x 4" (51 mm x 102 mm) to same length of the
inverted Universal rail.
10. Place inverted 2" x 4"
(51 mm x 102 mm) (place
top side down) on clean,
flat surface.
11. Place Universal rail (remembering to orient this
properly so that when flipped over, the Universal rail
will accept the baluster spacer and balusters), on the
2" x 4" (51 mm x 102 mm), centered.
12. Secure 2" x 4" (51 mm x 102 mm) to Universal rail
with 2" (51 mm) pan head screws (not provided)
approximately every 16" (406 mm) on center.
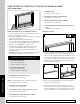
13. Place inverted Universal rail with 2" x 4" (51 mm x
102 mm) attached onto RSB’s with glass panel in the
channel. Attach Universal rail to RSB’s with three
self-tapping screws provided. (Use three outer holes;
do not use hole in RSB that is closest to post.) If two-
hole bracket is included, attach with two self-tapping
screws (provided).
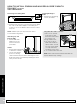
14. Pre-drill a pilot hole and toenail 2-1/2" (64 mm)
composite deck screw (not provided) at each end of
the 2" x 4" (51 mm x 102 mm) into post on back side
(side not facing decking).
15.
Attaching Panel Support Moldings
See instructions on page 71.
16-17.
Hiding Brackets
See instructions on page 71.
18.
Attaching Post Caps and Installing Foot
Block
Attach foot block per detailed instructions.
11
10
9
12
1
1
13
2
3
Hole
RSB
2
2
Hole
RSB
14
3
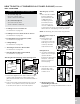
HOW TO ATTACH TRADITIONAL STYLE GLASS PANEL RAILING/CONTINUED
TREX TRANSCEND
NOTE: Construction methods are always improving. Please refer to www.trex.com for the most up-to-date installation requirements.