
Installation Guide


69
TRANSCEND RAILING
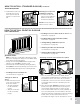
9. Pre-drill a pilot hole and
toenail 2-1/2" (64 mm)
composite decking
screw (not provided) at
each end of 2" x 4"
(51 mm x 102 mm) into
post on back side of
rail (side not facing
decking).
10.
Placing Baluster Spacers
See instructions on page 66.
11.
Attaching Balusters
See page 66 for standard baluster and instructions
below for aluminum balusters.
12. Slide baluster spacer up and snap into universal rail.
NOTE: If necessary, cut tips off rail gaskets prior to
installation.
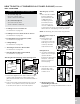
13.
Attaching Post Caps and Installing Foot Block
Attach foot block per detailed instructions.
HOW TO INSTALL TRADITIONAL RAILING/CONTINUED
TREX TRANSCEND
1
1
9
3
2
12
Optional
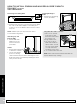
HOW TO INSTALL ROUND OR SQUARE ALUMINUM BALUSTERS
TREX TRANSCEND
1. Installing Pressure-Treated Posts
See instructions on page 65.
2.
Installing Post Sleeve Skirts and Post Sleeves
See instructions on page 65.
3.
Installing Railing Support Brackets (RSBs)
See instructions on page 65.
4.
Cutting Railings and Baluster Spacers
See instructions on page 66.
5.
Attaching Foot Block to Bottom Rail
See instructions on page 66.
6.
Attaching Bottom Rail (Universal Rail)
See instructions on page 66.
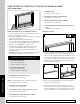
Installing Lower Aluminum Baluster Adaptor Strip
7. After bottom rail is fully
installed, place aluminum
baluster adaptor strip
into channel of bottom
rail, ensuring that it’s fully
seated into the channel.
When rail lengths are
non-standard, the
baluster adaptor strip
will need to be cut 2-1/2"
(64 mm) shorter than the
rail to allow clearance for the RSB’s on each end.
8.
Attaching Top Rail
See specific instructions based on top rail of choice.
Installing Upper Aluminum Baluster Adaptor Strips
and Baluster Spacers
9. After top rail is fully
installed, place aluminum
baluster adaptor strip
into channel of top rail,
ensuring that it’s fully
seated into the channel.
7
9