
Installation Guide


156
ADA RAILING
HOW TO INSTALL TREX® ALUMINUM ADA COMPLIANT HANDRAIL/CONTINUED
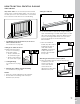
Elbows (90°, 36°, 34°, 31°, 5°)
1. If required, cut railing to proper length based on
location of elbows and other components being used.
2. If desired, collar ring can be used to hide seam of
elbow to rail. Slide over rail BEFORE inserting rail into
elbow.
3. Slide internal connector into rail end until metal spacer
screw is touching either end of rail or the collar, if this
was used.
4. Slide appropriate angled elbow onto opposite end of
internal connector, until it is touching metal spacer
screw.
5. Remove metal spacer screw using #2 square head
screwdriver.
6. Push elbow further over internal connector until it fits
in the collar (if used) or fits tightly against rail.
7. Attach wall mount to post per previous instructions.
8. Attach rail to wall mount per previous instructions.
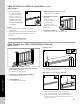
Handrail Return 180°
NOTE: Ramp application shown here. (Appropriate angle
elbow also required for stair applications.)
1. If required, cut railing to proper length based on
location of elbow used as well and other components
being used.
2. If desired, collar ring can be used to hide seam of
handrail return to rail or elbow being used. Slide this
over rail BEFORE inserting rail into other component.
3. Ensure that all components are aligned to both wall
mount on post as well as location of elbow on rail
BEFORE attachment.
4. Slide internal connector into appropriate elbow being
until metal spacer screw is touching either end of elbow
or the collar, if this was used.
5. Attach wall return to lower end of handrail return
(longer side), ENSURING wall return is at proper angle
of alignment to post. (Wall return is designed to have
tight fit into rail, thus location of attachment is critical.)
6. Slide opposite end of handrail return onto internal
connector, until it is touching metal spacer screw.
7. Remove metal spacer screw using #2 square-head
screwdriver.
8. Push handrail return further over internal connector
until it fits in the collar (if used) or fits tightly against
elbow.
9. Attach wall return to post per previous instructions.
10. Attach rail to wall mount per previous instructions.
11. Use end caps where required.
Corner Mount
1. Pre-drill metal post and install corner post to metal
post using specific hardware provided (see chart on
previous page).
2. If desired, collar ring can be used to hide seam of
elbow to rail. Slide this over rail BEFORE inserting rail
into elbow.
3. Slide internal connector into rail end until metal spacer
screw is touching either end of rail or the collar, if this
was used.
4. Slide appropriate angled elbow onto opposite end of
internal connector, until this is touching metal spacer
screw.
5. Remove metal spacer screw using #2 square-head
screwdriver.
6. Push elbow further over internal connector until this
fits in the collar (if used) or fits tightly against rail.
7. Install elbow to corner mount using specific hardware
provided.