
Installation Guide

NOTE: Construction methods are always improving. Please refer to www.trex.com for the most up-to-date installation requirements.
119
TREX
®
SIGNATURE™ RAILING
HOW TO INSTALL TREX
®
SIGNATURE™ COCKTAIL STAIR RAILING
TREX
®
SIGNATURE™/CONTINUED
Cutting Post and Post
Sleeve and Attaching
Deck Board to Top Rail
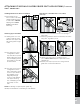
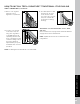
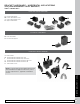
8. Cut post and post
sleeves at proper angle
so these are flush with
the top of the top
brackets and/or top rail
cover. BE CAREFUL
NOT to CUT brackets.
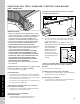
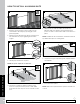
9. Place deck boards over
top rails. DO NOT use
Enhance (scalloped
profile) or Escapes
deck boards for top rail.
PLACE DECK BOARD
ON TOP RAIL TO CHECK
FOR PROPER FIT AND
RAIL CLEARANCE
AT BRACKET
LOCATIONS. DECK
BOARD MAY REQUIRE EITHER A NOTCH CUT ON
THE UNDERSIDE OR SLIGHT PLANING ON THE
UNDERSIDE TO ALLOW DECK BOARD TO CLEAR
TOPS OF BRACKETS AND SIT FLUSH ON TOP OF
POSTS AND RAILS. Attach boards on each post with
Trex-recommended composite screws (quantity of 2
per each board end).
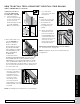
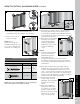
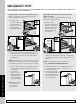
10. Secure boards to top rail
using Trex
®
Signature™
Cocktail Bracket (sold
separately). Ensure
that there is a bracket
at each end of the
stair railing section,
then space brackets
approximately every 24"
and attach with 4 screws
provided.
NOTE: Pre-drilling before attachment is recommended.
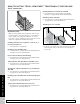
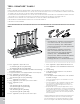
11. Use scarf cut for
posts where two deck
boards meet.
NOTES:
» Leave 1/8" (3 mm) gap
between deck boards.
» Deck boards can
overhang end of last
post maximum 1/2"
(13 mm).
12. Where deck board
terminates at top of
post horizontal deck
board, PREDRILL and
toenail two approved
composite deck screws
as shown into post,
being careful to avoid
hitting stair bracket.
Attachment of Bottom Bracket Covers and Skirts
13. See instructions on page 110.
NOTE: Top Bracket Covers are not attached in this
configuration.
8
Post
Top stair rail
Upper
bracket
1
1
9
2
11
1
10
2
12