
Installation Guide


155
ADA RAILING
HOW TO INSTALL TREX® ALUMINUM ADA COMPLIANT HANDRAIL
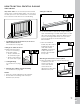
90° Wall Return
1. If required, cut railing to proper length based on location of
wall return(s) or attachment to other components.
2. If desired, collar ring can be used to hide seam of wall
return to rail. Slide over rail BEFORE inserting rail into wall
return.
3. Slide rail onto wall return until it is fully inserted and seam is
hidden under collar (if collar is being used).
4. Attach wall return to post using specific hardware provided
(see chart on previous page), ENSURING wall return is at
proper angle of alignment to post. (Wall return is designed
to have tight fit into rail, thus location of attachment
is critical.) If using metal posts, pre-drill post prior to
attachment of wall mount.
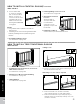
Wall Mount
NOTE: Refer to Rail-to-Rail Connections section if connecting
two or more rails together to make continuous straight run.
1. If required, cut railing to proper length based on location
of wall mount(s) or attachment to other components.
2. Attach wall mount to post using specific hardware
provided (see chart on previous page), ENSURING wall
mount is at proper angle of alignment to angle of rail. If
using metal posts, pre-drill post prior to attachment of
wall mount.
TIP: To help with angled attachment, place one screw into
bottom hole of bracket and pivot wall mount to position
required.
3. Attach rail to wall mount using specific hardware provided
(see chart on previous page).
4. Attach end cap to railing.
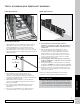
Inline Bracket
1. If required, cut railing to proper length based on location of
inline bracket(s) or attachment to other components.
2. Attach inline bracket to post using specific hardware
provided (see chart on previous page). If using metal posts,
pre-drill post prior to attachment of inline bracket.
3. Slide rail onto inline bracket until it is fully inserted.
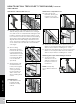
Rail-to-Rail Connections/Internal Connector
NOTE: When rail-to-rail straight connections are use for
longer spans, posts must be installed 6' OC max. In addition,
a wall mount MUST be used at each seam of rail-to-rail
connections as close to center of wall mount as possible. If
collar is used, this can be offset slightly to allow for the collar
to fit.
1. If required, cut railing to proper length.
2. If desired, collar ring can be used to hide seam between
rails. Slide ring over rail BEFORE inserting rails into
internal connector.
3. Slide internal connector into rail end until metal spacer
screw is touching either end of rail or collar, if used.
4. Slide second rail over opposite end of internal connector,
until it is touching metal spacer screw.
5. Remove metal spacer screw using #2 square-head
screwdriver.
6. Push second rail further over internal connector until
it fits in the collar (if used) or fits tightly against rail.
7. Attach wall mount to post per previous instructions.
8. Attach rail to wall mount per previous instructions.
9. Use end caps where required.