
Installation Guide


135
TREX
®
SIGNATURE™ RAILING
135
HOW TO INSTALL HORIZONTAL ROD RAILING/CONTINUED
TREX
®
SIGNATURE™
STANDARD
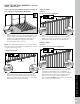
16. Slide all rods through intermediate supports and
into end vertical support.
NOTE:
When inserting rods through intermediate
supports, keep rods straight to avoid scratching.
17. Slide end vertical onto rods and attach to bottom
rail using HZ spacer and screws provided.
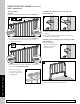
Installing Top and Bottom Rails
18. Using a mallet, install bottom rail cover onto
bottom rail.
19. Install top rail to all vertical and end supports using
HZ spacer and screws provided.
20. Drop assembled rod rail panel into brackets.
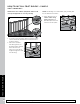
21. Attach bottom rail to bottom brackets by using one
self-tapping screw (provided) for each bracket.
22. Attach top rail to top brackets by using two self-
tapping screws (provided) for each bracket.
NOTE: Pre-drilling is required (7/64" [0.28 cm] drill bit)
for attachment of railing to bracket.
Inserting Rod Rail Stiffener – For Rail Sections
over 6'
23. Attach tape (qty 6 provided) to alternating sides of
the rod stiffener as shown.
16
17
1
1
1
2
19
1
1
1
2
20
18
2
21
1
7/64"
(.28 cm)
7/64"
(.28 cm)
2
22
1
7/64"
(.28 cm)
7/64"
(.28 cm)
23
Rod stiener