
Installation Guide


113
TREX
®
SIGNATURE™ RAILING
ATTACHING STAIR SWIVEL/COMPOUND SWIVEL BRACKETS AND
RAILS TO TREX
®
SIGNATURE™ POSTS AND PRESSURE-TREATED POST
AND POST SLEEVES/
CONTINUED
TREX
®
SIGNATURE™
11
Mounting HolesMounting Holes
2
1
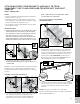
11. Remove upper stair rail from balusters and center
upper stair swivel bracket on post above the marked
line and attach using four self-tapping screws
(provided).
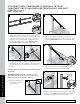
12. Cut top rail along with rail insert to the measurement
between the top stair swivel brackets. For standard
post to standard post configurations this would be
same dimensions as that of the bottom stair rail.
13. Mark and cut top rail
cover same length as
top rail for all top rail
configurations.
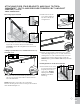
14. Attach “crowned" upper stair rail cover to upper
stair rail by aligning cover on one side of rail. Then
starting from one end of stair rail, snap cover onto
opposing slot working down length of stair rail.
GENTLE tapping with a rubber mallet may facilitate
fastening.
Installing Balusters into Bottom Stair Rail
15. Place balusters into holes in lower stair rail by snap-
ping fully into place. In some cases, GENTLE tapping
with a rubber mallet may facilitate fastening.
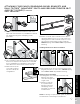
Attaching Upper Stair Rails
16. Working from one end of upper stair rail, snap
balusters into upper
stair rail working down
length of rail.
17. Attach top stair rail
to top stair bracket
(all types) using two
self-tapping screws
(provided) on each side
of stair bracket.
NOTE: Pre-drilling is required (7/64" [0.28 cm] drill bit)
for attachment of stair railing to stair bracket.
12
Standard
post
Standard
post
Standard
post
1
14
3
2
13
15
16
17