
Installation Guide


112
TREX
®
SIGNATURE™ RAILING
ATTACHING STAIR SWIVEL/COMPOUND SWIVEL BRACKETS AND
RAILS TO TREX
®
SIGNATURE™ POSTS AND PRESSURE-TREATED POST
AND POST SLEEVES/
CONTINUED
TREX
®
SIGNATURE™
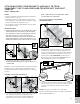
5. Attach “flat" bottom stair rail cover to bottom stair
rail. Align cover on one side of the bottom rail in slot
on side of rail. Then starting from one end of rail
snap cover onto opposing slot working down the
length of the rail. In some cases, GENTLE tapping
with a rubber mallet may facilitate fastening.
6. Set bottom stair rail into bottom stair rail brackets.
Attach bottom stair rail to bottom stair bracket using
two self-tapping screws (provided) on each side of
bracket.
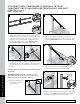
Installing Upper Brackets and Measuring Upper Stair
Rail–Stair Swivel and Compound Swivel
IMPORTANT NOTE: BEFORE CUTTING ANY TOP
RAILS MAKE SURE THAT WHEN MEASURING, ALL
BALUSTER HOLES LINE UP PARALLEL!
7. Place two balusters into
lower rail at each end
closest to post.
8.
Position top stair rail onto balusters ensuring
balusters are fully seated in top rail (position to side
of post) and ENSURE that balusters are parallel with
post.
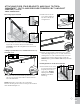
Installing Upper Stair Swivel and Compound Swivel
Brackets
9.
Clamp brackets to side of rail with brackets in correct
swivel location/angle (this is important to ensure
correct location of swivel brackets
).
1 0 .
Mark a light line on posts at UNDERSIDE of where
swivel bases (positioned correctly) meets the posts.
1
5
3
2
1
1
6
2
7
8
9
10
1
2
NOTE: Construction methods are always improving. Please refer to www.trex.com for the most up-to-date installation requirements.