
Installation Guide


89
TREX
®
SIGNATURE™ RAILING
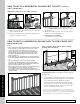
10. Set bottom rail into bottom brackets. Tabs on
brackets will be inside of bottom rail (not shown
when railing is attached). To ensure fit into tab,
measure and mark 1/2" (1.3 cm) out from side
of post.
11. Attach bottom rail to bottom bracket by fastening
through marked measurement on top of rail into
tab on bottom bracket using one self-tapping screw
each side (provided).
NOTE: Pre-drilling is required (7/64" [0.28 cm]
drill bit) for attachment of railing to bracket.
Installing Remaining Balusters into Bottom Rail
12. Place remaining balusters into holes in lower
rail by snapping fully into place. In some cases,
GENTLE tapping with a rubber mallet may
facilitate fastening.
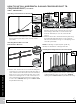
Attach Upper Railings
13. Working from one end of upper rail, snap balusters
into upper rail working down length of rail. Fasten
center baluster into center slot using two #8 x 1-1/4"
(3.2 cm) screws (provided).
14. Fasten upper rail to each
bracket by installing
screws diagonally
through upper rail into
bracket using two self-
tapping screws each
side (provided).
NOTE: Pre-drilling is
required (7/64" [0.28 cm]
drill bit) for attachment of railing to bracket.
15. Attach “crowned" upper rail cover to upper rail
by aligning cover on one side of rail. Then starting
from one end of rail, snap cover onto opposing slot
working down length of rail. GENTLE tapping with a
rubber mallet may facilitate fastening.
1/2"
(1.3 cm)
1/2"
(1.3 cm)
10
2
1
2
11
1
7/64"
(.28 cm)
7/64"
(.28 cm)
12
HOW TO INSTALL HORIZONTAL RAILING POST TO POST/CONTINUED
TREX
®
SIGNATURE™
2
14
1
7/64"
(.28 cm)
7/64"
(.28 cm)
1
1
13
2
1
15
3
2