
Installation Guide


82
TREX
®
SIGNATURE™ RAILING
IMPORTANT NOTES:
» EACH POST MUST BE ATTACHED AS SHOWN TO ENSURE A CODE-
COMPLIANT AND SAFE INSTALLATION.
» TREX
®
SIGNATURE™ POSTS CANNOT BE USED WITH TREX®
SIGNATURE™
TRADITIONAL OR TREX
®
SIGNATURE™ COCKTAIL
DESIGNS, ONLY PRESSURE-TREATED POST/POST SLEEVES
CAN BE USED. REFER TO DETAILED INSTRUCTIONS FOR MORE
INFORMATION.
» ALWAYS refer to your local building code official prior to installing
any railing system to ensure all code and safety requirements are met.
Trex cannot be held responsible for improper or non-recommended
installations.
» When installing Trex
® Signature™ posts on ACQ, CCA or concrete
surfaces, use an appropriate isolation barrier between post and
surface (contact local building code official if needed).
» For installing Trex
® Signature™ Post and/or Trex® Signature™ Crossover
Posts, see below.
» For pressure-treated posts, post sleeves, and skirts, see detailed
instructions provided with Trex
® Signature™ Railing Kits.
» All Trex
®
Signature™ stair installations require the use of a 53" (1346
mm) stair post, measured and cut to appropriate length if necessary.
» If crossover stair post is required, use stair post (again cut to
appropriate length if necessary) and use swivel crossover bracket.
» If installing on concrete, make sure all surfaces are level.
TOOLS AND MATERIALS NEEDED
» Drill and/or screw gun (hammer drill for concrete)
» 1/2" (13 mm) drill bit for wood, 3/8" (10 mm) drill bit for concrete
» Blocking – 2" x 8" (51 mm x 203 mm) pressure-treated Southern
Yellow Pine or equivalent
» Qty: 36 (per post) – 3" pressure-treated compatible wood screws
CODE APPROVED POST APPLICATIONS
POST SIZE
< 30" height decking Acceptable (Code Approval not Applicable)
IRC Compliant Yes
IBC Compliant No
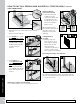
Installing Trex® Signature™ Posts and/or Trex
®
Signature™ Crossover Posts on Pressure-Treated
Wood Framing (Corner Post Installation)
1. Install 2" x 8" (51 mm x 203 mm) cross bracing
frame in between joists at 7-1/4" (184 mm). Attach
a total of twelve 3" (76 mm) pressure-treated
compatible screws (not provided).
2. Install two 2" x 8" (51 mm x 203 mm) boards as
blocking under post location. Securely attach
blocking using a total of 24 3" (76 mm) pressure-
treated compatible screws (not provided).
NOTE: TO ENSURE THE BLOCKING IS FULLY SECURE,
USE THE AMOUNT OF SCREWS indicated ABOVE.
TIP: Use two additional screws to "sandwich" blocking
boards together for easier attachment to framing.
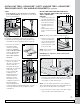
Line Post Installation
3. Install two 2" x 8" (51 mm x 203 mm) cross bracing
frames in between joists at 7-1/4" (184 mm). Attach
a total of twelve 3" (76 mm) pressure-treated
compatible screws (not provided).
4. Install two 2" x 8" (51 mm x 203 mm) boards as
blocking under post location. Securely attach
blocking using a total of twenty-four 3" (76 mm)
pressure- treated compatible screws
(not provided).
7-1/4"
(18.4 cm)
7-1/4"
(18.4 cm)
2" x 8" Pressure-treated
Cross bracing frame
1
2
Blocking
boards
7-1/4"
(18.4 cm)
7-1/4"
(18.4 cm)
3
Cross bracing
frame
Cross bracing
frame
4
Blocking
boards
7-1/4"
(18.4 cm)
7-1/4"
(18.4 cm)
2" x 8" Pressure-treated
Cross bracing frame
1
2
Blocking
boards
7-1/4"
(18.4 cm)
7-1/4"
(18.4 cm)
3
Cross bracing
frame
Cross bracing
frame
4
Blocking
boards
2.5" (64 mm)
2.5" (64 mm)
2.5 x 2.5 (64 mm x 64 mm) Post (IRC)
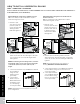
INSTALLING TREX
®
SIGNATURE™ POSTS AND/OR TREX
®
SIGNATURE™
CROSSOVER POSTS ON WOOD OR CONCRETE