
Installation & Assembly

IMPORTANT:
• ALLINSTALLATIONWORKSHOULDBEDONEBYACCREDITEDPROFESSIONAL.
• SHUTOFFPOWERSUPPLYATFUSEORCIRCUITBREAKER!
• USEONLYTHESPECIFIEDBULBS.DONOTEXCEEDTHEMAXIMUMWATTAGE!
PREPARING FOR INSTALLATION
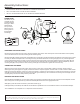
Removeallofthecontentsfromthecarton.Seetheimportantnotesabove.Shutoffthepoweratthecircuitbreakerandcompletely
removetheoldxturefromthewall,includingtheoldmountingstrap.
Mountingstrap(B)containsseveralpairsofthreadedholes.Findthepairofholesthatmatchesthespacingoftheholesonthejunction
boxandyourxture’sbackplate.Twoofmountingscrews(A)shouldbeattachedtomountingstrap(B).Youmayneedtotightenthe
nuts(c)thatholdthesescrewsinplace.Pullthehousewiresthroughthecenterofmountingstrap(B).Placemountingstrap(B)over
thejunctionboxsothatmountingscrews(A)arehorizontal,andinalignmentwiththeholelocationsonxturebackplate(F).Secure
mountingstrap(B)tothejunctionboxwithmountingscrews(D)andascrewdriver.Tightenthescrewssecurely.
CONNECTING THE WIRES
Attachthexture’swirestothepowersupplywiresfromthejunctionbox.Connectblacktoblack(orsmooth);whitetowhite(or
ribbed);groundtoground(greenorcopper).Twisttheendsofthewirepairstogether,andthentwistonawireconnector.Makesureall
twistsareinthesamedirection.Ifthereisnogroundwire(greenorcopper)fromthejunctionbox,locategroundscrew(E)onmounting
strap(B)andwrapthexture’sgroundwirearoundthegreengroundscrew(E).Useascrewdrivertosecuregroundscrew(E)ontothe
mountingstrap.Tuckallwiresneatlyintothejunctionbox.
FINISHING THE INSTALLATION
Placethexture’sbackplate(F)overmountingscrews(A)sothattheyprotrudethroughtheholesinthefrontofthebackplate.Thread
deconuts(G)ontomountingscrews(A).Twistuntilthebackplateofthextureissnugagainstthewall.
Slideglass(I)overthesocketandsecureinplacewithsocketring(J).
Installlightbulb(notincluded)inaccordancewiththexture’sspecications.Donotexceedthemaximumrecommendedwattage.
Yourinstallationisnowcomplete.Turnonthepowerandtestthexture.
BLACK
(Hot)
WHITE
(Neutral)
GREEN
(Ground)
HOUSE WIRES
SMOOTH
(Or Black)
FIXTURE WIRES
RIBBED
(Or White)
BARE COPPER
(Or Green)
AssemblyInstructions:
CLEANING TIPS
Treat the xture gently! Regular cleaning will reduce the need for deep cleaning. For regular cleaning, turn off the light and wipe down the
xture with a clean lint-free cotton or microber cloth. Never spray cleaner directly onto the xture.
PLEASE NOTE:
Thisxturemaybe
mountedwiththe
socketsandglass
facingupordown.
Pleasedecide
howyouwould
likethextureto
behungandturn
thebackplate
accordingly
H
I
J
E
F
B
A
G
D
C
BOTTOM VIEW