TEW-430APB Wireless G LAN Access Point Quick Installation Guide Guide d'installation rapide du Point d'accès sans fil 54Mbps 802.11g Anleitung zur Schnellinstallation des Drahtloser 54Mbit/s 802.11g Access Point Guía de Instalación Rápida Punto de Acceso Inalámbrico 802.11g a 54Mbps Version 09.27.04 TRENDnet TRENDware, USA What's Next in Networking Copyright ©2004. All Rights Reserved. TRENDware International, Inc.
Table of Contents English ...................................................................................................... 1. Prepare for Installation ...................................................................... 2. Install Hardware ................................................................................ 3. Configure TCP/IP Settings ................................................................ 4. Configure the Access Point ...........................................................
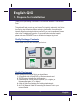
English QIG 1. Prepare for Installation Thank you for purchasing TRENDnet's TEW-430APB Wireless G LAN Access Point. This guide will help you set-up your Access Point quickly and easily. Just follow the step-by-step instructions below, and enjoy the benefits of accessing the Internet without ever being tied down to wires! If you run into problems, please refer to the Troubleshooting section. If you need further technical support, please visit www.TRENDNET.com or call technical support by phone.
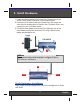
2. Install Hardware 1. Locate an optimum location for the Access Point. The best place for the Access Point is usually at the center of your wireless network. 2. Connect the RJ-45 network cable to the Access Point, then connect the other end of the network cable to a Switch or Hub. The Access Point is now connected to your 10/100mbps network. 3. Connect the power adapter to the Access Point.
3. Configure TCP/IP Settings Before the Access Point can be accessed and configured, the computer's TCP/IP settings need to be changed. (That includes your wireless card's IP address, too.) Windows 95/98/98SE/ME 1. Find the Start button located on the Desktop. 2. Click Start, click Settings, and then click on Control Panel. 3. Double-Click the Network Icon, and the Network Properties box will appear. 4. Under the Configuration tab, locate and select TCP/IP with the corresponding network card.
5. Under the IP Address tab, click on Specify an IP address and enter 192.168.1.50 for IP address and 255.255.255.0 for Subnet Mask and click OK. 6. Click OK.
. At this point, the installation may require files from your Windows CD-ROM. If you are prompted for the location of these files, insert your Windows 98 CD-ROM into your CD-ROM drive and select CD-ROM drive. 8. After the files load, the System Settings Change message appears. Click Yes to reboot your system. NOTE: If the message does not appear, manually restart your computer. 9. Your computer is now ready to access and configure the Access Point. Windows 2000/XP 1.
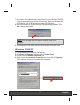
5. Under the General tab, locate and select Internet Protocol TCP/IP and then click Properties. The Internet Protocol (TCP/IP) Properties box will appear. 6. Click on Use the following IP address. Enter 192.168.1.50 for IP address and 255.255.255.0 for Subnet, then click OK. 7. Click OK. 8. Your computer is now ready to access and configure the Access Point.
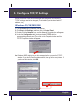
4. Configure the Access Point From a Wired Computer 1. Open a web browser (Internet Explorer or Netscape) and enter http://192.168.1.100 in the address bar, then press the Enter key. The TEW-430APB's configuration page will appear. 2. To configure the Wireless Settings, click on the Wireless option on the left panel, and select Basic Settings. The setting's window will appear.
3. Enter any AP Name for your Access Point. Create a SSID that your wireless network will be using, and select a channel. (For example: Wireless AP, Home AP, or Office AP). 4.
5. Select the country you live in and Click OK. Warning: Please note that selecting the incorrect country may result in a violation of applicable law in your country. It is users responsibility to ensure that the wireless channel configuration is compliant with the regulartory standards. For detailed information about the TEW-430APB's configuration and advanced settings, please refer to the Troubleshooting section, User's Guide CD-ROM. or TRENDnet's website www.trendnet.com.
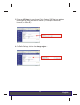
From a Wireless Computer (Using TRENDnet's TEW-226PC as an example in this section) The default settings of the Access Point are: SSID – default Channel - 6 1. On your wireless computer, open up your Wireless Utility Program. 2. Go to the Configuration section and select Infrastructure for Network Mode. Enter AP for the SSID and select Channel 6 if applicable, then click Apply.
3. Go to the Status section of your Wireless Utility Program. It should show Your wireless PC's connection information to the Access Point. 4. Now, open up your browser (Internet Explorer or Netscape) and enter http://192.168.1.100 at the address bar, and then press the Enter key. The TEW-430APB's configuration page will appear.
5. To configure the Wireless Settings, click on the Wireless option on the left panel, and select Basic Settings. The settings window will appear. 6. Enter any AP Name for your Access Point. Create a SSID that your wireless network will be using, and select a channel. (For example: Wireless AP, Home AP, or Office AP). 7.
8. Select the country you live in and Click OK. Warning: Please note that selecting the incorrect country may result in a violation of applicable law in your country. It is users responsibility to ensure that the wireless channel configuration is compliant with the regulartory standards. For detailed information about the TEW-430APB's configuration and advanced settings, please refer to the Troubleshooting section, User's Guide CD-ROM. or TRENDnet's website www.trendnet.com. 9.
Troubleshooting Q1: I specified the IP address http://192.168.1.100 in my internet browser's address bar, but error message says "The page cannot be displayed". How can I get into the TEW-430APB's web configuration page? A1: Please check your hardware and TCP/IP settings again by following the instructions sections 1~3, make sure the Power, WAN, WLAN on the Access Point's front panel are on and the TCP/IP configurations are correct. then try accessing http://192.168.1.100 again.
TRENDnet TRENDware, USA What's Next in Networking @ Product Warranty Registration Please take a moment to register your product online. Go to TRENDware’s website at http://www.TRENDNET.com TRENDware International, Inc. 3135 Kashiwa Street Torrance, CA 90505 http://www.TRENDNET.com Copyright ©2004. All Rights Reserved. TRENDware International, Inc.